
Related Manuals for uPunch HN2000


Summary of Contents for uPunch HN2000
- Page 1 HN2000/HN4000 Product Manual Watch and Learn Visit upunch.com/resources to view our helpful videos. Or scan this QR Code to get our step-by-step videos right on your phone.
- Page 2 CONTENTS INTRODUCTION YOUR uPUNCH ACCOUNT WALL MOUNT ADD DEPARTMENTS SETTING UP THE CLOCK ADD USERS USING THE CLOCK LIMITED WARRANTY REPLACING PRINT RIBBON SAFETY INFORMATION...
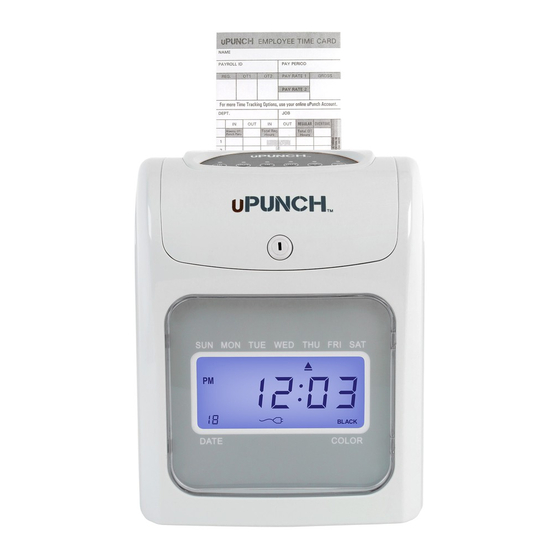
- Page 3 Thank you for purchasing the HN Series Auto-Align Mounting the time clock to the wall is optional and will require two dowels and Calculating time clock, part of the uPunch system two screws, which are not included. by Workwell Technologies.
- Page 4 To change the settings RESET Restart the time clock on your time clock, remove the cover with the included key to expose the setup labels that correspond with the IN and OUT buttons. QUESTIONS? Watch our helpful videos at upunch.com/resources...
- Page 5 To scroll through codes without changing settings, press the Enter button. The Back button allows you to reset an option that was confirmed incorrectly. NOTE: It is important that you match your uPunch account settings with your uPunch time clock settings.
- Page 6 10:00pm 22:00h and – buttons to make your selection, then press Enter to 11:00pm 23:00h confirm the setting. This may need to be set each year, 12:00am 24:00h depending on your time zone. QUESTIONS? Watch our helpful videos at upunch.com/resources...
- Page 7 Enter 00 for Sunday, 01 for Monday, 02 for Tuesday, 03 for Wednesday, 04 for 2019 November 3 Thursday, 05 for Friday, or 06 for Saturday. 2020 November 1 2021 November 7 2022 November 6 QUESTIONS? Watch our helpful videos at upunch.com/resources...
- Page 8 8:04, the punch will be rounded down to 8:00, but if they punch in at 8:05, the punch will When the code “03” appears, set the configuration of punch rounding you would like. QUESTIONS? Watch our helpful videos at upunch.com/resources...
- Page 9 Use the + and – buttons to make your selection, then When the code “05” appears, set the amount of time to deduct from a time card’s daily press Enter to confirm the setting. QUESTIONS? Watch our helpful videos at upunch.com/resources...
- Page 10 Setting the Ringing Time from Group 01 to Group 12 (codes 01–12) External bell and internal alarm Set up to 12 different times, or groups, for the alarm/bell to ring during the work week. QUESTIONS? Watch our helpful videos at upunch.com/resources...
- Page 11 5:00pm. With these settings in place, an employee 4. Press Enter to confirm these settings. can simply enter the time card and the clock will punch the card in the proper column. QUESTIONS? Watch our helpful videos at upunch.com/resources...
- Page 12 24 times during the week when the print color will change between red and black on or off. (codes 01–24). For example, your office employees work Monday–Friday from 8:00am–5:00pm and they all take a lunch break from 12:00pm–1:00pm. You allow a grace period of 15 minutes for QUESTIONS? Watch our helpful videos at upunch.com/resources...
- Page 13 If you use bi-weekly pay periods, you may use the reverse side for the following pay period; row 16 will reflect the first day of the next pay period. QUESTIONS? Watch our helpful videos at upunch.com/resources...
- Page 14 The punch will print in the first column. For more time tracking options, go to TrackMyPunch.com/SignUp. It's free! START REGULAR OVERTIME BREAK BREAK Weekly OT/ Total Regular Total Overtime Punch Pairs Hours Hours QUESTIONS? Watch our helpful videos at upunch.com/resources END OF WEEKLY PAY PERIOD...
- Page 15 ER 03—Repeat punch in same column. ER 91— Print Head Motor Issue: wrong position, left and right ER 92— Card Feed Motor Issue: wrong position, up and down QUESTIONS? Watch our helpful videos at upunch.com/resources END OF WEEKLY PAY PERIOD...
- Page 16 The number appears in the lower-right corner of B 00 the time card. Example 1: 8:02 12:04 12:34 17:04 Example 2: 8:02 12:04 12:34 17:04 END OF WEEKLY PAY PERIOD QUESTIONS? Watch our helpful videos at upunch.com/resources...
- Page 17 Push the cartridge head until it clicks into place. Turn the knob clockwise to fasten the ribbon. NOTE: We strongly recommend that you use genuine manufacturer time recorder ribbons. Using non-genuine or non-compatible ribbons will void your warranty and may damage your printer. QUESTIONS? Watch our helpful videos at upunch.com/resources END OF WEEKLY PAY PERIOD...
- Page 18 When you’re ready to export your data to your payroll provider, you’re done in seconds. Best of all, the upgrade is FREE. Try it today! To take advantage of the uPunch software without the uAttend upgrade, simply follow these steps to set up your departments and employees.
- Page 19 LIFETIME WARRANTY. ACCOUNT FEATURES Your FREE uPunch account includes 50 Employees, 20 Departments, Holiday Settings, Exports to Payroll Systems, Punch Rounding, Weekend Overtime, and More! QUESTIONS? Watch our helpful videos at upunch.com/resources...
- Page 20 ADDING DEPARTMENTS 5. Select... a. “Save & Add New” to add Departments are used to group users together within the uPunch system. a new department. You will need to set up at least one department before you add employees b. “Save & Continue” to add to your account.
- Page 21 WARRANTY AND TERMS OF SERVICE The uPunch time clock calculates hours worked per day and pay period for up to 50 employees. Complete the following steps to add employees to your account: This Warranty covers the HN Series time clock, and any subsequent uPunch Device models.
- Page 22 3. Pack the items being returned in the original packing carton or equivalent. Damage circumstances: in transit is end user’s responsibility and may be cause to void the warranty claim. 1. Modification or repair by the end user or any non-authorized WWTech service provider; or QUESTIONS? Watch our helpful videos at upunch.com/resources...
- Page 23 1. Read all instructions before operating. 2. This time clock must be properly installed and located in accordance with these instructions before used. 3. Do not use outdoors. QUESTIONS? Watch our helpful videos at upunch.com/resources...
- Page 24 RISK OF FIRE OR ELECTRIC SHOCK – DO NOT OPEN WARNING: TO REDUCE THE RISK OF FIRE OR ELECTRIC SHOCK, DO NOT OPEN THE TIME CLOCK. NO USER SERVICEABLE PARTS ARE INSIDE. REPAIRS SHOULD BE COMPLETED BY AUTHORIZED SERVICE PERSONNEL ONLY. QUESTIONS? Watch our helpful videos at upunch.com/resources...
- Page 25 Contact us seven days a week. Monday-Friday 5am–6pm Pacific | Saturday-Sunday 7am–3:30pm Pacific Call Text Email Visit 800-518-8925 760-701-5102 support@trackmypunch.com support.trackmypunch.com Designed, Developed, and Supported by Workwell Technologies, Inc. © Workwell Technologies, Inc. All rights reserved. 2777 Loker Avenue Suite A Carlsbad CA 92010 workwelltech.com Rev: 07/2018...
Need help?
Do you have a question about the HN2000 and is the answer not in the manual?
Questions and answers