Advertisement
Quick Links
Retro Bluetooth DAB+/FM Stereo Radio
with CD Player & USB TX-102
The manufacturer Technaxx Deutschland GmbH & Co.KG hereby declares that this
device, to which this user manual belongs, complies with the essential requirements
of the standards referred to the Directive RED 2014/53/EU. The Declaration of
Conformity you find here: www.technaxx.de/ (in bar at the bottom
"Konformitätserklärung"). Before using the device the first time, read the user
Service phone No. for technical support: 01805 012643 (14 cent/minute from
German fixed-line and 42 cent/minute from mobile networks).
Keep this user manual for future reference or product sharing carefully. Do the same
with the original accessories for this product. In case of warranty, please contact the
dealer or the store where you bought this product. Warranty 2 years
Before usage
Choose the installation location of your unit carefully. Avoid placing it in
direct sunlight or close to a source of heat. Also avoid locations subject to
vibrations and excessive dust,heat, cold or moisture.
in a inclined position, It is designed to be operated in a horizontal position only.
If the unit is brought directly from a cold to a warm location, moisture may
condense inside the player, and cause damage it. When you first install the
unit, or when you move it from a cold to a warm location, wait for 30 minutes
before operating the unit.
beside the amplifier/receiver. Do not place a CD player or other equipment on
top of the device.
circuitry or electrical shock.
time, be sure do disconnect the player from the AC power source. When
removing the power plug, never yank the cord.
hazard, disconnect your unit from the AC power source when cleaning. Use
caution when cleaning and wiping the plastic parts. Do not attempt to clean the
unit with the chemical solvents as this might damage the finish.
®
Technaxx
manual carefully.
Free Email: support@technaxx.de
Make sure there is enough space above and
Do not open the cabinet. This might cause a damage to
If you are not going to use the player for long
* User Manual
1
Do not install the unit
To prevent fire or shock
Advertisement

Related Manuals for Technaxx TX-102


Summary of Contents for Technaxx TX-102
- Page 1 Retro Bluetooth DAB+/FM Stereo Radio with CD Player & USB TX-102 The manufacturer Technaxx Deutschland GmbH & Co.KG hereby declares that this device, to which this user manual belongs, complies with the essential requirements of the standards referred to the Directive RED 2014/53/EU. The Declaration of Conformity you find here: www.technaxx.de/ (in bar at the bottom...
- Page 2 Cleaning: Protect the device from contamination and pollution (use a clean drapery). Avoid using rough, coarse-grained materials solvents/aggressive cleaner. Wipe cleaned device accurately. Distributor: Technaxx Deutschland GmbH & Co.KG, Kruppstr. 105, 60388 Frankfurt a.M., Germany...
-
Page 3: Technical Specifications
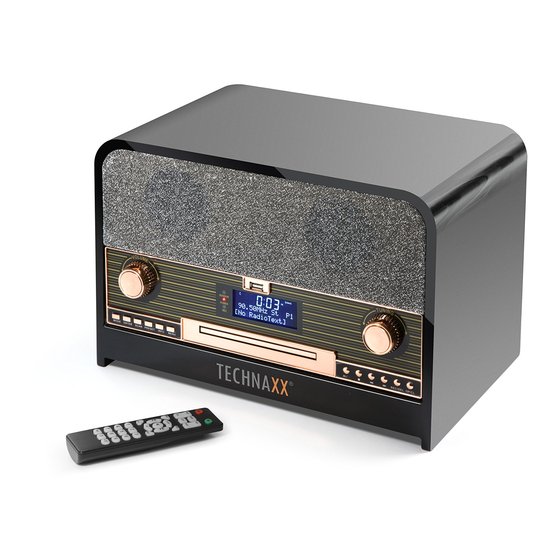
(L) ~1.5m Material MDF + PVC + Plastic Weight / Dimensions 5.13kg / (L) 37.0 x (W) 25.7 x (H) 21.3cm Package Contents Retro Bluetooth DAB+/FM stereo radio with CD player & USB TX-102, Remote control, DAB/FM antenna, User Manual... - Page 4 Produkt View Front View Volume knob (VOL) LCD display USB port CD tray Dial scale Tuning knob Mode Enter Scan 10 Preset 11 Info 12 Menu 13 Play/Pause 14 Stop 15 Skip – (Backward) 16 Skip + (Forward) 17 Record (REC) 18 CD tray open/close button...
- Page 5 Rear View 19 DAB/FM antenna 20 On/OFF switch 21 AC power cord (~1.5m) 22 3,5mm headphone jack 23 AUX Press MODE button (5) on the remote control (see next page) repeatedly to select DAB / FM / BT / CD / USB / AUX.
- Page 6 Remote Control ON / OFF switch CD tray open/close button Record (REC) button Delete button Mode button Stop button Repeat button Program button Play / Pause button 10 SCAN button 11 EQ button 12 Skip– / Rewind button 13 Skip+ / Fast forward button 14 Numeric keyboard 15 + 10 16 Enter...
- Page 7 First start Carefully read the manual. Insert the plug of the device into a socket with AC 220–240V/50Hz. Ensure that the voltage is as indicated on the rating plate on the rear of the unit. Switch ON/OFF SWITCH (20) to ON position to turn the unit ON. Switch ON/OFF SWITCH (20) to OFF position to switch the unit OFF.
- Page 8 5. The month digits will flash on the display. Press SKIP+/– repeatedly to set the correct month. Press STOP again to confirm. 6. The day digits will flash on the display. Press SKIP+/– repeatedly to set the correct day. Press STOP again to confirm. Setting the alarm (in STANDBY mode) 1.
- Page 9 DAB/FM MODE Navigate the menu In FM/DAB mode there is an option menu. 1. Press MENU (12) [17 remote control] to access to the options. 2. Press SKIP+/– (15/16) [12/13 remote control] to search the options. 3. Press ENTER (8) [16 remote control] to select the options. 4.
- Page 10 Full Scan Select this option to perform a full scan of the available DAB programs. You can press SCAN (9) to perform the same action. Manual Tune Select this option to select manually the DAB frequency. select this option to choose between DRC low, DRC high and DRC off.
- Page 11 FM Mode Press MODE (7) [5 remote control] repeatedly to select FM mode. Turn the TUNING KNOB (6) to manually select the frequency. FM Menu Press MENU (12) [17 remote control] to access to the options. Scan Setting to choose between scanning all stations or only the strong stations.
- Page 12 CD MODE playing Compact Disc 1. Press MODE (7) [5 remote control] repeatedly to select CD mode. 2. Press CD TRAY OPEN/CLOSE BUTTON (18) [2 remote control] to open the CD door. Place a CD with the printed side facing up inside the tray, then close the CD tray.
- Page 13 1. Press the button (7) [5 remote control] to select the BLUETOOTH function. “BT Mode” will be shown on the display and starts blinking. 2. Select from your portable device (Smartphone, Tablet...) the Bluetooth tag “Technaxx TX-102” then confirm connection.
-
Page 14: Usb Mode
3. When the pairing is successful the “BT Mode” on the display of the device will stop blinking. 4. Now you can transfer the music to the “Technaxx TX-102” and all operations can only be operated from your mobile device. - Page 15 Recording function 1. While listening to BLUETOOTH/AUX–IN/DAB, press REC. “REC” will be shown on the display. The REC indicator will light up. Recording will start. Note that the recording speed is 1:1. 2. Press STOP to stop recording. 3. The device will create a folder on the USB flash drive that contains all recorded tracks.
- Page 16 Nothing will play via the USB flash drive Make sure the memory device is properly inserted in the USB port and the correct function is selected. NOTE: If normal operation cannot be obtained, unplug the power cord from the power outlet and plug it in again. Important Safeguards Do not use this unit for anything other than its intended to use.
Need help?
Do you have a question about the TX-102 and is the answer not in the manual?
Questions and answers