Table of Contents
Advertisement
Quick Links
Advertisement
Table of Contents

Related Manuals for Goji GBTDABN14


Summary of Contents for Goji GBTDABN14
- Page 1 Portable Wireless DAB radio Instruction Manual GBTDABN14 / GBTDABR14...
-
Page 2: Table Of Contents
Contents Safety Warnings ....................4 Unpacking ......................9 Product Overview ..................10 Front View ....................10 Left Side View ....................11 Top View ......................12 Back View ....................14 Connecting to the Mains Supply ............15 Charging from the USB OUTPUT Charging Port ......16 Using Earphones ..................17 Basic Operation .....................18 Powering ON/OFF ..................18 Adjusting the Volume................18... - Page 3 NFC (Near Field Communication) ............28 AUX IN Mode ....................29 System Settings.....................30 Setting Sleep .....................30 Setting Equaliser ..................30 Setting Contrast ..................31 Maintenance ....................32 Cleaning the Unit ..................32 Hints and Tips ....................33 Specifications ....................34...
-
Page 4: Safety Warnings
Safety Warnings • Read all the instructions carefully before using the unit and keep them for future reference. • Retain the manual. If you pass the unit onto a third party make sure to include this manual. • Check that the voltage marked on the rating label matches your mains voltage. - Page 5 Naked Flames • Never place any type of candle or naked flame on the top of or near the unit. Moisture • To reduce the risk of fire, electric shock or product damage, do not expose this unit to rain, moisture, dripping or splashing.
- Page 6 • In the interests of safety and to avoid unnecessary energy consumption, never leave the unit switched on while unattended for long periods of time, e.g. overnight, while on holiday or while out of the house. Switch it off and disconnect the mains plug from the mains socket.
- Page 7 Earphones • Listening to loud sounds for prolonged periods of time may permanently damage your hearing. • Before putting on earphones, turn the volume down then put the earphones on and slowly increase the volume until you reach a comfortable listening level.
- Page 8 Service • To reduce the risk of electric shock, do not remove screws. The unit does not contain any user- serviceable parts. Please leave all maintenance work to qualified personnel. • Do not open any fixed covers as this may expose dangerous voltages.
-
Page 9: Unpacking
Thank you for purchasing your new Goji Portable Wireless DAB radio. We recommend that you spend some time reading this instruction manual in order that you fully understand all the operational features it offered. You will also find some hints and tips to help you resolve any issues. -
Page 10: Product Overview
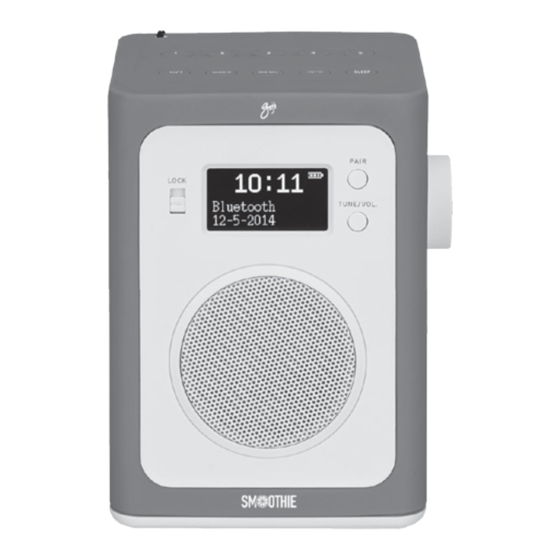
Product Overview Front View PAIR LOCK TUNE/VOL. 1. LOCK Button • Slide up to lock the function of all buttons. • Slide down to unlock the function of all buttons. 2. Display 3. PAIR Button • Press to show paired Bluetooth devices. • Press and hold to disconnect Bluetooth connection. -
Page 11: Left Side View
Left Side View 1. NFC (Near Field Communication) Sensor... -
Page 12: Top View
Top View MENU INFO SLEEP MODE 1. DAB/FM Aerial 2. Preset Buttons 1, 2, 3, 4 and 5 In FM or DAB mode, • Press and hold to store preset station 1, 2, 3, 4 or 5. • Press to recall preset station 1, 2, 3, 4 or 5. Button • While the unit is using mains power, press to switch on or standby. - Page 13 MENU INFO SLEEP MODE Press to display menu screen. 6. SCROLL/SELECT Dial • Turn to browse options. • Press to confirm selection. • Turn the SCROLL/SELECT dial clockwise/ anticlockwise to increase/decrease the volume. 7. SLEEP Button Press to set a sleep time. 8.
-
Page 14: Back View
Back View 1. DC IN 12V Socket 2. AUX IN Socket Headphones Socket 4. USB OUTPUT 5V 1A Charging Port For charge your mobile device. -
Page 15: Connecting To The Mains Supply
Connecting to the Mains Supply • This unit is designed to operate with an AC power supply or with the built-in battery. • Unwind the mains adapter cable to its full length. Connect the end of the cable to the DC IN 12V Socket at the rear of the unit and then connect the mains adapter to the mains socket. -
Page 16: Charging From The Usb Output Charging Port
Charging from the USB OUTPUT Charging Port The USB OUTPUT 5V 1A Charging Port is designed only for charging mobile devices (e.g. MP3 player, mobile phone, etc). It supplies 5V DC at a charging current of up to 1000mA (1A). Use a USB cable (not included) to connect mobile device to the USB OUTPUT 5V 1A Charging Port of... -
Page 17: Using Earphones
Using Earphones Turn down the volume before connecting the earphones. Slowly raise the volume with the earphones on until you reach your desired volume. When earphones are connected, the speakers automatically mute. Long-term exposure to loud music may cause hearing damage. It is best to avoid extreme volume when using earphones, especially for extended periods of time. -
Page 18: Basic Operation
Basic Operation Powering ON/OFF While using battery power: • Press to switch the unit on. • Press again to switch the unit off. While using mains power: • Press to switch the unit on. again to switch the unit in Standby mode. •... -
Page 19: Factory Reset
Factory Reset 1. Press MENU button and then turn the SCROLL/ SELECT dial to select <Factory Reset>. Press SCROLL/SELECT dial to confirm. 2. Turn SCROLL/SELECT dial to select <YES>. Press SCROLL/SELECT dial to confirm. After the factory reset, all the tuned stations, DAB/FM preset stations will be erased. -
Page 20: Dab Operation
DAB Operation When you turn on the radio it will automatically search and store all the available stations. You may conduct an additional Full Scan to ensure all stations are picked up and stored. It is also recommended every few months to run a new scan to pick up any new DAB/DAB+ that may have begun broadcasting after your radio scanned last time. -
Page 21: Full Scan
Full Scan This feature enables your radio to scan for all available stations in DAB mode. Press MENU and then turn the SCROLL/SELECT dial to <Full scan>, press SCROLL/SELECT dial to confirm. Station List This feature enables you to select a station from available station list. -
Page 22: Showing Signal Strength
Showing Signal Strength While you selected Signal strength, a signal bar with the strength of the current station will show on the display. The indicator on the signal bar shows the minimum acceptable signal level. BBC 2 Strength of signal Minimum signal level Stations with signal strength below the minimum signal level may not provide a steady stream of... -
Page 23: Storing Preset Stations
Storing Preset Stations This is the same for DAB/DAB+ and FM stations. Your radio can store up to 5 of your favourite DAB/DAB+ stations as preset stations. This will enable you to access your favourite stations quickly and easily. While a station is playing, you can: Press and hold one of preset buttons 1, 2, 3, 4 or 5 •... -
Page 24: Fm Operation
FM Operation Selecting FM Mode 1. Press MODE button repeatedly to select FM mode. 2. For initial use, it will start at the beginning of the FM frequency range (87.50MHz). Or it will play the last FM station you were listening to. 3. -
Page 25: Audio Setting
Audio Setting By default, all stereo stations are reproduced in stereo. For weak stations, this may result in a poor signal-to- noise ratio (hiss). 1. To play weak stations in mono, press MENU button, and then turn SCROLL/SELECT dial to select <Audio setting>, press SCROLL/SELECT dial to confirm. -
Page 26: Preseting Stations
Preseting Stations This is the same for DAB/DAB+ and FM stations. Your radio can store up to 5 of your favourite FM stations. This will enable you to access your favourite stations quickly and easily. While a station is playing, you can: Press and hold one of preset buttons 1, 2, 3, 4 or 5 •... -
Page 27: Bluetooth Mode
Bluetooth Mode The unit has a Bluetooth function that can receive a signal within 10 metres. Pair the unit with a Bluetooth device to listen to music: 1. Press MODE button repeatedly to select Bluetooth mode. 2. The display will show <Bluetooth discoverable...>. 3. -
Page 28: Nfc (Near Field Communication)
NFC (Near Field Communication) NFC enables you pair and connect with Bluetooth devices in a easy way. 1. Press MODE button repeatedly to select Bluetooth mode. 2. Make sure that your NFC is turned “On” on your mobile device. 3. Hold your mobile device about 2cm close to NFC logo on the left side of unit for receiving an auto- connection between your mobile device and radio. -
Page 29: Aux In Mode
AUX IN Mode The AUX IN mode allows for quick and easy connection to an MP3 player or other external audio sources. 1. Before connecting to the mains socket, use a 3.5 mm audio cable (not included) to connect to your external audio device through the AUX IN Socket on the rear side of the unit. -
Page 30: System Settings
System Settings Setting Sleep This function enables your unit to switch to standby mode by itself after a set sleep time when unit runs by mains power. 1. Press SLEEP button repeatedly to view options: Sleep off, 15, 30, 45, 60 or 90 minutes. Select Sleep off and then press the SCROLL/SELECT dial to confirm. -
Page 31: Setting Contrast
Setting Contrast This features enables you to change the contrast of power on mode. 1. Press MENU button, turn SCROLL/SELECT dial to select <Contrast>, and then press SCROLL/SELECT dial to confirm. 2. Turn SCROLL/SELECT dial to select through contrast level: High, Medium or Low, and then press SCROLL/SELECT dial to confirm. -
Page 32: Maintenance
Maintenance Cleaning the Unit Ensure the unit is fully unplugged from the mains socket before cleaning. • To clean the unit, wipe the case with a slightly moist, lint-free cloth. • Do not use any cleaning fluids containing alcohol, ammonia or abrasives. •... -
Page 33: Hints And Tips
Hints and Tips If a problem does occur, it may often be due to something very minor. The following table contains various tips. Problem Solution No power • Ensure the mains adapter cable is connected securely. • Make sure that the unit is switched on. -
Page 34: Specifications
Specifications Model GBTDABN14 / GBTDABR14 Mains Adapter AC Input: 100-240 V, 50/60 Hz DC Output: DC 12V/1000 mA Power 12 W (max.) Consumption Output Power 3 W rms USB Output Radio FM 87.5 – 108 MHz Frequency DAB/DAB+ 174.928 - 239.200 MHz... - Page 35 For general information about this appliance and handy hints and tips, please visit www.knowhow.com/knowledgebank or call 0344 5611234. Visit Partmaster.co.uk today for the easiest way to buy electrical spares and accessories. With over 1 million spares and accessories available we can deliver direct to your door the very next day.
- Page 36 The symbol on the product or its packaging indicates that this product must not be disposed of with your other household waste. Instead, it is your responsibility to dispose of your waste equipment by handing it over to a designated collection point for the recycling of waste electrical and electronic equipment.
Need help?
Do you have a question about the GBTDABN14 and is the answer not in the manual?
Questions and answers