Advertisement
Quick Links
STARLITE SWING
USER'S MANUAL
Jafim Imports CC T/A Anchor International
No. 12 Kimberlite Road, Theta Ext 5, Booysens Reserve,
Johannesburg 2091,South Africa
+2711 835 2520
www.chelino.co.za
Sky Dream Baby Ltd. Co.
No. 10 (Chelino Store), Bahar-e-jonoobi Street, Inqlab Street, Tehran, Iran
0098-21-8830-5695
www.chelino.ir
Advertisement

Subscribe to Our Youtube Channel
Related Manuals for Chelino STARLITE SWING

Summary of Contents for Chelino STARLITE SWING
- Page 1 USER’S MANUAL Jafim Imports CC T/A Anchor International No. 12 Kimberlite Road, Theta Ext 5, Booysens Reserve, Johannesburg 2091,South Africa +2711 835 2520 www.chelino.co.za Sky Dream Baby Ltd. Co. No. 10 (Chelino Store), Bahar-e-jonoobi Street, Inqlab Street, Tehran, Iran 0098-21-8830-5695 www.chelino.ir...
- Page 2 Due to variations on the styles and designs of our products, the photographs and illustration shown in this instruction manual and box are generic, Therefore product fabric, color and design may vary from images shown, Chelino reserves the right to alter product specifications. ◆:Contents I.
-
Page 3: Assembly Instruction
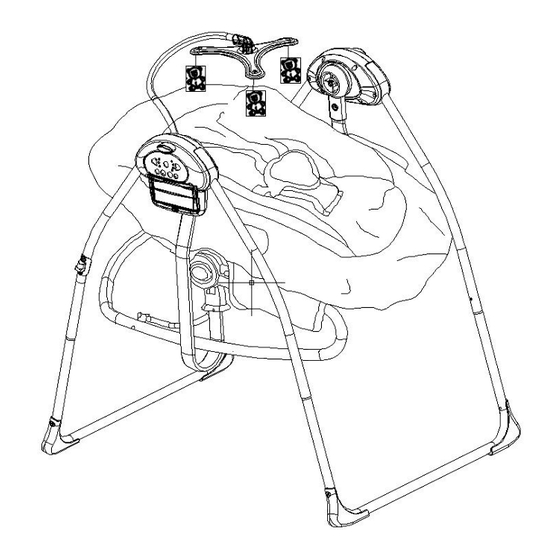
II:Assembly instruction 1) Open out the down tube on each swing mechanism. The down tubes are fully open once you hear a “click” 2)Take one set of feet (both sets are identical) and attached to the swing mechanism as shown, ensuring the letter “A” on the feet is on the same side as the letter “A”... - Page 4 4) Place the host swing arm unit on the control module and the support swing arm on the support and push each swing arm onto the metal axis. IMPORTANT! The left hand swing arm has a half-round hole. This must align with the matching half round axle on the left hand swing mechanism (with the music panel).
- Page 5 7) Attach the seat base frame to the corresponding slot at each side of the seat cover. Push the seat base frame into the lower end of the position adjustment component until the snap click and lock into place. 8) Join the completed seat into the U shape tube on the swing frame until the snap click and ensure it is securely in place. 9) Insert the toy arch in the swing arm plastic, the toy arch can be 180 degree rotation.
- Page 6 10) The swing arms can be locked to restrict the swinging motion. This is perhaps most useful whilst feeding your child. Push in locking pin to prevent the swing from swinging. 11) First fold the seat unit up as indicated, pulling the footrest up towards the headrest. Next, press and hold in the buttons on each swing mechanism and at the same time fold the legs inwards.
- Page 7 13)3 reclining positions by pressing the left and right button on the seat assembly for option. ( Fig.16) 14) Plug into the connector at the back of support frame to use adaptor (not supplied). 15) The product is a 2 in 1 design, the seat could be used as a Rocker when pull it up and out from the swing. Please don’t leave the baby onto the seat when taking out.
- Page 8 16)To use the seat as a Rocker in stationary mode, pull down the shift able tube at the rear of seat base frame III:Operating instructions 1) Place the infant in the seat as below shown. Insert the left and right sets of buckles into the restraint latch, Adjust the straps in the buckles as needed so that the restraint fits snugly, but not Too tightly...
- Page 9 2) Features: POWER The power button switches the swing on and off。 SPEED The speed button control the speed of swing, press the button quickly to change to next swing speed, 3 swing speed is available, a led indicator light tells you which speed is activated.1 is the slowest,3 is the fastest swing speed.
-
Page 10: Battery Safety
To insert /replace batteries: Do not use the reclined cradle if any components are broken or missing. This product requires 4*1.5V”C” batteries [not supplied] Undo the screw on the battery compartment cover and open the compartment Fit batteries into space provided ensuring they observe the correct polarity [as shown on product. Close the compartment replace the screw and tighten. - Page 11 Booysens Reserve, 2091, Johannesburg, Gauteng, RSA. Please note, that any repair which will needs to be made to this product must be done at the Chelino workshop which is situated at 12 Kimberlite Road, Theta Ext, Booysens Reserve, 2091, Johannesburg, Gauteng, RSA. Our offices hours are Monday to Thursday from 9:00 am to 13:00 pm and 14:00 pm to 16:30 pm and Fridays from 9:00 am to 12:00 pm and 14:00 pm to 16:30 pm.
- Page 12 17. This product is fit to carry a child weighing no more than 8kgs. 18. Chelino takes no responsibility and will not be held liable for any damage or injury caused by using this product or if this product is used for any other purposes other than its intended purpose.
Need help?
Do you have a question about the STARLITE SWING and is the answer not in the manual?
Questions and answers