Table of Contents
Advertisement
Quick Links
Advertisement
Table of Contents

Related Manuals for Hobie QUEST 13


Summary of Contents for Hobie QUEST 13
- Page 1 Hobie ® Quest Manual...
- Page 3 In 1950, Hobie’s dream was born in his parents’ garage when he decided to apply his love of woodworking to the sport of surfing. Dad backed out the Buick... Hobie carved out his very first surfboard... Hobie’s business of fun had begun.
-
Page 4: Table Of Contents
Vantage CT ................7 On the Water ................14 Lowrance Ready Option ............15 ® Storage and Transportation ..........17 Paddling ................20 Safety ...................21 Warranty ................23 Look for this icon. Online video is available at www.hobie.com/support/products Please read through the instruction manual before using this product... -
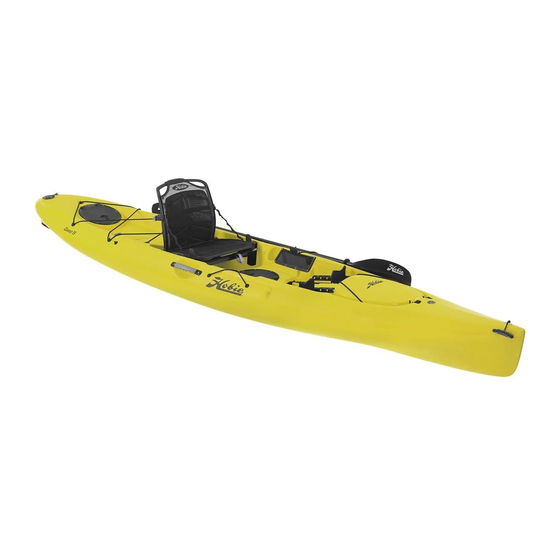
Page 5: Anatomy
Anatomy Hull Vantage CT Seat Paddle Gear Bucket hobie.com... -
Page 6: Assembly Required
Assembly Required Vantage CT Assembly Line up threaded inserts on seat back frame with holes molded in seat bottom frame. Once aligned, insert screws and tighten. -
Page 7: Vantage Ct
Kickstand Activate Handle Molded-in Kickstand Supports (Exclude Quest 11 Models) Front Up/Down Adjust Structural Inserts for Kickstand Supports (Insert Does Not Require Any Fasteners) Recline Adjust Front Up/Down “Key” ® Seat Bottom Frame “Shoe” ® BOA Lumbar Adjust Leash Kickstand hobie.com... - Page 8 Vantage CT Seat Installation Line up the front of the seat bottom frame over key and slide the back of the frame to the back wall in the cockpit. Put pressure on the front of the seat mesh & lift the back of the seat bottom frame to set the seat into the key.
- Page 9 When the two parts are clicked into place, the seat is secured to the kayak. Pinch to unlock. Warning: Failure to secure the seat with the leash buckle could result in loss of seat during a capsize event. hobie.com...
- Page 10 Vantage CT Front Up/Down Adjustment Pull lever out to activate front up/down adjustment. Lean back into seatback to raise the front up/down adjustment. Use body weight in seat bottom to drop into a lower positon. Release lever to lock the desired position of the front up/down adjustment.
- Page 11 Pull “T” handle to activate kickstand. Set kickstand on the boat hull for mid-level seating. HIGH Set kickstand on the shelf for high-level seating. (There is no shelf for the high seating position on Quest 11 models.) hobie.com...
- Page 12 Vantage CT Recline Adjustment Pull lever out to activate the seatback to recline. While holding the lever out, push back into the seat to recline. Release lever to lock seat into position.
- Page 13 Vantage CT Lumbar Adjustment Pull knob to release lumbar. Press knob to lock lumbar. Rotate knob to tension lumbar. hobie.com...
-
Page 14: On The Water
On The Water Seat Drainer Pull “T” Handle to open drain. Cleat to keep drain open. Note: Pedal at a brisk pace to evacuate water from seat well. Uncleat and release to close drain. -
Page 15: Lowrance Ready Option
Lowrance Ready Option Transducer Installation ONLY ON QUEST 13 MODELS. Metal clips 1/8” The transducer is an optional accessory and is not included with boat Wire Installation Run the cable into the plug just behind the transducer scupper. Lead the cable through... - Page 16 Lowrance Ready Option Thru-Hull Plugs, Single and 3-way Locate the thru-hull plug and unscrew the nut on the inside of the boat. Remove the solid rubber plug. Choose the correct plug for your wire size and insert the wire by opening the plug along the slit.
-
Page 17: Storage And Transportation
Hanging the boat by the scuppers can distort the scupper holes. Never hang the boat by handles or pad eyes. They are not designed to handle long– term load and will fail. hobie.com... - Page 18 Storage and Transportation Additional Storage Key Points • Always remove all water from boat • Don’t leave tie–down straps tight over a long period of time • Storing in non-recommended configurations can result in hull damage and can void your warranty Cart The cart should be used for transportation purposes only and not as a storage platform.
- Page 19 Many people like to use the scupper holes to tie the boat to the car. This helps prevent the boat from sliding back and forth or the tie-down rope from slipping off the boat. (This is an acceptable method for tying the boat down for transport.) hobie.com...
-
Page 20: Paddling
Paddling Paddling These guidelines will help you to get started. To start, sit in your kayak. Your backside should be all the way back in the seat and your knees comfortably bent. To find the proper footwell, straighten your legs all the way out and then bring them back one “well”. If your legs are too outstretched, you may experience strain on your lower back. -
Page 21: Safety
(lifejacket). • Never go in flood and/or • Dress appropriately for fast moving water weather conditions; cold conditions. Hobie kayaks water and/or weather can are not designed for fast result in hypothermia; apply moving water. sunscreen and other sun •... - Page 22 Helpful Paddling Tips Hobie kayaks are very easy to use and very forgiving. By beginning in calm water, you can quickly get the feel of the boat and paddle techniques.
-
Page 23: Warranty
If you have a problem or question with your Hobie product, please see your Authorized Hobie Kayak Dealer. They will be able to assess the problem, assist with a repair and file a warranty claim with Hobie Cat Company if needed. All warranty claims must go through your Authorized Hobie Kayak Dealer. - Page 24 Hobie Cat Company Holding Company Oceanside, California, USA 1-800-HOBIE-49 Hobie Cat Australasia Subsidiary Huskisson, New South Wales, Australia 1-800-4-HOBIE Hobie Cat Europe Subsidiary Toulon, France +33 (0) 494 08 78 78 Hobie Kayak Europe Independent Distributor Stellendam, The Netherlands +31 (0) 187 499 440...
Need help?
Do you have a question about the QUEST 13 and is the answer not in the manual?
Questions and answers