Table of Contents
Advertisement
Quick Links
See also:
User Manual
Advertisement
Table of Contents

Related Manuals for Amcrest WLD895


Summary of Contents for Amcrest WLD895
- Page 1 HD Digital Wireless Network Surveillance Monitor User's Manual Please read carefully before using this equipment.
-
Page 2: Package Contents
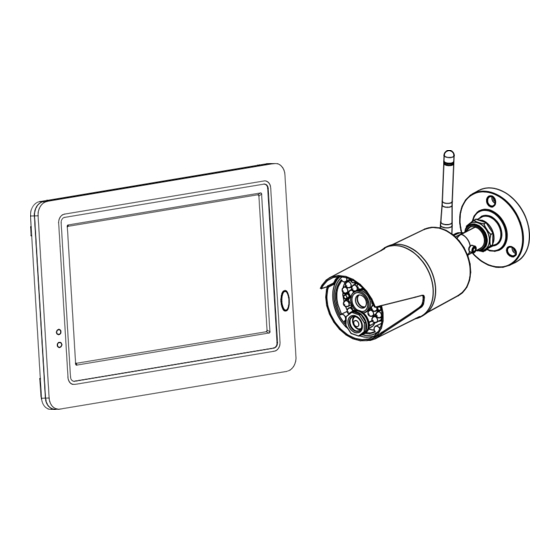
Package Contents One camera One monitor Two power adapters (9V/800mA for Camera, 5V/2A for Monitor) Three screws and three anchors One antenna One allen key User's manual Product Layout Camera Antenna Pairing button Allen screw Mounting bracket Screw for mounting Infrared LEDs (Twenty LEDs provide infrared for night vision) Power LED... -
Page 3: Setting Up The Camera
Setting up the Camera Twist the antenna clockwise onto the antenna port on the back of the camera. Use the included mounting screws to mount the camera to the mounting surface: Mark the positions of the screw holes on the mounting surface. Drill holes and insert the anchor (included) as needed. - Page 4 Adjust the angle of the cameras until the desired view is set. Tighten the allen screw, and the adjustment ring to secure each camera’s position. Connect the plug of the power adapter with the power in the socket of the cable from the camera. Make sure power plug is pushed all the way in.
- Page 5 Setting up the Monitor Peel off the plastic cover that is protecting the LCD display. The system is designed for MicroSD card recording. Please insert an MicroSD card into the Micro SD card slot in the monitor if you want to record video. The system supports MicroSD cards with a maximum capacity of 32GB.
- Page 6 LED indicator Status Glows blue when the camera has detected motion. Flashes blue if the system is unlinked. Alert Glows green when powered on. Glows orange when charging. Power Flashes red if the battery is running low. Note: When a certain alert event has been viewed on the device, then tap the screen or press the Menu button, the LED will turn off.
- Page 7 Recording modes: Displays the current event that has been scheduled to record. There are 3 modes for recording (Motion detection / Schedule / Manual). Motion recording Schedule recording Record Status: If the recording symbol is red, this indicates that the device is currently recording. You can also tap this icon to start recording manually.
-
Page 8: Menu Options
Menu Options Press the menu button on the monitor to display the main menu on the screen; Press again to return live view when it is in the menu. The main menu contains 6 sub-menus. Note : In menu, if you don't tap the screen or press the Menu button, after 1 minute, the screen will return to live view automatically. -
Page 9: Menu Layout
Menu Layout Main Menu Camera Setup Pairing (Camera 1 - 4) Camera ON/ OFF Selection (Camera 1 - 4) Resolution (VGA/ HD) Brightness (Lever 1 - 8) Anti-Flicker (50 Hz/ 60 Hz) Record Setup Motion Detection Sensitivity (High/ Medium/ Low) Recording Mode (Motion Recording/ Schedule Recording/ Manual Recording) Recording Time (5 min/ 10 min/ 15 min) Storage Management... - Page 10 Camera Setup The camera menu contains 5 sub-menus. Pairing: If you have purchased addition cameras, use the pairing function to add the cameras. You will also need to use the pairing button located at the back of the camera. Tap the camera number you want to pair at the screen you will see a small pairing animation underneath the camera selection.
- Page 11 Resolution: In this submenu you can setup each camera’s resolution individually. You have the option of viewing and recording your camera(s) in VGA resolution (640x480) or HD (720p). Camera Camera Resolution Brightness: In this submenu you can change the brightness for each camera that is configured.
- Page 12 Record Setup The record menu contains 4 sub-menus. Motion Detection Sensitivity: In this submenu you can repeatedly tap the camera to change the motion detection sensitivity for each camera. You have the choice of low, medium and high. Record Record Motion Detection Record Mode: Tap the screen to select the time sections and set up the recording type.
- Page 13 Recording Time: In this submenu you can select the recording time for each recording file. Record Record Recording Time Storage Management: This menu contains 2 sub-menus. Format SD Card: Tap Format icon to format the MicroSD Card. Formatting the card will remove all files that you have on there.
-
Page 14: System Setup
System Setup The system menu contains 6 sub-menus. Date and Time: This function allows you to configure the date and time. Tap the ”+” and “-” icons to adjust it. System System Date and Time Hour Minute Year Month Power Saving: To conserve battery power, the power saving feature will turn off the display after a set time of in-activity. - Page 15 Language: This function allows you to change to the language that you prefer. System System Language English Français Español Deutsch Italiano Upgrade FW: If the monitor has a connection to Internet, it will auto detect is there any new version firmware that can be updated. If there is a new version firmware, the icon will change to .Tap the...
-
Page 16: Network Settings
Network: This menu contains 2 sub-menus that allow you to configure your network settings. IP Setting: The default setting is DHCP and the IP number that has been provided to the monitor by your router. There is not much to do here unless you want to use a “Static IP”. - Page 17 Alert Setup The alert menu contains 5 sub-menus. Motion Alert: This selection allows you to choose the alert tones or disable the alerts for motion detection. Alert Alert Motion Alert Unlink Alert: This selection allows you to choose the alert tones or disable the alerts when the cameras disconnected.
-
Page 18: Alert Volume
Alert Volume: This function allows you to increase / decrease the volume or turn off the alert sound. Alert Alert Alert Volume Cycle: This function allows you to adjust the time duration between each alert. Note : When the alert tone has been heard, tap the screen or press the Menu button;... -
Page 19: Volume Level
Tap on the file to play the event. Playback Playback 0 8 2 9 4 6 S 2 2 0 1 4 / 0 4 / 2 1 0 8 : 1 0 : 1 8 1. File name 0 6 2 9 2 9 D 1 2 0 1 4 / 0 3 / 0 6 0 6 : 3 3 : 0 2 2. -
Page 20: Add Device
Remote Access Function From the system, you can monitor your home on your smartphone or table at any time, from anywhere in the world. Before Setting Up Make sure your home router is turned on and it can connect to Internet. - Page 21 Tap the “Add Device” icon then tap “QR Code” to scan the QR code located on the rear of the monitor. You can also tap “Add” to manually input the UID instead of scanning the QR code. The UID and QR code label is on the rear of the monitor.
- Page 22 Device List Screen Tap the “Device” icon and you will see the device list screen. Device photo: Tap the device photo to view a live video. Device name: When you launch the app, all the devices you have added will be shown on the screen. Device status: a.
- Page 23 Live Video Screen Tap the device photo on the “Device List” screen and you can see a live video from the camera. Camera 1 will be displayed by default. If you have multiple cameras configured, tap “Channel” and select the camera that you want to view.
- Page 24 Device Setting (Edit Device) Tap the icon beside the device name on the “Device List” screen to switch the screen to “Edit Device” . Back: Tap this to return to “Device List” screen. Name: Tap this if you want to change the device name.
- Page 25 .2.5 Advance Settings Within the settings screen you can change the default password, alter the video quality and increase or decrease the interval time for alerts. Modify Password: If you want to change the password, please tap this row to carry out the change.
- Page 26 .2.6 Searching Events Function Tap the “Event” icon then tap from the “Device List” screen. From the “Event List” screen, tap “Search” to select different search criteria. By taping “Custom” , you can specify a date and time period to search for events. A list of all video events matching your search criteria will be displayed.
- Page 27 Tap the “Camera” icon to enter “Add Device” screen. The UID and QR code are located at the rear of the monitor. You can manually input the UID or tap “Scan” to scan the QR code. Please hold your smartphone or tablet close to the QR code to scan.
- Page 28 Give the device a new name or leave it as displayed. Enter the default password “12345”, and then tap “OK” to finish the device setup. Device List Screen Device photo: Tap the device photo to view a live video. Device name: When you launch the app, all the devices you have added will be shown on the...
- Page 29 Live Video Screen Tap the device photo on the “Device List” screen and you can see a live video from the camera. Camera 1 will be displayed by default. If you have multiple cameras configured, tap the “CH” icon and select the camera that you want to view.
- Page 30 Device Setting (Edit Device) Tap the “Advanced function” icon on the “Device List” screen, and then select “Edit Device” to switch the screen to “Edit Name: Tap this if you want to change the device name. Password: If you have changed the device password with another smartphone or tablet,...
- Page 31 Note: HD: high video quality but low frame rate. VGA: medium video quality and medium frame rate. QVGA: High frame rate but low video quality. Alert Interval: Tap this to adjust the time that the app will alert you when there is an event. You also have the option of turning off alerts.
-
Page 32: Troubleshooting
Troubleshooting You don't getting any signal at all Ÿ Make sure the camera and the monitor are turned on. Ÿ Make sure the power plugs are pushed all the way in. If the signal is poor, or there is interference Ÿ...
Need help?
Do you have a question about the WLD895 and is the answer not in the manual?
Questions and answers