Advertisement
Advertisement
Table of Contents

Related Manuals for Thermopatch HS3E


Summary of Contents for Thermopatch HS3E
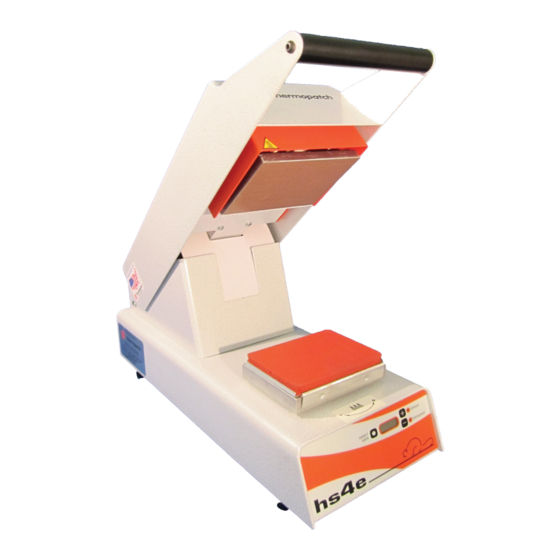
- Page 1 HS 3 E -4 E Operator’s Manual 47243-MAN - 1212...
- Page 2 Copyright © 2011, Thermopatch, Syracuse, New York. No part of this publication may be reproduced by any means without the prior written permission of Thermopatch, Syracuse, New York. Thermopatch, Thermo-Seal, Alligator, Beaver, Cheetah, Deco-Print, Penguin, TruFlex and the Thermopatch logo are ® trademarks of...
-
Page 3: Table Of Contents
Contents 1. Introduction 1.1 What Did You Receive? 1.2 Machine Specifications 1.3 Safety Information 1.4 Conditions of Warranty 1.5 Customer Service 1.6 Setting Up the Machine 2. Machine Settings 3. Operating Instructions 4. Troubleshooting 4.1 Common Problems and Causes 4.2 Temperature Controller Error Codes 5. -
Page 4: Introduction
1. Introduction The HS3E and HS4E heat seal machines provide the heat, time and pressure required for the application of a wide variety of Thermopatch products including mending materials, emblems, label tapes and transfers. 1.1 What Did You Receive? HS3E or HS4E Heat-Seal Machine... -
Page 5: Safety Information
This will occur when the preset “Power Saver Time” has elapsed. Re-activation of the HS3E or HS4E machine is achieved by lowering the Seal Arm handle of the machine. Once the Seal Arm Handle is lowered into the “Locked”... -
Page 6: Customer Service
Thermopatch markets a complete line of heat-seal and marking machines, as well as a complete line of materials and supplies. Label Print Machines – Manual, automatic and computer controlled. -
Page 7: Setting Up The Machine
1.6 Setting Up the Machine 1. Set the machine on the worktable in a desired location. 2. Raise the Seal Arm Handle to the upright position. 3. Plug the line power cord into the back of the machine. 4. Plug the line power cord into a properly grounded outlet of correct voltage. 5. -
Page 8: Machine Settings
3 times to adjust Preset Power Saver Time. Setting the Power Saver Time to “0” disables the Power Saver. 4 times to change Power Saver Temperature. Thermopatch does not recommend changing the default setting. - to adjust to your desired setting. -
Page 9: Operating Instructions
(Transfers should be placed ink side down). 5. Lower the Seal Arm Handle to its locked position. 6. At the end of the Sealing Cycle an alarm buzzer will sound. The HS3E Series Machine requires a manual release. The HS4E Series Machine will automatically release. -
Page 10: Troubleshooting
4. Troubleshooting 4.1 Common Problems and Causes Head will not come down. The most common causes are: 1. Mechanical binding 2. Broken links 3. Broken link pivot shaft Head will not lock down. The most common causes are: 1. Sealing platen is adjusted too low 2. -
Page 11: Temperature Controller Error Codes
4.2 Temperature Controller Error Codes Error 1 (Sensor Shorted) The most common causes are: 1. Faulty temperature sensor 2. Shorted wiring to sensor 3. Faulty temperature controller Error 2 (Sensor Broken) The most common causes are: 1. Faulty temperature sensor 2. -
Page 12: Maintenance
2. From the side, gently wedge a screwdriver between the aluminum base and aluminum backing plate of the platen assembly. The Lower Press Platen can now be removed from the base. Lubrication The HS3E and HS4E machines do not require lubrication. -
Page 13: Drawings And Parts Listings
Drawings and Parts Listing On the following pages, the reader will find technical drawings and corresponding parts listings of the HS3E and HS4E machines. The technical drawing illustrating a particular sub-assembly or area of the machine provides the individual parts for that sub-assembly or area. - Page 14 8 WHT 7 BLK LEGEND: Seal Switch Motor Control HTR - Heater Switch LS1 - Limit Switch 1 LS2 - Limit Switch 2 hs3e Series MTR - AC Motor Electrical Schematic SSR - Solid State Relay 115 Volt - Temperature Sensor...
- Page 15 Chassis Gnd GRN/YEL Power Entry Module Fuses: [2] 6.3 Amp L1 BLK L2 WHT Controller Board Press Arm Wire Harness Plug 6 YEL 5 YEL Thermocouple, Type K Solid State High Limit Heater Unit Wire Harness Relay Thermostat Plug 5 BLK L1 WHT 6 WHT L2 WHT...
- Page 25 HS3E and HS4E Parts Listing Part # Part Description 20015-20 Fuse, 6 amp, 2 required 20018-24 High limit thermostat 20040-69 Solid State Relay 21050-185 Rubber feet, 4 required 20080-70 115 volt electric power cord 24080-29 Spring, tension; HS4E only, release cam...
- Page 26 F +1 315 445-8046 sales@thermopatch.com Thermopatch European Headquarters The Netherlands T +31 36 549 11 11 F +31 36 532 03 98 sales@thermopatch.nl Thermopatch Australia Pty Ltd Australia T +61 395325722 F +386 2 80 55 232 marktpatchaust@bigpond.com.au Thermopatch Canada Inc Canada...
Need help?
Do you have a question about the HS3E and is the answer not in the manual?
Questions and answers