Table of Contents
Advertisement
Advertisement
Table of Contents

Related Manuals for Strauss water T6

Summary of Contents for Strauss water T6
- Page 2 Dear Customer, We are pleased to welcome you to the Strauss Water family upon your purchase of the T6 water bar. Now you can enjoy an unlimited supply of water, just the way you like it - cold or hot.
-
Page 3: Table Of Contents
Predetermined Cold Water Dispensing Predetermined Cold Water Dispensing - Large Quantity (1 litre) Hot Water Dispensing (T6-US models only) Predetermined Hot Water Dispensing (T6 non-US models only) Water Boiling Hot Water Dispensing when "Child Safety" Mode is ON Mix Water Dispensing 11. -
Page 4: Unit Description
1. Unit Description Point-Of-Use (POU) drinking water UV activated carbon unit 2. Manufacture Strauss-water, Or Yehuda 1 , Israel. Global web site: www.strauss-water.com 3. Specifications Power supply 115 volts 230 volts Electricity Voltage 115V, 1 Phase 230V, 1 Phase Frequency 60 Hz 50 Hz Cooling power consumption... - Page 5 Maximum ambient temperature: +32°C/90°F ASHRAE check point condition, Evaporating temp = -23°C / -10°F, Water output capacity is measured in an environmental temperature that is no greater than +25°C / 77°F, with the temperature of the water in the water system being no greater than + 22°C / 72°F.
-
Page 6: Replacement Components
• UL - Electrical Safety Standard North America requirements • Performance • T6 certified against NSF standards by NSF and WQA "Gold Seal" program against NSF 42/53 - "Material safety", NSF 55 Class B, NSF 42 • Israeli Standard IS 1505 - "Domestic water treatment devise"... -
Page 7: Performance Data Sheet
7. Performance Data Sheet Point-Of-Use (POU) drinking water UV activated carbon unit. • T6 water Bar is tested and certified against NSF/ANSI standards by WQA under "Gold Seal" program as verified and substantiated by test data against (*): • NSF/ANSI 42/53 - "Material safety"... -
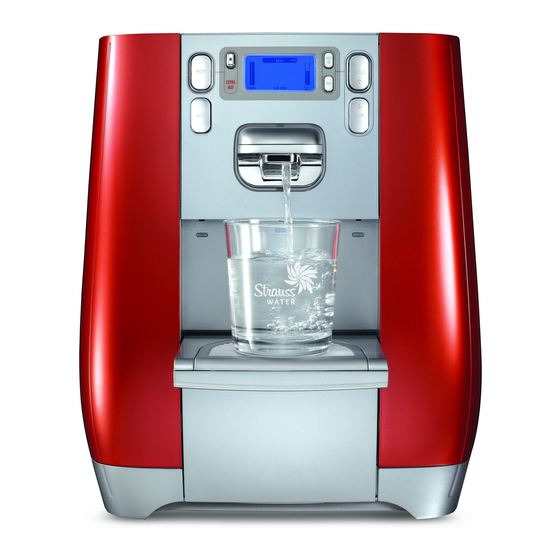
Page 8: General View
8. General View 1. Top Pad 2. Operation Panel with Digital Display Screen 3. Water Spout 4. Folding Tray 5. Drip Collector 6. Tray Grid 4. Folding Tray 7. Condenser 8. Power Cable 9. Heating System Switch Water Inlet... -
Page 9: Operation Panel
9. Operation Panel COLD 1. Mixed water dispensing button with predetermined quantity and temperature ( 2. Hot water dispensing button ( 3. Water boil button ( EXTRA HOT 4. Digital display screen 5. Menu functions and entering menu selections button ( MENU/OK 6. -
Page 10: Operation
10. Operation Attention! When dispensing water (either hot or cold), the "FRESH WATER" indication will appear. This indication shows that the system is working properly and providing high quality water*. a. Cold Water Dispensing Press and hold the button for continuous cold COLD water dispensing. -
Page 11: Hot Water Dispensing (T6-Us Models Only)
The "Hot Cup" icon will COLD appear on the digital display screen. e. Predetermined Hot Water Dispensing (T6 non-US models only) Press the button once for a predetermined 140 ml quantity of hot water. The "Hot Cup" icon and water... -
Page 12: Hot Water Dispensing When "Child Safety" Mode Is On
Hot Water Dispensing when "Child Safety" Mode is ON The "Child Safety" mode can be set optionally ON or OFF only on the T6 non-US models. The mode is CHILD PROTECTION PRESS always ON for T6 US models. &... -
Page 13: Setting Menu Functions
11. Setting Menu Functions a. General Press the button to enter the menu. Use the arrows (buttons MENU COLD to move between the menu options, and press the to choose the desired MENU option. To exit a selected option, press BACK b. -
Page 14: Energy Saving Mode
b.5 Setting the Day CLOCK Use the arrows on buttons to set the day. COLD DAY SET Press to confirm. MENU This function has no affect on any of the other programs. c. Energy Saving Mode This option automatically switches off the heating system after a predetermined period of time. -
Page 15: Setting The Automatic Wake-Up Timer
d. Setting the Automatic Wake-Up Timer You can set two wake-up times, for example, WAKE UP morning and evening. To set wake up timer, enter WAKE UP 1 WAKE UP 2 the "Wake Up" sub-menu. MAIN MENU TIME & DATE WAKE UP The current status of the two wake-up timers (WAKE WAKE UP 1... -
Page 16: Child Safety Mode
Child Safety Mode The "Child Safety" mode can be set optionally ON CHILD LOCK or OFF only on the T6 non-US models. The mode is always ON for T6 US models. When this mode is ON, hot water can only... -
Page 17: Language Setting
i. Language Setting This option allows you to choose the display language: LANGUAGE Spanish or English. ENGLISH ESPAÑOL To change the language, enter the "Language" sub-menu: MAIN MENU SETTINGS LANGUAGE The current language selection will appear on the display: Spanish or English. Use the arrows (buttons ) to COLD change the language. -
Page 18: Setting Cold Water Quantity In Predetermined Dispensing Mode
l. Setting Cold Water Quantity in Predetermined Dispensing Mode This option allows you to set the quantity of cold COLD WATER QTY water dispensed when the button is pressed. COLD / CUP To set the quantity, enter the "Cold Water Quantity" TO SET TEMP PRESS sub-menu:... -
Page 19: Setting Mix Water Quantity In Predetermined Dispensing Mode
This option allows you to set the quantity of hot HOT WATER QTY water dispensed when the button is pressed , or COLD / CUP when are pressed simultaneously (T6-US TO SET QTY COLD PRESS models only). 60 ml TO CONFIRM To set hot water dispensing quantity, enter the "Hot... -
Page 20: Maintenance
12. Maintenance a. Emptying the Drip Collector It is important to empty the drip collector in time (before it is full). To empty drip collector: (1) Close folding drip tray and wait a few seconds until all the water will drain into the drip collector. (2) Remove the drip collector by pulling it gently so as to not spill the water. -
Page 21: Uv-C Lamp And Filter Replacement Counter Display
c. UV-C Lamp and Filter Replacement Counter Display The filter and lamp replacement counter can be displayed on the screen. MAIN MENU REPLACEMENT d. Automatic Flushing Unplug the unit from the power supply, press and hold the button and MENU reconnect the unit to the power supply whilst pressing the button (until 3 short beeps are heard). -
Page 22: Cleaning The Unit
15. Safety Precautions • Caution! Moving the unit may cause flooding. • T6 uses power at 115 V. Make sure you connect the unit to a power outlet with a 16A fuse. • The unit must be plugged into a power receptacle with ground fault circuit interrupters. -
Page 23: Troubleshooting
16. Troubleshooting Your water bar is extremely reliable and requires almost no maintenance and service, except for the replacement of the filter and UV lamp at predetermined intervals. Please consult the following table to ensure that you are experiencing a system fault, and not a problem with electricity or water supply.
Need help?
Do you have a question about the T6 and is the answer not in the manual?
Questions and answers