Advertisement
Quick Links
Start up
Battery Operation
- For portable use, the monitor will operate up to 70
hours on 4 AA industrial alkaline batteries. The batteries can be installed by
removing the battery cover and following the diagram imprinted on the back
plastic cover.
LOW BATT flashes when there is less than 30 minutes of battery life. At
this point the batteries should be replaced or the AC adapter should be
used as a substitute. If operation continues, the unit will become
inoperable and only the LOW BATT will be blink on the LCD display.
AC Power Operation
- The sensor is shipped with a 6V DC
500mA AC/DC adapter. To use the adapter, connect the plug into the
back of the unit and plug the transformer into any standard wall outlet.
NOTE Use the supplied adapter. The wrong adapter may cause damage
to the unit. Battery operation will not function as a back up during a
power loss.
Power-Up
1. Press the Power Button and a 2 second delay will occur before the
display becomes visible.
2. 10 seconds will elapse before displaying current CO
3. WARM-UP will display for approximately 1 minute. During this time,
adjustments can not be made to the sensor.
Display Features and Modes
WARM-UP - indicates a 1 minute warm-up
ON LINE - Displays when a PC is communicating to the sensor via RJ45 port.
Normal Operating Mode - After warm-up the sensor will stabilize and
display current conditions.
Adjustment Modes
Pressing the mode button scrolls through the adjustment modes. Once
the desired mode is displayed, press Enter to make adjustments. Press
Enter again to save and leave the adjustment mode.
ELEVATION - Used to compensate for elevation changes.
CALIBRATION - Used when calibrating.
TEMPERATURE - For Temperature calibration
OUTSIDE - To Manually input CO
CALIBRATION IN PROGRESS - Displays during calibration
Display Features
CO
Readings (Upper Display) - Remain visible at all times.
2
Temperature and Ventilation Rates (Lower Display)
The Up/Down arrows allow you to toggle through the Temperature and
Ventilation modes. When pressing the up arrow, the display will go
through the following sequence:
Temp°C > Temp°F > Vent Rate l/p/s > Vent Rate cfm/p > Blank
US Standard to Metric Conversion
The Temperature, Ventilation rates and Elevation Readings can be
viewed in US Standard or Metric readings. The Temperature is converted
from Fahrenheit (°F) to Celsius (°C), the Ventilation Rates are converted
from Cubic Feet Per Minute Per Person (cfm/p) to Liters Per Second (l/p/
s) and the Feet (ft) to Meters (m).
Operation
Elevation Correction - The
sensor, like any other gas
measuring device is affected
by altitude changes. The
sensor is shipped with the
elevation setting set at "zero"
or sea level. If you are at an
altitude greater than 500 feet,
an adjustment should be made
to assure maximum sensor
accuracy. Once the elevation
correction is set it will be
stored and saved in the
monitor memory. To change
the default setting follow the
steps below.
1. Press the Mode button until
ELEVATION begins to blink.
2. Press Enter.
3. Press Mode to toggle the
elevation reading between
feet(ft) & meters(m).
4. Use the Up/Down button to
adjust the altitude in increments of 500(ft) or 100(m). Once the correct
altitude is set, press Enter to save the setting and return to normal mode.
Temperature or CFM/Person – The lower display will cycle through the
following units when the Up/Down button is pressed: Temp°F, Temp°C,
CFM, turn lower display off.
Stand-alone Monitoring - Once Elevation correction has been made (as
described in the steps above), the sensor will begin to accurately display
current room conditions.
Using an External Datalogger - Voltage outputs for both CO
temperature are available via an RJ-45 jack on the rear of the unit.
readings
2
levels for the CFM ventilation rate
2
Enter
Power
Mode
Up/Down
Button
Button
Button
Button
This drawing is for reference to identify the
location of the different modes and adjustment
features. The display won't display all features
simultaneously (as shown).
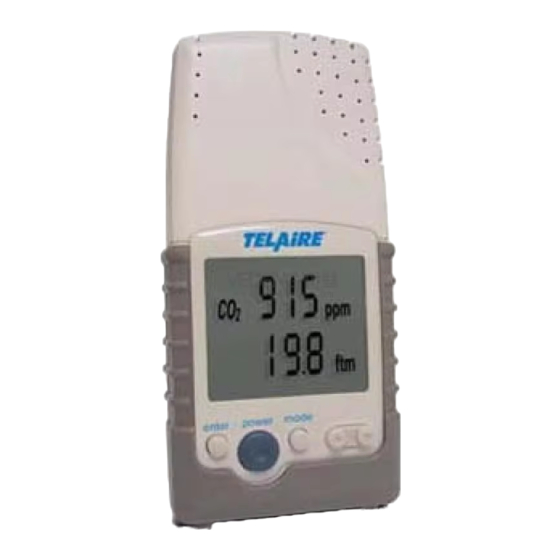
Telaire
Carbon Dioxide and Temperature Monitor
1
2
Features
1. Display
2. Enter Button
3. Power Button
4. Up/Down Button
5. Batter Compartment
The Telaire
monitor. The unit provides stable, highly accurate readings due to
our patented dual beam NDIR technology. Equipped with a 0-4V
output, the unit is perfect for long-term monitoring/recording.
6860 Cortona Drive, Suite B - Goleta, California, 93117
Ventilation Rate (cfm/p)
Overview - Press the up/down button until cfm/p is displayed. This value
represents how much outside air is being introduced on a CFM per
person basis. The reading is derived from calculating the outside air
ventilation rate to a space based on the inside/outside CO
readings. Current codes/standards generally require 15 to 20 CFM/
Person to be delivered to most spaces to ensure acceptable air quality.
Low values indicate low ventilation rates and potentially poor air quality.
High levels can indicate excessive ventilation and potential excessive
energy usage. To obtain accurate measurements, readings should be
taken 2 to 3 hours after occupancy has stabilized in a space or at a peak
in daily CO
concentrations.
2
Adjusting the Outside CO
The sensor is factory set to assume an outside level of 400 ppm, which
should be close to the outside concentration in most areas. The outside
level of CO
can also be changed by measuring outside levels or by
2
manually adjusting the monitor.
1. Power up outside and wait for CO
2. Save the reading by holding the Enter button on the sensor for 5 secs.
3. This value is used to calculate the ventilation rate based on the
differential of the measured outside value and into measured inside
concentration.
Manual Input of Outside Concentration
The monitor is factory set at 400 PPM. To adjust the factory setting (for the
cfm/person calculation) or to verify the current setting follow steps below:
1. Press the mode button until CO
2. Press the enter button and the current outside value will display.
3. Use the Up/Down button to increase/decrease the CO
4. Press enter to save and store the value in the monitor.
Calibration (CO2)
IMPORTANT - The sensor has been factory calibrated and should need
calibration once every 12 months using either a zero concentration gas or a
gas with a specified concentration of CO
calibration we recommend purchasing a Telaire calibration kit (P/N 2075).
Sensor drift usually occurs at the zero reference point. The manual calibra-
tion process allows the user to perform a one point calibration based on
ambient levels or by flowing a gas of a known concentration through the
sensor. This process will adjust the zero offset of the sensor and will provide
an accurate calibration. If a two point calibration is required the Calibration
and
kit should be used. For manual calibration, follow the steps below.
2
1. The calibration procedure will last approximately 15 minutes. Before
performing the calibration procedure, remove the battery cover to
7001
®
5
4
3
6. Adapter Connection
7. RJ-45 Connection
8. Cal Button (under cover)
9. Gas Connection
10. Kickstand
®
7001 is an easy-to-use hand-held CO
P- 805-685-4000 F- 805-685-0015
Concentration
2
levels to stabilize (approx 5 min).
2
and ppm flash.
2
. For the most accurate field
2
5
8
6
7
9
10
/Temperature
2
62292-006 05/12/2004
differential
2
value.
2
Advertisement

Related Manuals for Telaire 7001

Summary of Contents for Telaire 7001
-
Page 1: Display Features
. For the most accurate field Temperature or CFM/Person – The lower display will cycle through the calibration we recommend purchasing a Telaire calibration kit (P/N 2075). following units when the Up/Down button is pressed: Temp°F, Temp°C, Sensor drift usually occurs at the zero reference point. The manual calibra- CFM, turn lower display off. -
Page 2: Specifications
Items received without a return authorization number will be refused. Storage Temperatures Product to be serviced under this warranty should be sent to Telaire, 6860 Cortona Dr, -4 to 140°F (-20 to 60°C) Suite B, Goleta, CA 93117. Shipment must be prepaid, properly packed and insured.
Need help?
Do you have a question about the 7001 and is the answer not in the manual?
Questions and answers