Table of Contents
Advertisement
Quick Links
Advertisement
Table of Contents

Related Manuals for Advanced Diagnostics BRAVO III

Summary of Contents for Advanced Diagnostics BRAVO III
-
Page 2: Table Of Contents
CONTENTS GUIDE TO THE MANUAL ..................1 GENERAL INTRODUCTION .................2 TRANSPORT ....................4 Packing ....................4 Transport ....................4 Unpacking .....................4 Handling the machine ................5 WORKING PARTS ..................6 MACHINE DESCRIPTION ................7 Safety ....................9 Technical Data ..................9 Electric circuit ..................10 ACCESSORIES PROVIDED .................11 MACHINE INSTALLATION AND PREPARATION ........12 Checking for damage ................12 Environmental conditions ..............12 Positioning ..................12... -
Page 3: Guide To The Manual
BRAVO III with EZ-Jaw GUIDE TO THE MANUAL This manual is a guide to the use of BRAVO III with EZ-Jaw key-cutting machine. Read it carefully; it is essential if you wish to operate your machine safely and efficiently. ONSULTATION The contents of the manual are divided into sections relating to: Transport and handling .................... -
Page 4: General Introduction
The BRAVO III with EZ-Jaw must be installed and used in the way laid down by the manufacturer. If the key-cutting machine is used differently or for purposes different from those described in this manual, the customer will forego any rights he may have over SILCA S.p.A. - Page 5 Operating manual - English BRAVO III with EZ-Jaw • Machine Identification The BRAVO III with EZ-Jaw key-cutting machine is provided with an identification label which shows the serial number (fig. 2). Manufacturer’s ¨ identity Type of machine Serial No. Working...
-
Page 6: Transport
The machine must be placed in its packaging and carried manually by two persons. Packing The BRAVO III with EZ-Jaw is packed in a strong cardboard box, the dimensions of which are shown in fig. 3, sufficiently robust to be used for storing the machine for long periods. -
Page 7: Handling The Machine
BRAVO III with EZ-Jaw Handling the machine When the BRAVO III with EZ-Jaw has been unpacked, place it directly on its workbench. This operation can be carried out by one or two persons, firmly holding the base and no other part, to lift and carry the machine (fig.4). -
Page 8: Working Parts
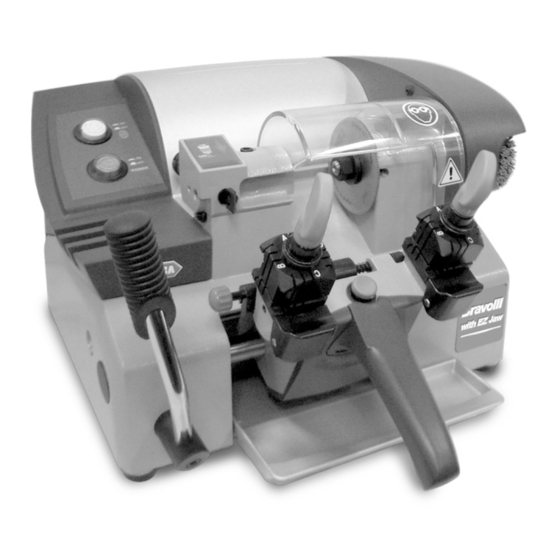
BRAVO III with EZ-Jaw Operating manual - English WORKING PARTS Fig. 5 A - cutting tool B - tracer point B1- tracer point support C - master switch D - carriage E - clamp F - clamp knob H - transparent protective shield... -
Page 9: Machine Description
Cutting Tool The cutting tool (A) is the part of the BRAVO III with EZ-Jaw used for cutting key blanks from the tracer point’s reading of the cuts on the original key. The cutting tool is in HSS super rapid steel or hard metal and is covered by a transparent plastic shield (H) which provides protection for the operator. - Page 10 BRAVO III with EZ-Jaw Operating manual - English Fig. 6 Copyright Silca 2010...
-
Page 11: Safety
Operating manual - English BRAVO III with EZ-Jaw Safety • Cutter motor protection ATTENTION: the cutter motor is protected from overheating by a device (inside the motor) that stops it when it reaches a dangerous temperature. This condition can occur when the machine motor is left on continuously, with high ambient temperatures or in severe working conditions. -
Page 12: Electric Circuit
Electric circuit The BRAVO III with EZ-Jaw key-cutting machine has a 1 speed single phase motor. The main parts of the electric circuit on the BRAVO III with EZ-Jaw are listed below: 1) Main plug with fuses 6,3 Amps rapid... -
Page 13: Accessories Provided
BRAVO III with EZ-Jaw ACCESSORIES PROVIDED To ensure trouble-free working with the BRAVO III with EZ-Jaw, it is advisable to always have certain spare parts on hand. It is good policy to have a replacement CUTTER, BRUSH and BELT in the tool box. -
Page 14: Machine Installation And Preparation
Operating manual - English MACHINE INSTALLATION AND PREPARATION The BRAVO III with EZ-Jaw key-cutting machine can be installed by the purchaser and does not require any special skills. The machine is supplied ready for use and does not need to be set up. However, some checks and preparation for use need to be carried out by the operator. -
Page 15: Description Of Work Station
WARNING LABEL (X) (fig.9) 0.002" Separate parts The separately packed parts must be installed on the BRAVO III with EZ-Jaw key-cutting machine by the purchaser, as follows: Connection wire Connect the supply wire to the inlet on the back of the machine. -
Page 16: Checking And Setting
Operating manual - English Checking and setting The cutting tool on the BRAVO III with EZ-Jaw is the part used to cut the key blanks and should be periodically checked and replaced, if necessary. Every time the cutting tool is changed, and during periodical operational tests, check calibration. - Page 17 Operating manual - English BRAVO III with EZ-Jaw XIS CALIBRATION Axis calibration is regulation of the cutting space on the key (fig.12). Proceed as follows: 1) Turn off the master switch (C) to operate safely and prevent activation of the cutting tool.
-
Page 18: Cutting Operations
Key cutting When BRAVO III with EZ-Jaw has been turned on by means of push button (C), it is ready for cutting but the cutting tool is not rotating (because the carriage is held in the idle position). Now the original key and the blank can be placed in the jaws, ready for cutting. -
Page 19: Cutting Pin Keys
Operating manual - English BRAVO III with EZ-Jaw SING THE PINS For keys with narrow or thin stems one pin must be used (fig. 18-1 fig. 18-2). For keys with narrow, thin stems, two pins must be used (fig. 18-3), the second one to give a secure grip on the key. -
Page 20: Cleaning And Maintenance
Operating manual - English CLEANING AND MAINTENANCE Although the BRAVO III with EZ-Jaw key-cutting machine does not require special maintenance, it is advisable to check and, if necessary, replace the parts subject to wear, such as: the belt, cutting tool, brush, tracer point. -
Page 21: Replacing The Brush
Operating manual - English BRAVO III with EZ-Jaw Replacing the brush When the brush no longer cleans off the burrs it must be replaced as follows: 1) Turn the machine off and unplug it. 2) Place the locking pin into the groove in the base and into the special hole in the cutter shaft (fig.22). -
Page 22: Regulating Of Maximum Carriage Depth
BRAVO III with EZ-Jaw Operating manual - English Regulating of maximum carriage depth To prevent damage to the clamps and cutting tool, maximum cutting depth must be established. ATTENTION: the distance between the cutting tool/tracer point and clamp must be 0.1 mm. If this is not the case, proceed as follows: 1) Turn the machine off and unplug it. -
Page 23: Access To Bottom Compartment
Operating manual - English BRAVO III with EZ-Jaw Access to bottom compartment 1) Turn the machine off and unplug it. 2) Remove the swarf tray. 3) Turn the machine onto its right-hand side. 4) Loosen the 7 screws (W) and 2 feet (W1) and remove the bottom safety plate (W2) (fig.26). -
Page 24: Replacing The Condenser (Motor)
BRAVO III with EZ-Jaw Operating manual - English Replacing the condenser (motor) 1) Turn the machine off and unplug it. 2) Remove the bottom panel (see ch. 7.7). 3) Loosen the nut (Z) and remove the washer (Z1) and condenser (fig.28). -
Page 25: Replacing The Microswitch
Operating manual - English BRAVO III with EZ-Jaw 7.10 Replacing the microswitch 1) Turn the machine off and unplug it. 2) Release the carriage and leave it in the working position (towards the tracer point). 3) Remove the bottom panel (ch.7.7, page 21). -
Page 26: Replacing The Switch And/Or Push Button
BRAVO III with EZ-Jaw Operating manual - English 7.11 Replacing the switch and/or push button 1) Turn the machine off and unplug it. 2) Loosen the 2 screws (H1) on the cutter cover (H) and remove (fig.30). 3) Loosen the 3 screws (T1) on the central cover, raise slightly and remove, tipping a little. -
Page 27: Replacing And/Or Tightening The Belt
Operating manual - English BRAVO III with EZ-Jaw Fig. 32 Fig. 33 7.12 Replacing and/or tightening the belt 1) Turn the machine off and unplug it. 2) Loosen the 2 screws (H1) on the cutter cover (H) and remove (fig. 30, page 24). -
Page 28: Replacing The Single Speed Motor
BRAVO III with EZ-Jaw Operating manual - English 7.13 Replacing the single speed motor 1) Turn the machine off and unplug it. 2) Remove the bottom panel (see ch. 7.7). 3) Disconnect the 4 motor wires (1, 2, 3, 4) from their connections (fig.35). -
Page 29: Replacing Carriage Spring
Operating manual - English BRAVO III with EZ-Jaw 7.14 Replacing carriage spring 1) Turn the machine off and unplug it. 2) Release the carriage and leave it in the working position (towards the tracer point). 3) Loosen the 2 screws (V1) on the carriage knob (V) (fig.38). - Page 30 BRAVO III with EZ-Jaw Operating manual - English Fig. 40 Fig. 41 Copyright Silca 2010...
-
Page 31: Disposing Of Machine
Although residue coming from the key-cutting operations is classified as special waste, it is included in solid urban waste (SUW) as metal wool. • Cutting machine The BRAVO III with EZ-Jaw key-cutting machine is designed for many years of operation and is also re-usable. Re-cycling is a recommended ecological practice. • Packing The BRAVO III with EZ-Jaw is consigned in a cardboard packing box which can be re-used if undamaged.
Need help?
Do you have a question about the BRAVO III and is the answer not in the manual?
Questions and answers
Our Silca Bravo 3 stopped working the other day. We tried to different plugs, flipping the switch in the back, and both push buttons. Nothing is lighting up or turning on. Are we missing something?