Table of Contents
Advertisement
Advertisement
Table of Contents

Subscribe to Our Youtube Channel
Related Manuals for Kiwi Technics KiwiSix


Summary of Contents for Kiwi Technics KiwiSix
-
Page 2: Table Of Contents
5) KLM-368 Adjustments..................31 6) PolySix Common Faults..................32 7) PolySix Waveform Mod..................34 7) PolySix Hold Pedal Mod..................34 8) PolySix Power Supply Upgrade................35 Midi Data.................38 Continuous Controllers....................39 Real Time Commands....................41 NRPN Controllers.....................42 Midi Sysex Support............43 Midi Sysex Data......................44 www.kiwitechnics.com KiwiSix Upgrade User Manual v3... -
Page 3: Kiwisix Features
(note - Power cord is not supplied), screws and space to mount the Korg Serial Number plate and midi in and out sockets are mounted. An internal cable is supplied to plug into the KiwiSix Upgrade board for Midi I/O. -
Page 4: Kiwisix Flow Chart
KiwiSix Flow Chart... - Page 5 KiwiSix Front Panel...
-
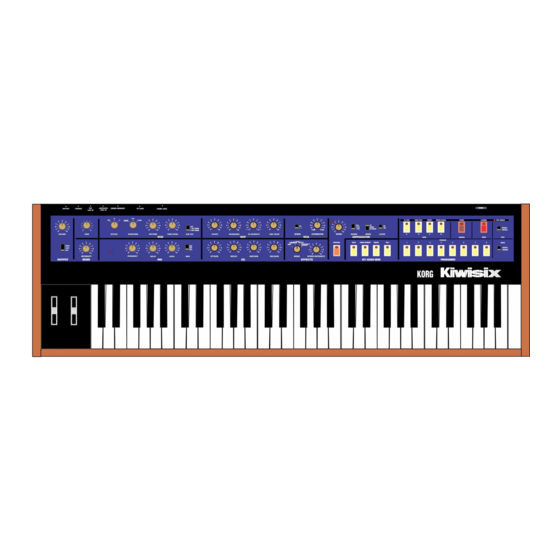
Page 6: Kiwisix Front Panel
Tone Selection The method for selecting tones Tones are selected using a two button differs from the Polysix. The Kiwisix system. Tones in any one group are supports 512 fully editable tones numbered 1-1 to 8-8 making 64 tones in whereas the original Polysix had 32 each group. -
Page 7: Kiwisix Preset Section
Synth Bass Synth 4 Oriental Synth Harp Wah Wah Sound Whistle Sound Gambang Sound Sound Cave Echo Sound Sound Effect 1 Effect 2 Effect 3 Effect 4 Effect 5 * = Set to unison www.kiwitechnics.com KiwiSix Upgrade User Manual v3... - Page 8 Note - it is best to set the chord using while the chord keys are pressed. middle 'C' as the base note. Canceling Chord Mode. To cancel chord mode press and release the Chord Button with no notes pressed. www.kiwitechnics.com KiwiSix Upgrade User Manual v3...
-
Page 9: Chord Mode
The Arp button light will flash when between the ARP Mode & SEQ the Kiwisix is in SEQ Mode. Mode. When the Latch Switch is towards the keys the Kiwisix is in SEQ Mode. Chord Mode It is possible to arpeggiate a chord. - Page 10 +2 Octs - Poly Flashing Fast Note - if the tape switch is on when the KiwiSix is powered on this will be ignored. You will need to switch it off and then on again to edit the Key Transpose.
-
Page 11: Edit Parameters
TAPE switch so that the LED is off. Note - if the tape switch is on when the KiwiSix is powered on this will be ignored. You will need to switch it off and then on again to edit a parameter. - Page 12 Tone 2(F) On = 16th note triplets (4/Step) Tone 3(F) On = 32nd note (3/Step) Tone 4(F) On = 32nd note triplets (2/Step) Tone 5(F) On = 64th note triplets (1/Step) (F) = Flashing Adjust Using the FX Rate Knob www.kiwitechnics.com KiwiSix Upgrade User Manual v3...
- Page 13 This section is entered by pressing the Bank B (Load) button while the KiwiSix is powered on. The Update file is then 'played' into the KiwiSix using midiOX or similar program. The update progress is displayed on the Tone Lights.
- Page 14 Bank C, Tone 2, Write. This file will contain 512 Tones. These tones will load to the same positions in memory when loaded into the KiwiSix. Note - this is a large file. The global parameters can be dumped to midi by using the following keys...
-
Page 15: Sequencer
Sequencer The KiwiSix Upgrade contains a ARP Button polyphonic sequencer that has the capacity step automatic This button is used to start or stop playing. Up to 6 notes can be played sequencer playing while at a time so writing a chord is Sequencer mode. -
Page 16: A) Writing / Editing
Pressing the ARP button again will stop the sequence playing and the indicator will go out. (refer to Sequencer Playing in the next section) (5) Return the Memory Protect Switch to the Off Position. www.kiwitechnics.com KiwiSix Upgrade User Manual v3... - Page 17 Bank 7 – Insert Step to be too difficult to implement a Tie system in the KiwiSix. This When the Bank 7 button is pressed button is ignored while in edit mode and notes are being held the sequence step is Bank 3 –...
-
Page 18: C) Playing
Patch Button 1-8 while in same key transpose that is set in the Sequence Mode (Arp Latch is in the KiwiSix. By starting a sequence and ON position). The Sequence that is then switching to SHIFT mode by... -
Page 19: Arpeggiator
RANGE & MODE switches. loaded. These are saved with the Patch. Note - If the Master clock source is set to the Midi Clock the Arp will not play if the midi clock is not present. www.kiwitechnics.com KiwiSix Upgrade User Manual v3... -
Page 20: Setting Up With External Devices
Arp & Seq clock output as the commands need to be divider settings. interpreted which cannot be done until a full command arrives. Full midi command details are at the end of the manual. www.kiwitechnics.com KiwiSix Upgrade User Manual v3... -
Page 21: Install Instructions
If you are in any doubt at all or do not understand any part of this document then have this work done by a If you are in any doubt at all or do not understand any part of this document then have this work done by a professional. professional. www.kiwitechnics.com KiwiSix Upgrade User Manual v3... -
Page 22: Rear Panel Install
The KiwiTechnics KiwiSix Upgrade must be installed by a competent technician with the correct tools or damage to your PolySix can occur. KiwiTechnics will not be responsible for damage done to your precious PolySix if this upgrade is not fitted correctly. - Page 23 (in this order). This needs to be tight to ensure a good ground connection. Carefully remove all metal fragments from the drilling from the synth. www.kiwitechnics.com KiwiSix Upgrade User Manual v3...
-
Page 24: Klm-367 Replacement
Retain the four screws as these will be used for the KiwiSix board c) Remove the KLM-366 40 cpu located in the blue socket marked with the green arrow. This is easily done using a small flat blade screw driver fitted between the cpu and the socket at each end. -
Page 25: Klm-369 Front Panel
The Kiwisix Upgrade board should now look like the photo. Make sure all the cables are the correct way around and correctly on the plugs. g) Plug in the midi cable to the midi connector on the KiwiSix board (CN99). This is keyed and can only be plugged in the correct way around. - Page 26 IC2 pin 2 and CN09 Pin5 at the end of R16 (yellow arrows) and the other longer wire between IC2 pin 4 and the left end of R18 (purple arrows). The gray wires to CN13 have been removed in the photo for clarity. www.kiwitechnics.com KiwiSix Upgrade User Manual v3...
-
Page 27: Klm-371 Mods
The LED's for the Bank buttons A-C share a common resistor. This is fine if only one light is on at a time but is not ideal for the upgrade. The Kiwisix upgrade uses these lights in combinations to show Bank Groups and the Bank A-C will show activity on the other lights and will also be dimmer that the others. -
Page 28: Adjustments For The Polysix
Leave the Polysix running for at least 15 minutes with the top closed to let the electronics stabilize. Set the front panel to the Normal setting. Also center the Tune Knob and set Bend Intensity to 0. www.kiwitechnics.com KiwiSix Upgrade User Manual v3... - Page 29 Using an accurate 4 1/2 digit or better DVM check and trim the +15v, +5v and -5v power in this order. The test points for connecting the DVM are clearly marked on the power supply board. To adjust these you will require a small screwdriver. The +15v should be ±50mv and the +5v and -5v should be ±10mv. www.kiwitechnics.com KiwiSix Upgrade User Manual v3...
- Page 30 3) Power supply adjustment (KiwiSix upgrade power board). Using an accurate 4 1/2 digit or better DVM check and trim the +15v, +5v, -15v and -5v power in this order (red arrows). The test points for connecting the DVM are clearly marked on the top left of the power supply board. To adjust these you will require a small screwdriver. The +15v and -15v should be ±50mv and the +5v and -5v should be ±10mv.
- Page 31 Obtain ground at TP5. Set the Octave to 8, Waveform to PW and PWM to 10. Measure CN05-7 (on the voice board or CN05-13 on the KiwiSix Board) using the DVM and adjust the VCF cutoff control to as close as you can get to 0.000v. Check CN05-11 (on the voice board or CN05-9 on the KiwiSix Board) with the DVM and adjust the Resonance control as close as you can get to 8.000v.
-
Page 32: Klm-368 Adjustments
(less than 0.2v peak to peak). 4) Output Level Adjustment Set Octave to 4' with other settings at normal. Play C3 and adjust VR8 to obtain an output of 3v Peak to Peak at SIG OUT (TP5) (±5%). www.kiwitechnics.com KiwiSix Upgrade User Manual v3... -
Page 33: Polysix Common Faults
(yes gold shouldn't oxidize so it isn't pure) and the other is the carbon used in the rubber section is not very conductive. New replacement rubber contact are being made by LA Synth at time of printing. The URL is http://shop.lasynthco.com/product/key- contacts-for-korg-poly-oberheim-sequential-prophet-600-kawai-and-others www.kiwitechnics.com KiwiSix Upgrade User Manual v3... - Page 34 Power Upgrade board marked GND and with a white box around it. If you are installing the Kiwisix without the PSU upgrade then use the ground leg of the largest capacitor as the ground point.
-
Page 35: Polysix Waveform Mod
4) Fit the supplied ferrite clamps onto the keyboard scan lines and the front panel switch scan lines. The Keyboard scan lines run from the voice board to the left hand end of the keyboard and are usually black & white. The front panel scan lines run from the Kiwisix board from CN6 and are usually blue in colour. -
Page 36: Polysix Power Supply Upgrade
The result of this is we now have a mistrust of the design as it stands. This upgrade is optional and will require some tools. Tools required Crosshead screwdriver, multimeter Soldering and desoldering Equipment Heat Transfer Paste www.kiwitechnics.com KiwiSix Upgrade User Manual v3... - Page 37 These should be screwed up fairly tight but don't overdo it or you will strip the thread. These regulators must all be isolated from the metal rail so check using a multimeter that there is no contact. www.kiwitechnics.com KiwiSix Upgrade User Manual v3...
- Page 38 This should be done in the order +15v, +5v, -15v & -5v. Note: in the photo the extra blue +5v wire to the front panel KLM-369 board has not been fitted yet. www.kiwitechnics.com KiwiSix Upgrade User Manual v3...
-
Page 39: Midi Data
If Omni selected the Kiwi106 will recognize any midi channel Note Number 24(C1)-108(C8) 0-127 Notes that are received outside the KiwiSix range of 24-108 are transposed to the nearest octave within range. Mode Voice Modes need to be changed using Midi Control or Sysex... -
Page 40: Continuous Controllers
$40-$7f (64-127) FX Rate/Intensity $3f (63) $00-$7f (0-127) Hold Pedal $40 (64) $00-$1f (0-31) $40-$7f (32-63) MG Wave $41 (65) $00-$0f (0-15) Triangle $10-$1f (16-31) Square $20-$2f (32-47) $30-$3f (48-63) Rev Saw $40-$7f (64-127) Random www.kiwitechnics.com KiwiSix Upgrade User Manual v3... - Page 41 Note – this is only here because the BCR2000 is not able to step programs using two buttons All Sound off $78 (120) Stops all output immediately All Notes off $7b (123) Stops all output immediately www.kiwitechnics.com KiwiSix Upgrade User Manual v3...
-
Page 42: Real Time Commands
Real Time Commands Midi Clock $f8 (248) Midi Timing Clock Start $fa (250) Start Arp/Sequence/Pattern Play Stop $fc (252) Stop Arp/Sequence/Pattern Play Continue $fb (251) Continue Arp/Sequence/Pattern Play www.kiwitechnics.com KiwiSix Upgrade User Manual v3... -
Page 43: Nrpn Controllers
MSB will be ignored NRPN LSB $62 (98) $07-$3f (7-63) See table Note: the Kiwisix supports 12 bit control only so the two lowest bits are ignored NRPN Data $6 & $26 14 bits of data $6 (6) is upper 7 bits and is optional (6 &... -
Page 44: Midi Sysex Support
$00 $21 $16 Kiwitechnics Manufacture ID Kiwitechnics ID Product Family ID (KiwiSix) Product ID Major Program Version Byte Minor Program Version Byte Major BootLoader Version Byte Minor BootLoader Version Byte Build Number End of Sysex www.kiwitechnics.com KiwiSix Upgrade User Manual v3... -
Page 45: Midi Sysex Data
WARNING! Sysex dumps have the ability to put non valid settings into memory and few checks are made for validity. If the KiwiSix becomes unusable due to non valid data you may need to do a full restore of the KiwiSix which will lose all saved memory. - Page 46 Data Details Byte details 7 ------- 0 $01 (1) Request Global Dump No Data KiwiSix transmits a $02 (2) comman $02 (2) Transmit or Receive Global $00 (00) = Midi Channel In 000yxxxx xxxx = 0-15 for midi channel 1-16...
- Page 47 $23(35)=Env 1 Attack 0xxxxxxx 0-127 Range $24(36)=Env 1 Decay 0xxxxxxx 0-127 Range $25(37)=Env 1 Sustain 0xxxxxxx 0-127 Range $26(38)=Env 1 Release 0xxxxxxx 0-127 Range $27(39)=MG Rate 0xxxxxxx 0-127 Range $28(40)=MG Delay 0xxxxxxx 0-127 Range www.kiwitechnics.com KiwiSix Upgrade User Manual v3...
- Page 48 010 - Up/Down 011 - Random 100 - As Played $2f(47)=Midi Control 0000w0yz Arp Enable (1=Enabled) Seq Enable (1=Enabled) Hold Enabled (1=Hold On) $30(48)=PWM Control 00000xxx xxx = 000=Triangle 001=Square 010=Saw 011=Rev Saw 100=Random www.kiwitechnics.com KiwiSix Upgrade User Manual v3...
- Page 49 Bank + Tone + 128 data bytes WARNING! This command will overwrite the Tone Number 0xxxxxxx 0-127 current sounding tone with the Kiwisix transmits data in the same format as the $04 Tone selected Command www.kiwitechnics.com KiwiSix Upgrade User Manual v3...
- Page 50 3 for tones 385-512 WARNING! This command will overwrite the $01 (1) = Tone Number 0xxxxxxx 0-127 current sounding tone with the Kiwisix transmits data in the same format as the $0c Tone selected (12) Command www.kiwitechnics.com KiwiSix Upgrade User Manual v3...
- Page 51 Juno-106 transmits a $14 (20) command Buffer Dump $14 (20) Transmit/Receive 892 bytes Data Data Format is the same is $0a (10) Command (with 0 Sequence Number) Sequence Edit Buffer Dump Null + 892 data bytes www.kiwitechnics.com KiwiSix Upgrade User Manual v3...
- Page 52 Note 5 0xxxxxxx Byte 8-13 xxxxxxx = voice 1-6 Level (0-127) Note 6 0xxxxxxx Byte 7 00abcdef Byte 8 0xxxxxxx Byte 9 0xxxxxxx Byte 10 0xxxxxxx Byte 11 0xxxxxxx Byte 12 0xxxxxxx Byte 13 0xxxxxxx www.kiwitechnics.com KiwiSix Upgrade User Manual v3...
Need help?
Do you have a question about the KiwiSix and is the answer not in the manual?
Questions and answers