Table of Contents
Advertisement
Advertisement
Table of Contents
Troubleshooting

Subscribe to Our Youtube Channel
Related Manuals for Delta-T HH2


Summary of Contents for Delta-T HH2
- Page 1 User Manual for the Moisture Meter type HH2 Version 4.0.1 Delta-T Devices Ltd...
- Page 2 Copyright All rights reserved. Under the copyright laws, this manual may not be copied, in whole or in part, without the written consent of Delta-T Devices Ltd. Under the law, copying includes translation into another language. Copyright © 2013, Delta-T Devices Ltd.
- Page 3 But the temperature sensor in the ML3 takes about 30 minutes* to thermally equilibrate with the surrounding soil, and should ideally be buried in the soil. So for these two reasons it is not appropriate to use the HH2 for soil temperature readings with this sensor.
- Page 4 To check which version of HH2Read that you currently have, run HH2Read on your PC and select Help. About. To check which version of firmware in the HH2 connect it to your PC via e.g. COM1 and select the Version button in HH2Read Upgrade Options Complete upgrade.
- Page 5 HH2Read PC software. It is not that difficult (see the link below for instructions). The downside is - each time your HH2 battery goes flat for more than 30 seconds you will have to reinstall the ML3 linearisation table.
- Page 6 Press Read to take a reading. How to upgrade your HH2 Support for SM300 is provided in version 2.5 of the HH2 firmware and version 2.5 of the PC software HH2Read. Older versions of the HH2 Moisture Meter can be upgraded to work with the SM300 –...
- Page 7 To check which version of HH2Read that you currently have, run HH2Read on your PC and select Help, About. To check which version of firmware in the HH2 connect it to your PC via e.g. COM1 and select the Version button in HH2Read Upgrade Options Complete upgrade.
- Page 8 Press Read to take a reading. How to upgrade your HH2 Support for SM150 is provided in version 2.6 of the HH2 firmware and version 2.6 of the PC software HH2Read. Older versions of the HH2 Moisture Meter can be upgraded to work with the SM150 –...
- Page 9 To check which version of HH2Read that you currently have, run HH2Read on your PC and select Help, About. To check which version of firmware in the HH2 connect it to your PC via e.g. COM1 and select the Version button in HH2Read Upgrade Options Complete upgrade.
-
Page 10: Table Of Contents
Contents Quick Start! Introduction to the Moisture Meter Navigating Options and Readings SM200 and ThetaProbes Profile Probes WET Sensor Equitensiometers Memory use PC Software - HH2Read Dataset Import Wizard CSV Data File Layout About Soil Parameters a0 & a1 Linearisation Tables Format Changing the Battery Care and Maintenance Technical Reference... -
Page 11: Table Of Contents
Unpack - see page 6. Connect the battery or press Esc to wake the Moisture Meter if it is asleep. Connect the sensor. The HH2 will assume it is an ML2 ThetaProbe in mineral soil unless you tell it otherwise. Ignore that for now! Put the sensor in soil and press Read to read and display a result. -
Page 12: Introduction To The Moisture Meter
Introduction to the Moisture Meter Description The Moisture Meter reads and stores measurements taken with the following Delta-T soil moisture sensors: ThetaProbe, types ML2, ML2x & ML1 SM200 soil moisture sensors Profile Probe, types PR2 and PR1 Equitensiometer, type EQ2... - Page 13 25-way D socket DSK1 25 way D Socket Kit for user to solder onto sensors with bare wires to connect to HH2. Spares Kit HH2-SPK Set of Spares for HH2 6 Introduction to the Moisture Meter Moisture Meter User Manual 4.0...
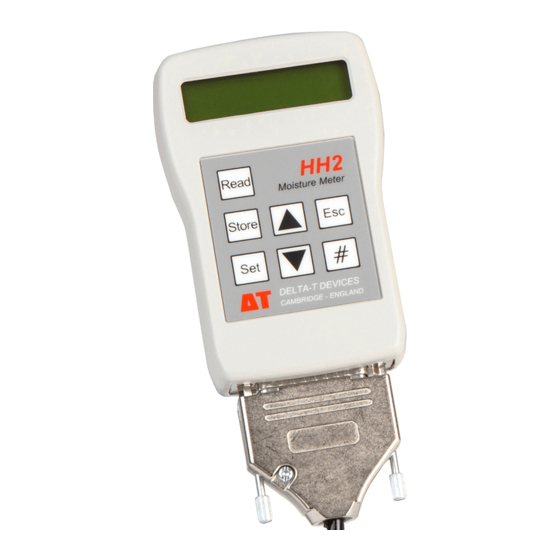
- Page 14 Moisture Meter Parts LCD with 2 rows of 16 characters - used to display menus and readings Keypad Read take readings Store save reading select menu or select option wake meter or reject option & go back ▲▼ scroll average Splash proof case 25-pin D Connector for sensor connection or PC connection...
- Page 15 The display will go blank and the meter will power down to reduce its power consumption. To make the HH2 sleep, press Esc once to return to the banner "Delta-T Devices Moisture Meter" then press Esc one more time to make it sleep.
-
Page 16: Navigating Options And Readings
Navigating Options and Readings Press Esc to wake the HH2 and examine the Navigation Map overleaf. There are two main routes - round the Read Cycle, and down (and up) the Options Menus. Individual options or values are set at the bottom level of each menu path. - Page 17 10 Navigating Options and Readings Moisture Meter User Manual 4.0...
- Page 18 WET users have a choice of standard soil types and, if purchased pre-installed in the HH2, custom calibrations for specific commercial artificial soils such as stone wool. If you want mm deficit you MUST define the Field Capacity and Root Depth for each soil type.
- Page 19 You can set the clock from the PC or from the keypad of the Moisture Meter. To set the time in the HH2 to that of your PC use the Settings, Clock command in the HH2Read application, (see page 64). Alternatively you can set the clock from the keypad.
- Page 20 Note that the date - month - year order will be set to reflect that on your PC the first time you use the Settings, Clock option in the Data Collection software HH2Read on your PC. Use the up and down keys to change the first field and press Set to accept it. ...
- Page 21 It is useful for immediate feedback in the field, particularly if you don’t want to save data to your PC and analyse it later. The HH2 provides a single, cumulative average of selected readings. The average cannot be uploaded to your PC.
- Page 22 Write them down if you want a permanent record. To erase the current cumulative average press Esc until you return to the main “Delta-T Devices” menu. After each reading, to store the reading use Store. To ignore it press Esc. (Neither choice affects the average) To add a displayed reading to the cumulative average press the # key twice.
- Page 23 You will always be asked if you want to store each reading. This applies even if you just want the average. Note: You cannot take a new reading until you have decided whether or not to store the current one. Your running average will not update if your last reading was outside limits, e.g.
-
Page 24: Sm200 And Thetaprobes
This is a dimensionless parameter, expressed either as a percentage (%vol), or a ratio (m If you tell the HH2 the Root-Depth and Field Capacity for a given soil it can also display water deficit in mm (see "Water Deficit Explained" on page 103). - Page 25 18 SM200 and ThetaProbes Moisture Meter User Manual 4.0...
- Page 26 Quick Start On first configuring the HH2 for use with a ThetaProbe: Select Options, Device, SM200, ML2 or ML1. Select a soil type or the generic mineral soil calibration will be used. Connect the device and press Read and Store to take and save a reading.
- Page 27 Data Select Options, Data to see this menu. Plot ID You can label each reading with a Plot ID. Options - A to Z. Default: A. Select Options, Data, Plot ID. Scroll through the options, and press Set to select one. Press Esc to return to the main menu.
- Page 28 Options: Mineral, Organic, Soil 1, Soil 2,...Soil 5 Default: Mineral. Two factory set soil types are installed in the HH2, Mineral and Organic. You may also define your own via the Soil Set-Up option on the main menu. Up to five custom soil types can be stored in the HH2.
- Page 29 Soil moisture deficit in mm + mV Sensor output in milliVolts. Warning: Use of the HH2 default value for Field Capacity may not give meaningful results because it may not represent a common soil type. Select the Options, Display menu.
- Page 30 Batt: shows remaining battery life. Readings# : shows number of readings in HH2 memory. Version This shows the version number of the HH2 firmware, i.e. the embedded control program, and also of any installed sensor and soil tables. Remote Select Options, Remote to connect to the PC.
- Page 31 SM200 and ThetaProbe Options Summary Menu Actions, Notes, (factory default values in bold) Data Sets Plot Label, A..Z Plot Id Sets Sample Number, 1..2000 Sample Sets Device ID, 0..255 Device Id Rooting Depth, 0..9950mm Root Depth Sets Sensor Depth, 0..9999mm Sensor Depth No (cancels the action), Yes (erases all readings stored Erase...
- Page 32 Set the Sample number (optional, it auto increments). Set the Display. Set the Date and Time if you have not done so for a few weeks. Connect the HH2 to the sensor. To take Readings Press Read If successful the meter displays the reading, e.g.- Store? 32.2%vol...
- Page 33 Having got your readings safely stored on your PC, what do you do with the results? The .CSV files can be opened in Microsoft Excel for analysis and graphing. A Dataset Import Wizard is provided with HH2 Read to help you Import saved data files into Excel in a much more controlled and organised way.
-
Page 34: Profile Probes
Profile Probe types measure the volumetric soil moisture content at 4 or 6 locations in the soil profile simultaneously. Soil moisture deficit can be displayed on the HH2 if the Field Capacity and Root Depth are known. Up to 1800 sets of readings can be stored from a Profile Probe. The actual number depends on which options you choose. - Page 35 28 Profile Probes Moisture Meter User Manual 4.0...
- Page 36 Quick Start On first configuring the HH2 for use with a Profile Probe:- select Options, Device, PR2, PR1 or PR-Special. Select a soil type or the generic mineral soil calibration will be used. Connect the device and press Read and Store to take and save a reading.
- Page 37 Data Select Options, Data to see this menu. Plot ID You can label each reading with a Plot ID. Options - A to Z. Default: A. Select Options, Data, Plot ID. Scroll through the options, and press Set to select one. Press Esc to return to the main menu.
- Page 38 Soil Type (first menu) Displays a choice of sensors for associating with a soil type in the next sub-menu. Options : All Sensors, Sensor 1, Sensor 2,..Sensor 6 Default: All Sensors Each sensor in a Profile Probe can have a different soil type associated with it. You may choose to set all sensors to the same soil, or individually set each one.
- Page 39 Soil Set-Up (sub-menu) Displays available soil parameters that may be defined. a0 & a1 These options are available for user-defined soils only, not Mineral or Organic Options: a0 Range: -49.9 to +50.0 Default: 1.0 a1 Range: 0.1 to 50.0 Default: 7.0 Previously you should have selected a custom soil name from the Options, Soil Set- Up menu.
- Page 40 + mV Sensor output in milliVolts Warning: Use of the HH2 default value for Field Capacity may not give meaningful results because it may not represent a common soil type. You must also enter a Root Depth or the result will be zero.
- Page 41 Batt: shows remaining battery life. Readings# : shows number of readings in HH2 memory. Version This shows the version number of the HH2 firmware, i.e. the embedded control program, and also of any installed sensor and soil tables. Remote Select Options, Remote to connect to the PC.
- Page 42 Profile Probe Options Summary Menu Actions, Notes(factory default values in bold) Data Sets Plot Label, A..Z Plot Id Sample Sets Sample Number, 1..2000 Sets Device ID, 0..255 Device Id Sets Rooting Depth, 0..9950mm Root Depth Erase No (cancels the action), Yes (erases all readings stored in memory) Device Selects the device for subsequent readings.
- Page 43 Set the Clock if you have not done so for a few weeks. Select the Plot and Device IDs (optional). Set the Sample number (optional, it auto increments). Connect the HH2 to the Profile Probe. To take Readings Press Read.
- Page 44 The Store option becomes unavailable when memory is full (or corrupted). In this case upload the readings to your PC using HH2Read Retrieve, then, using Options, Data, Erase (via the keypad), delete the readings in the HH2. See also : Memory use on page 58.
- Page 45 38 Profile Probes Moisture Meter User Manual 4.0...
-
Page 46: Wet Sensor
σ or EC ) and Temperature. From these, and with the use of specific soil calibration tables and equations, the HH2 calculates volumetric soil moisture θ, and pore water conductivity σ or EC The WET sensor is used in precision horticulture and soil science research and is usable in both soils and a variety of artificial growing substrates, such as rock wool. - Page 47 WAKE Select the item Delta-T Devices Read 47.5% Moisture Meter SLEEP Wake or Sleep Escape to the previous Store higher menu Previous, current Average 47.5% Scroll or Read change value Options Data Device Soil Type Soil Set-up Units Display Compensation...
- Page 48 Quick Start On first configuring the HH2 for use with a WET Sensor- install the sensor calibration into the HH2 via your PC using HH2Read. Select Options, Device, WET. Connect the device, press Read and Store to take and save a reading.
- Page 49 Data Menu Select Options, Data to see this menu. Plot ID You can label each reading with a Plot ID. Options: - A to Z. Default: A. Select Options, Data, Plot ID. Scroll through the options, and press Set to select one. Press Esc to return to the main menu.
- Page 50 WET sensors require a soil type to be selected, because the soil moisture calculation uses a soil-specific calibration table. Tables for the standard soils listed below are pre- installed in the HH2. You can install 5 custom tables using your own soil calibration data if you have any.
- Page 51 Units Conductivity and water content readings can be displayed in a range of units. Conductivity Options: mS.m , mS.cm , µS.cm Select Options, Units, Conductivity. Scroll to your option and press Set. Water Content Options : m , %vol. Select Options, Units, Water Content Scroll to your option and press Set.
- Page 52 For some applications it is useful to know the true electrical conductivity at the measurement temperature. In that case uncompensated readings are required, and this is the default for the HH2. For most applications the electrical conductivity is a means of estimating the ionic content of the pore water, and for these applications it is necessary to compare readings after they have been adjusted to a standard temperature.
- Page 53 Batt: shows remaining battery life. Readings# : shows number of readings in HH2 memory. Version This shows the version number of the HH2 firmware, i.e. the embedded control program, and also of any installed sensor and soil tables. Remote Select Options, Remote to connect to the PC.
- Page 54 WET Options Summary Menu Actions, Notes, (factory default values in bold) Data Plot Id Sets Plot Label, A..Z Sample Sets Sample Number, 1..2000 Device Id Sets Device ID, 0..255 Sets Rooting Depth, 0..9950mm Root Depth Sensor Depth Sets Sensor Depth, 0..9999mm Erase No (cancels the action), Yes (erases all stored readings) Device...
- Page 55 Reading the WET Sensor Before Taking Readings Check the following. Install your WET sensor calibration table in the HH2 using HH2Read. Set the Device type to WET. Select the Plot ID, Device ID, Root Depth and Sensor Depth (all optional).
- Page 56 Having got your readings safely stored on your PC, what do you do with the results? The .CSV files can be Opened in Microsoft Excel for analysis and graphing. A Dataset Import Wizard is provided with HH2 Read to help you Import data files into Excel in a much more controlled and organised way.
- Page 57 50 WET Sensor Moisture Meter User Manual 4.0...
-
Page 58: Equitensiometers
This is an important indication of plant water stress. See also the Glossary. Equitensiometer readings are normally given in kPa, but the HH2 only displays the output in mV. Once readings are uploaded to your PC you may derive the soil matric potential (in kPa) using the unique linearisation table supplied with each sensor, as described in its User Manual. - Page 59 52 Equitensiometers Moisture Meter User Manual 4.0...
- Page 60 Scroll down to EQ2 using the up and down keys and press Set. Device EQ2 Press Esc to return to the start-up screen or last reading. The selected EQ2 should now appear on the start-up screen, and re-appear at start- up when the HH2 awakes after sleeping. Equitensiometers 53...
- Page 61 Data Menu Select Options, Data to see this menu. Plot ID You can label each reading with a Plot ID. Options: - A to Z. Default: A. Select Options, Data, Plot ID. Scroll through the options, and press Set to select one. Press Esc to return to the main menu.
- Page 62 Notes Date order format is automatically set by your PC when you set the time using the data collection software HH2Read. The HH2 reverts to the default values if power is lost for more than 30 seconds. Equitensiometers 55...
- Page 63 The Store option becomes unavailable when memory is full (or corrupted). In this case upload the readings to your PC using HH2Read, then, using Options, Data, Erase (via the keypad), delete the readings in the HH2. See also: Available memory on page 63.
- Page 64 Some users send their data to a commercial irrigation management firm for interpretation, or they use a commercial irrigation database management package such as Probe for Windows (see http://www.rsne.com.au/prwin/pr1.htm). Contact Delta-T for the latest information on compatible irrigation management and graphing solutions. Equitensiometers 57...
-
Page 65: Memory Use
Memory use Stored readings To see the number of readings taken and memory used, select Options, Status, Resources. The number of readings you can save depends on what device and what menu options you select and how often you change them. How Many Readings Can I Take? The number of readings depends on how much information you change each time you take a reading, on which device you are using, and on how many different... - Page 66 How do I erase readings? The readings stored in the HH2 should be erased once you have successfully uploaded them to your PC. The data is erased via the keypad, not from the PC. Select Options, Data, Erase. The default setting is No. Scroll up for Yes and press Set.
-
Page 67: Pc Software - Hh2Read
PC Software - HH2Read Introduction Use HH2Read to collect data from your HH2 Moisture Meter. Readings are saved to a file on your PC, in a comma separated format. This can be viewed and graphed by loading it into Excel or similar spreadsheet packages. - Page 68 (If your PC does not have a COM port with a 9-way D connector, purchase a USB- RS232 adapter and install it on your PC). Select Remote from the HH2 Options menu. The HH2 should display "Connecting to PC" Run HH2Read on your PC.
- Page 69 Whenever you send a request for information to the HH2 Moisture Meter it is also asked to report its internal clock. Initially the clock display appears blank. When the HH2 has finished dealing with the original request, the date and time...
- Page 70 Note: Equitensiometers do not have a table. If your table is faulty the HH2 will replace it with the default table. See Linearisation Tables Format, page 76, for guidance on correcting faulty tables. PC Software - HH2Read 63...
-
Page 71: Settings Menu
Settings Menu This menu allows you to select the COM port (1 or 2) and to set the clock. COM1 and COM2 Use the Settings, COM1 or COM2 command to identify the serial communications port of your PC. This requires a 9-pin D connector at the back of your PC for your RS232 cable. - Page 72 The date selection calendar Select the desired date using your mouse, and also, or alternatively, use the left, right, up and down keys. Either click on a date with the mouse or highlight it with the arrow keys and press return.
-
Page 73: Tools Menu
Linearisation tables for all these devices are permanently installed in the HH2 microprocessor. These are not lost in the event of battery failure. Only install new tables to the HH2 if you wish to replace the default tables by your own custom tables - e.g. for unusual soils. -
Page 74: Help Menu
Open dialog. 3. Select the required table e.g.WET201023.Cal. Once the sensor calibration is installed, the HH2 will be able to display readings - providing the device is selected from the keypad (e.g. using Options, Device, WET). Note: WET sensor calibrations cannot be altered by the user. -
Page 75: Dataset Import Wizard
Dataset Import Wizard This PC program assists importing saved datasets into Microsoft Excel. It is good for quick graphs, and for managing large amounts of data. It is not an irrigation management program, but if you are comfortable with Excel you can do quite a lot with it. - Page 76 HH2. The wizard can import data directly from DL2e, data loggers, but will not directly import data from the HH2. (Use HH2Read, Retrieve to save the data as a .CSV file on your PC first, and import that.)
-
Page 77: Csv Data File Layout
CSV Data File Layout The following shows a sample of the data from an HH2 Moisture Meter, saved as a .CSV file using HH2Read, Retrieve, and opened in Microsoft Excel using the File, Open command. The values here are not representative of expected soil moisture values. - Page 78 Data File : Part 1 - Header Delta-T Devices. HH2 Data Record Versions: PC Software: 2.1 HH2 Firmware: 2.3 Table >> PR1 2.0 PR-SPECIAL SM200 1.2 Ready Ready Ready Ready Ready Ready Units >> Sq.Rt.E Sq.Rt.E Sq.Rt.E Sq.Rt.E Sq.Rt.E Sq.Rt.E 1.02...
- Page 79 Data File : Part 2 - Meter Settings and Readings Soil >> Organic Mineral Soil 1 Soil 2 Soil 3 Soil 4 Soil 5 >> >> Field Capacity 0.38 0.38 0.38 0.38 0.38 0.38 0.38 Device >> Root Depth >> Sensor Depth >>...
- Page 80 Below: typical layout if you import the .CSV data file using the Dataset Import Wizard (File, Import Datasets command). Note the changes in how the various HH2 Options have been displayed. The Plot ID, in this example- "A" is added to the labels in the first row.
-
Page 81: About Soil Parameters A0 & A1
θ × About a0 and a1 These soil specific parameters are unique for each soil type. They are used with a linearisation table, in the HH2, to convert the sensor output, in mV, into soil moisture readings. Sensor Type vε... - Page 82 For optimum accuracy you should obtain these parameters, a0 and a1, experimentally for your soil as described in your sensor user manual. Then enter these via the Soil Set-Up menu in the HH2. Using Default values of a0 & a1 Alternatively you can choose the Mineral or Organic option in the Soil Types sub menu.
-
Page 83: Linearisation Tables Format
Linearisation Tables Format .LIN File Format The HH2 linearisation table for SM200, ML1, ML2, PR1 or PR2 devices may be changed by loading a ".lin" format file from the PC using HH2Read. This facility is provided to enable Delta-T to provide updates to linearisation tables for these devices. - Page 84 0000,000.000 0000,000.000 0000,000.000 The HH2 contains factory set linearisation tables. You can upgrade or change these tables with .LIN files using HH2Read. If the meter should lose power, then the memory containing readings and these new tables will be lost and replaced by the factory set tables. In that case you will have to reload any newer tables.
-
Page 85: Changing The Battery
(provided that you do disconnect your sensor and you do not disconnect your battery). If you continue to use the HH2 despite the low battery warning it will eventually stop working in order to protect saved readings. At this point it will not upload data to the PC. - Page 86 To Replace the Battery When the HH2 reaches its low point, then you will have to replace the battery. To do so, unclip the back panel by pressing downwards on the clip at the rear. You will find the connector as shown above. It can only be fitted one way.
- Page 87 WARNING: when the meter measures the battery voltage, power will be applied to any attached device. Soil moisture devices supplied for use with the HH2 by Delta-T are unaffected by this. No support for non- Delta-T Devices is implied by this statement.
-
Page 88: Care And Maintenance
The HH2 is poorly protected against water ingress. If the meter is partially or wholly immersed in water or is used in heavy rain, then the unit will fill with water. If water gets inside the unit, then there may be non-repairable damage with the loss of all readings recorded. -
Page 89: Technical Reference
Technical Reference Specifications Soil moisture range Zero to saturation, 0 to 1500 mV Measurement ± (0.13% of mV reading + 1.0mV) Accuracy Resolution 1 mV Memory Up to 5000 readings, see table - Maximum Number of Readings on page 83 Battery 9V Alkaline Cell(PP3) Battery Life... - Page 90 Memory Maximum Number of Readings Worst case Best case PR2/6 SM200, ML1,ML2, 2186 EQ1,EQ2 1272 Worst Case: Every possible configuration changes per reading. Best Case: The soil configurations, and sample configurations remain static for every reading. Note: These figures may be out by 1 or 2 readings Technical Reference ...
- Page 91 RS232 cable) or to a sensor. The following diagram indicates which of the pins on the D-connector are used for which function. The HH2 has been designed to avoid sharing pins for the sensor and PC connections to prevent accidental damage to attached equipment.
- Page 92 EMC Certificate Technical Reference 85...
-
Page 93: Troubleshooting
(and are wired straight through). WET sensor will not read (Common with WET kit users) The HH2 battery runs low and when it is changed, it is no longer possible to read the WET sensor. This can occur if the HH2 has resets itself. - Page 94 HH2 has detected an error condition with some of the readings. Unfortunately if this has happened the readings can no longer be accessed and the only way to restore the HH2 will be to cold boot it. Note: readings will be lost.
- Page 95 If using a converter, then check that it is not damaged. If you have spare converters then try one of those. If you have fitted a connector to the device yourself using the Delta-T adapter kit (type DSK1) then check that the wiring has been correctly applied and that the wiring connections are good with no interference from other connectors, for example solder applied to one wire may be touching another.
- Page 96 This does not fix the problem, but at least it allows you to recover the good data. If faulty sensors exist and are all lowest in the PR2 then the HH2 will use the lowest good sensor and extrapolate down to the Root Depth to calculate mm deficit.
- Page 97 Zero mm Deficit The default root depth in the HH2 is zero. If you do not enter a root depth for your soil you will get zero for mm deficit. Do not assume that the default values for Field Capacity pre-set in the HH2 will give reliable results for your particular soil.
- Page 98 You might also want to delete the old one. ) Alternatively, in the Add-ins dialog, click Browse and select the new version of DtImpWiz.xll - you will find it in Program Files\Common Files\Delta-T. 5. Finally, in Windows Explorer again, locate the renamed file DtImpWiz.xl$ and restore its original name DtImpWiz.xll.
-
Page 99: Error Messages
Errors detected by the PC software HH2Read are reported immediately on your PC screen. The HH2 display normally shows the reading and its units. If an error occurs during a reading, the HH2 display shows an error message. If you press Store an error code is saved with the reading. - Page 100 See also: Readings can't be stored on page 89. Live Sensor Connected The HH2 cannot sleep. A sensor may be connected to one of the analogue inputs which is feeding a live voltage to the HH2. The sensor should be disconnected from the unit to allow it to go to sleep.
- Page 101 “No Table” is displayed. Over-range The sampled voltage value was higher than the HH2 can handle, or the resultant soil moisture value was calculated to be greater than 1. As soil moisture is a ratio, this is reported as too high.
- Page 102 Under-range The sampled voltage value was lower than the HH2 can handle, or the resultant soil moisture value was calculated to be negative. As soil moisture is a ratio, this is reported as too low. Technical Reference 95...
-
Page 103: Warranty And Service
Delta-T shall not be liable to the buyer by reason of any delay or failure to perform our obligations in relation to the goods and/or services, if the delay or failure was due to any cause beyond the Delta-T’s reasonable control. -
Page 104: Technical Support
No goods or equipment should be returned to Delta-T without first obtaining the agreement of Delta-T or our distributor. On receipt at Delta-T, the goods will be inspected and the user informed of the likely cost and delay. We normally expect to complete repairs within a few working days of receiving the equipment. -
Page 105: Accessories
Equitensiometer type EQ2/t. Provides socket for sensor IP68 Tajimi plug. PR2 to HH2 cable 1.5 m cable connects PR2 Profile Probe to HH2 Moisture Meter, Type PRC/d-HH2. IP68 M12 connector (female) to 25-way D-socket (IP54). See also Unpacking on page 6. - Page 106 Probe or ThetaProbe, type ML2 or ML1. It forms a waterproof (IP67) connector for use with the Moisture Meter, type HH2. Note: PR2 Profile Probes users converting from loggers to an HH2 should use the special PR2 to HH2 cable type PRC/d-HH2, not this D connector socket kit.
- Page 107 35mm with heat shrink: 40mm without outer sleeve or >8mm diameter. screen bare Wire Preparation Thread the cable through the hood body, (complete with back & grommet). You can’t do this after soldering on the D socket! Strip away the cable sheath & screen, taking care not to damage the insulation of the individual wires (or cut back the wires, if already stripped) to give 40mm free wire length.
- Page 108 1. Push the two D locking screws into the hood body, either side of the connector recess. They can be used to hold this socket to the HH2 plug. 2. Fit the cable clamp to grip the protruding cable sheath for the PR1 or the end of the heat shrink for ML1 or ML2.
- Page 109 The connector should now be ready to connect to the Moisture Meter. If assembled as above, the connector should be waterproof, so it can be left outdoors. Avoid long-term exposure of the DSK1 to bright sunlight, as it may eventually degrade the hood plastic.
-
Page 110: Water Deficit Explained
Water Deficit Explained Saturation is the moisture content at which all the air within the pores has been replaced by water. It’s not a stable situation because the water will immediately start to drain through. It’s a property of soil type only. Field Water Capacity Field Capacity ) is the moisture content obtained... - Page 111 Available Water Capacity is the difference between Field Capacity and Wilting Point. Water Deficit is the amount of irrigation water or rainfall (mm) that has to be added to a soil profile in order to bring it back up to field capacity. The size of the water deficit will depend on the depth of the soil profile that it relates to (usually taken as some function of the crop rooting depth).
- Page 112 Water Deficit Calculation for Profile Probes For a Profile Probe, water deficit is the sum of water deficits calculated for each sensor included within the rooting depth: D = (FWC - VWC ) * d .. + (FWC – VWC ) * (d –...
-
Page 113: Field Water Capacity Values
Field Water Capacity Values Field Water Capacity values are given for several soil types. These values can be entered in the ‘Field Capacity’ option of the Data menu. This is needed if you want the meter to display mm deficit. You will also need to enter a value for Root Depth. - Page 114 Identifying Soil Types Adapted by courtesy of the U.K. Ministry of Agriculture, Food and Fisheries. Does soil stain the Is the soil mostly rough fingers Sand and gritty? Loamy sand Is it difficult to roll the soil into a ball? Sandy loam Does soil feel smooth and silky...
- Page 115 Calculating Field Capacity There are two methods for estimating Field Capacity: Interpretation of field measurements Laboratory measurements Field Measurements To determine a field’s natural capacity, it is necessary to collect a series of soil moisture profile readings before, during and after a thorough wetting-up of the soil. Unless time is of the essence, this is best done by a heavy, prolonged rainfall or by a complete field irrigation .
- Page 116 For the lower soil profiles the interpretation is often not so clear, because the rate of infiltration from the soil profile directly above may not be great enough to cause field capacity to be exceeded. In that case, use the maximum soil moisture level encountered as an estimate of the Field Capacity.
- Page 117 Available Field Water Capacity Available Water Capacity is the difference between Field Capacity and Wilting Point. Available Water % by Volume (mm/100 mm depth) Topsoil SubSoil Sand Loamy sand Sandy loam Sandy silt loam Silt loam Clay loam Sandy clay loam Silty clay loam Caly Sandy clay loam...
- Page 118 Finding the Refill Point The following is reproduced by courtesy of Research Services New England. Refill Point Water (%Vol) REFILL Parallel Lines FULL Extraction 1000 1200 When the moisture content is maintained in the "optimum zone" the drying cycle line on a graph of depth vs.
-
Page 119: Glossary
Equitensiometer. The HH2 Moisture Meter only reads Equitensiometers in raw mV. Each Equitensiometer linearisation table is unique. These are not stored in the HH2 in order to save memory. - Page 120 Engineering Units These are the units of measurement of the reading shown on the display of the HH2. The units available depend on the sensing device. Options: mV, percentage of soil water by volume (%Vol), cubic metres of water per cubic meter of soil (m3.m-3), and mm deficit.
- Page 121 Sample Number A number between 1 and 2000. This will default to 1 when the meter is reset or all readings are erased, but the user is able to modify this number at any time. The sample number is recorded with the next reading to be recorded (not the last reading recorded).
-
Page 122: Index
Field Capacity, 22, 32, 108 Field Water Capacity, 103 Field Water Capacity Values, 106 battery, 6, 78 Battery, 63, 78 Changing, 78 Battery Change, 94 HH2, 6 Battery Low, 93 HH2BAT, 6 HH2Read, 60 HHRS2, 6 C-HH2, 6 C-HH2-DIN, 6... - Page 123 Readings Format, 70 Linearisation Table, 77 Readings can't be stored, 89 Linearisation Table Corruption, 93 Readings Corrupt, 87, 94 Linearisation Tables Format, 76 Refill Point, 111 Live Sensor, 93 Remote Link, 61 Ls2Win, 70, 91 RS232, 84 Maintenance, 81 Saturation, 103 memory, 58 Service, 81 Memory, 83...
- Page 124 WET Options Summary, 47 WET sensor, 86 Version, 61 WET sensor error, 86 WET Sensors, 39 Wilting Point, 103 Warranty and Service, 96 Water Deficit, 43, 103, 104 Water Deficit Calculation for Profile Zero Readings, 88 Probes, 105 Index 117...
Need help?
Do you have a question about the HH2 and is the answer not in the manual?
Questions and answers