Table of Contents
Advertisement
Electrochemical Ammonia (NH
) Leak Detector
3
EC-FX-NH3
Instruction and Installation Manual
Part No. 1998M0872
Revision 1
June 2014
Honeywell Confidential & Proprietary This work contains valuable, confidential, and proprietary information.
Disclosure, use or reproduction outside of Honeywell Inc. is prohibited except as authorized in writing. This
unpublished work is protected by the laws of the United States and other countries.
Advertisement
Table of Contents
Troubleshooting

Related Manuals for Honeywell EC-FX-NH3


Summary of Contents for Honeywell EC-FX-NH3
- Page 1 Honeywell Confidential & Proprietary This work contains valuable, confidential, and proprietary information. Disclosure, use or reproduction outside of Honeywell Inc. is prohibited except as authorized in writing. This unpublished work is protected by the laws of the United States and other countries.
-
Page 3: Table Of Contents
Symbol Definitions ....................5 Introduction ......................6 System Description ....................7 Specifications .................... 7 Installation ......................9 Locating the EC-FX-NH3 Sensor ............9 Wiring ................... 11 Outputs: ..................13 Cable Recommendation: .............. 14 Operation ......................16 Start-up Procedures ..............16 Simple Start-Up Test: .............. -
Page 4: Figures
Figure 2. 4/20 mA Output Wiring Diagram ..........13 Figure 3. RS-485 Communication and Power Wiring Diagram....15 Figure 4. LED Blink Sequence ..............17 Figure 5. EC-FX-NH3 Detector Components ..........18 Figure 6. LED Sequence Indicator and Operation Summary ...... 19 Figure 7. LCD Module................27... -
Page 5: Notices And Trademarks
Notices and Trademarks © 2014 by Honeywell International Inc. While this information is presented in good faith and believed to be accurate, Honeywell disclaims the implied warranties of merchantability and fitness for a particular purpose and makes no express warranties except as may be stated in its written agreement with and for its customers. -
Page 6: Contact Us
Online Honeywell Organization WWW Address (URL) Corporate www.honeywell.com Honeywell Analytics www.honeywellanalytics.com To return a product, contact haservice.canada@honeywell.com to obtain an RMA number. For sales Information, contact detectgas@honeywell.com. Telephone Contact us by telephone at the numbers listed below. Organization Phone Number 1-800-538-0363 Honeywell Analytics Inc. -
Page 7: Symbol Definitions
OPERATOR MANUAL Symbol Definitions The following table lists those symbols used in this document to denote certain conditions. Symbol Definition ATTENTION: Identifies information that requires special consideration. TIP: Identifies advice or hints for the user, often in terms of performing a task. REFERENCE-EXTERNAL: Identifies an additional source of information outside of this bookset. -
Page 8: Introduction
Warranties made by Honeywell Analytics with respect to this equipment will be voided if the equipment is not used and serviced in accordance with the instructions in this manual. If in doubt about a procedure, please contact... -
Page 9: System Description
OPERATOR MANUAL System Description The EC-FX-NH3 leak detector is a three-wire 4/20 mA transmitter/sensor with RS-485 Modbus RTU communication. It is designed for low-level ammonia detection in industrial refrigeration, cold-storage environments, and engine rooms. The detector exhibits excellent durability and precision, with negligible response to common interference gases and changes in relative humidity. - Page 10 Due to variables such as sensor current draw, line loss, and cable size, contact Honeywell Analytics for help with power requirements. Gas Sampling: Diffusion method is standard.
-
Page 11: Installation
OPERATOR MANUAL Installation Locating the EC-FX-NH3 Sensor Because each sensor is a point measurement, it is very important that the sensor be located properly. One of the most important considerations when installing EC sensors is that they must be easily accessible for calibration and maintenance. -
Page 12: Figure 1. Mounting Dimensions
OPERATOR MANUAL Figure 1. Mounting Dimensions • Sensor must be mounted vertically. • Never mount flat on a ceiling. • Enter enclosure only through existing hole in bottom. • Always make a drip loop in the conduit (see Figure 1). Blast Freezers: Never mount sensor above the coil. -
Page 13: Wiring
NEVER mount the sensor on evaporators as vibration can damage the sensor. Other Locations: When mounting Sensors in locations such as roof top air units, duct- work, attic spaces, makeup air intakes, etc., contact Honeywell Analytics for application assistance and recommendations. Wiring... - Page 14 Refer to the controller manual for specific wiring details. When many sensors are connected to one set of power cables, total current draw may exceed cable recommendations and/or cause considerable line-loss. Contact Honeywell Analytics for recommendations on power cable sizing and additional power supplies.
-
Page 15: Outputs
400 mA max. Respect minimum voltage requirements. Outputs: ATTENTION: The EC-FX-NH3 detector is shipped with a 100 ohm, 1/4 watt resistor in the green, four position terminal block, across the Signal and Ground terminals (see Figure 3). This resistor is needed to “fake out”... -
Page 16: Cable Recommendation
Due to variables such as sensor current draw, line loss, and cable size, contact Honeywell Analytics for help with power cable requirements. Monitoring: The EC-FX-NH3 ammonia detector may be monitored by the GM- JR, AirAlert 96d, or other appropriately configured system. For 4/20 output, monitoring equipment must be configured to indicate a fault if the signal is below 1.5 mA. -
Page 17: Figure 3. Rs-485 Communication And Power Wiring Diagram
OPERATOR MANUAL Figure 3. RS-485 Communication and Power Wiring Diagram... -
Page 18: Operation
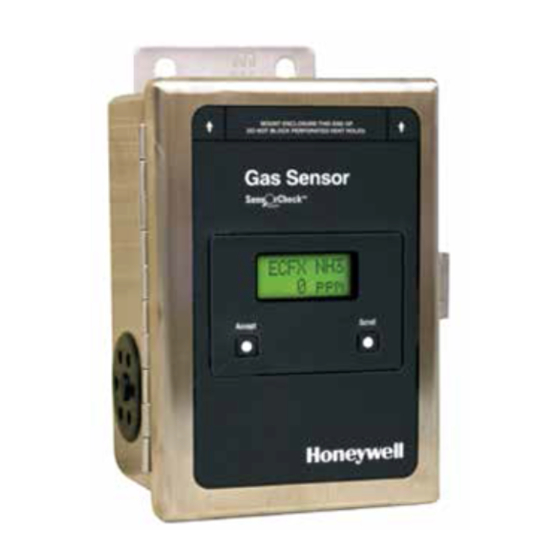
Pushbutton Operation and LED Indicators The EC-FX-NH3 has an internal pushbutton that is utilized for navigation of test functions and operating modes (see Figure 5, Note 5). It also has a group of LEDs (green, red, yellow — see Figure 3 on page 15) that blink in specific sequences to indicate sensor operation modes. -
Page 19: Green Led
0.5 mA fault signal is output from the sensor. All other functions and devices would be inoperable (optional LCD, network, pushbuttons, etc.). Contact Honeywell Analytics for technical support. Slow Blink — Near death, possible dried up or disconnected sensor. A 0.5 mA fault signal is output from the sensor during this error event. -
Page 20: Green - On, Red - Fast Blink, Yellow - Fast Blink
4/20 mA loop test failed the 22 mA high extremity. Check output impedance and ensure it is between 10Ω and 700Ω referenced to ground. In addition, ensure power supply voltage is within specified operating range. Figure 5. EC-FX-NH3 Detector Components... -
Page 21: Figure 6. Led Sequence Indicator And Operation Summary
OPERATOR MANUAL Figure 6. LED Sequence Indicator and Operation Summary Mode Green LED (Left) Red LED (Center) Yellow LED (Right) Note Normal Run Mode During Span Calibration Mode During Simple Zero Test Manual SensorCheck Weak Sensor Failed or Disconnected Sensor Hardware failure During 4/20 mA... -
Page 22: Sensorcheck Tm
OPERATOR MANUAL SensorCheck SensorCheck is a microprocessor-based technology that monitors and predicts the electrical viability of its electrochemical and infrared ammonia sensors by testing every 24 hours. If the sensor becomes depleted or is disconnected, SensorCheck sends an indication that can be detected by a gas detector or PLC. -
Page 23: 4/20 Ma Loop Test
Medium blink PLC and monitoring equipment should indicate Fault at this extremely low signal output, (i.e., Honeywell Analytics recommends fault indication on any signal below 1.5 mA.) Exit: Press and hold button for one second. Sensor will exit test and return to normal operation. -
Page 24: Simple Zero Test
Observe the 4/20 mA signal which should be approximately 4.0 mA (40 mV on meter). Range should be 39.4 to 40.6 mV. If sensor output is not in this range, contact Honeywell Analytics. • Plug sensor back into pre-amp. Wait for sensor to stabilize at approximately 4.0 mA. -
Page 25: Span Calibration
OPERATOR MANUAL The EC-FX-NH3 detector is factory calibrated but it must also be calibrated at start-up. The sensor performs best when calibrated in the environment in which it will be used. Using calibration gas other than the recommended full scale will affect the stated accuracy. One pot on the preamp is used for Span calibration (see Figure 4, Note 1). - Page 26 20 mA ±0.5 mA even though the signal may begin to drop slowly. NOTE: For an EC-FX-NH3 detector with the LCD option, once cal mode is initiated, “Apply gas” will show on the display.
-
Page 27: Span Signal Formula
OPERATOR MANUAL by pressing the “scroll” then “accept” button. 5. Remove the calibration adaptor and shut off the gas. 6. Ensure that the output decreases to a stable 4 mA ±0.2 mA, this should take about 5 to 15 minutes. NOTE: If the output doesn’t decline to 4mA ±0.2 mA, an internal offset procedure may be necessary. -
Page 28: Modbus Address Change
OPERATOR MANUAL MODBUS Address Change NOTE: To view or change the Modbus address, the Manning LCD Module is required. Contact Honeywell Analytics to obtain the module. NOTE: No two devices on the network can have the same address. Each device needs to have a unique address. -
Page 29: Figure 7. Lcd Module
OPERATOR MANUAL After 5 minutes of inactivity, the LCD returns to normal (idle) operating display. Figure 7. LCD Module... -
Page 30: Troubleshooting
OPERATOR MANUAL Troubleshooting If low-level signals appear to be surfacing occasionally slightly above 4mA, the internal offset setting may be the issue, especially for differences in gain settings that have occurred over time. INTERNAL OFFSET PROCEDURE: 1. Place the EC-FX detector in Cal. Mode. 2. - Page 31 SHLD at the sensor (not touching the metal enclosure) and properly grounded at the readout unit. Interference Gases: The EC-FX-NH3 is designed to be quite specific to ammonia. However, some other gases can affect the reading. Phosphene, methyl mercaptan, and hydrogen can give a slight upscale indication.
-
Page 32: Figure 8. Troubleshooting
OPERATOR MANUAL Figure 8. Troubleshooting... -
Page 33: Maintenance
When the sensor becomes depleted, a replacement sensor can be obtained from Honeywell Analytics. Simply unplug the ribbon cable from the pins labeled Sensor, pull the old sensor from the spring clip, discard the old sensor and replace it with a new one. -
Page 34: Ec Sensor Replacement Procedure
Honeywell Analytics’ recommendation is to check the calibration of all new sensors with certified calibration gas. Follow the procedure in the Calibration section of this manual. Replacement Parts For replacement parts, contact Honeywell Analytics. Be sure to have the model number and serial number of the unit. Calibration parts: EC-FX-CK ECFX cal kit 17/34L .300LPM reg... -
Page 35: Limited Warranty
(“Purchaser”) of the EC-FX-NH3 leak detector (“Product”) that if any part thereof proves to be defective in material or workmanship within two years of the date of shipment by Honeywell Analytics, such defective part will be repaired or replaced, free of charge, at Honeywell Analytics’ discretion if shipped prepaid to Honeywell Analytics at 405 Barclay Blvd., Lincolnshire,... -
Page 36: Limitation Of Liability
OPERATOR MANUAL Limitation of Liability It is understood and agreed that Honeywell Analytics’ liability, whether in contract, in tort, under any warranty, in negligence or otherwise shall not exceed the amount of the purchase price paid by the purchaser for the product and under no circumstances shall Honeywell Analytics be liable for special, indirect, or consequential damages.
Need help?
Do you have a question about the EC-FX-NH3 and is the answer not in the manual?
Questions and answers