Table of Contents
Advertisement
Quick Links
Download this manual
See also:
Instruction Manual
Advertisement
Table of Contents

Related Manuals for Aero Hawk Field Hawk

Summary of Contents for Aero Hawk Field Hawk
- Page 1 Instructions Manual Quick Guide: Field Hawk Refer Questions to Support@Aero-hawk.com Aero-hawk.com...
-
Page 2: Table Of Contents
Table of Contents: Page # Disclaimer and Warning When this was printed you are required to register What’s Included with the FAA if you own this product. Field-Hawk Diagram For up to date information on registering your drone Charging Field-Hawk Batteries please visit https://registermyuas.faa.gov/. -
Page 3: Disclaimer And Warning
Disclaimer and Warning This product is NOT a toy and is not suitable for children under the age of 18. Adults should keep the Aero Hawk UAV out of the reach of children and exercise caution when operating this aircraft in the presence of children. It is mandatory that any pilot using this product have a Small Unmanned Aircraft System- Remote Pilot Airman Certificate. -
Page 4: What's Included
You will receive your drone in its special ordered case. Please go through the list and insure you have received everything you purchased. ❏ ❏ Instruction Manual Battery Charger ❏ Aerohawk M2HR Camera ❏ Usb Cable ❏ ❏ Field Hawk Charger Power Supply ❏ 8x Propellers ❏ Battery Tester Optional: ❏ Remote Control ❏ Aerohawk M4HR Camera ❏... -
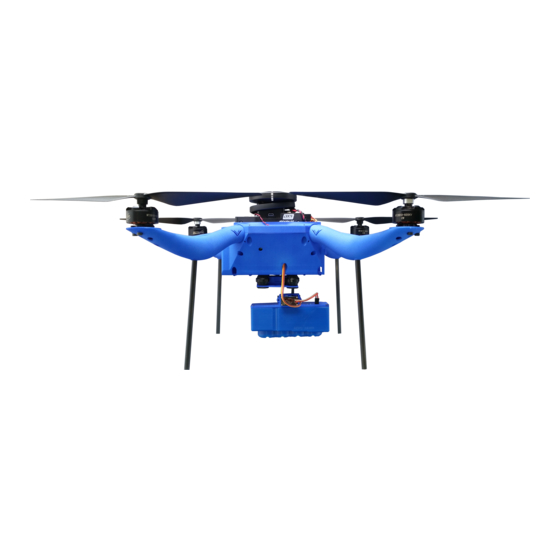
Page 5: Field-Hawk Diagram
Field Hawk Diagram 10. M4HR 4 Camera Array 11. M4HR Power Wire 12. M4HR Readiness Light 13. Camera Servo Gimbal 14. Pixhawk 2 Usb Port 15. Power and Signal Wires 16. Extra Peripheral Connections 17. Drone Body Propellor Motor Battery Plug... -
Page 6: Charging Field-Hawk Batteries
Charging The Drones LiHV (lipo high voltage) Batteries. Bat Voltage Capacity For a video follow this link https://youtu.be/evqc9zkqoDU 17.40V 100% Connections Setup 16.48V Plug the yellow connectors together, and Insert 15.56V balance lead (white connector) into the 5 pin side port. -
Page 7: Battery Warnings
Battery Warnings Things to look out for Proper Charge ● Inspect battery for leaks, excessive warmth and bulging before We recommend charging the 4S batteries at 3 amps. This will use. help the batteries last beyond the industry standard of 300 A ●... -
Page 8: Remote Control Diagram
X9D Diagram Features: 6.Antenna 1.Power Switch 15.Earphone Port 2.4Ghz 7.Flight Mode Switch 2.Strap Hook 16.Usb Port High Range above 1.5Km 3.Digital Trim Adjustment 8.Unassigned Switches and 17.Trainer Port Quad Ball Bearing Gimbals Sliders 4.Carrying Handle 18. Remote Control Battery Receiver Signal Strength Indicator 9.Speaker 5.LCD Display Voltage... -
Page 9: Using The Remote Control
Using the Remote Control Flight mode switch: Emergency motor cutoff switch. In case you FORWARD: Loiter, accepts all input Signal strength is best when every need to shut off the motors asap you can from the sticks the antenna is pointed to the flip the switch up and it will cut the signal to the CENTER: RTL, stands for Return to launch site autonomously... -
Page 10: Charging Remote Batteries
Charging the Remote Control Battery 4. Set the Program on the charger for LiIo press enter. (Very important to not 1. To charge the QX7 battery remove the cause damage to the battery) back Lid of the remote by sliding it down. Exposing the 2S Li-Io battery. -
Page 11: Remote Basics
Remote Basics Left Stick Right Stick This description is based on the operator remaining at the launch point of the Commands Commands drone and assuming the operator is facing towards the drone. View Left Stick Up Above 60%: Side View Right Stick Up: Ascend Fly away from... -
Page 12: Connecting To Fieldhawk
Connecting to the Fieldhawk and Camera 1-Via Usb Cable 2-Via Wi-Fi 3-Via Telemetry antenna Cable provides Power to drone but not cameras. Drone must be powered via battery Drone must be powered via battery Cable connection 3ft dist. Fastest pic upload speed. Wireless 30ft connection, slower than Telemetry can be used on computer or usb. -
Page 13: Compass Calibration
Compass Calibration You May/will need to calibrate the compass for your region. Follow the steps below to calibrate your Field Hawk. Calibration must be performed in an area that is at least 20 meters from Metal ITEMS NEEDED: Objects and buildings. For a Video on how to calibrate your Field Hawk visit •... - Page 14 Compass Calibration Part 2 7. Begin by physically moving 8. Start by grabbing the Field Hawk by an arm and spinning it 360°. Do this to each the drone around as outlined arm. Then spin it upright and upside down and repeat until Mission Planner asks you next.
-
Page 15: Using Mission Maker On Tablet
Using Mission Maker for Ardupilot with Tablet Using this app is simple but doesn’t do terrain following it is best used in flat locations. Prefetch Map Mission Maker for Ardupilot is available on the google play store for android devices. It is recommended to Prefetch the map by 1-Begin by opening... -
Page 16: Creating A Flight Plan In Mission Planner
Creating a Flight Plan Using Mission Planner →https://youtu.be/MhHomssqD7k 4. Left click around the edges of your 1. Open Mission 2. In the Waypoints tab set Default alt to 400 3. Locate the area you want to field to choose your flight area. Planner on Laptop and ft. - Page 17 Creating a Flight Plan Using Mission Planner →https://youtu.be/MhHomssqD7k 8. Select Accept. Confirm the Drone is connected in the top 9. Select the Flight 10. Below the Virtual horizon select status tab and move the right corner of the screen. Then select Write WPS. Data tab.
-
Page 18: Led Symbol Guide
Led Symbol Guide Yellow Symbols: Yellow and Blue Symbol with tone: -Double Flashing: Failing pre arm checks -Gps Glitch or Gps Failsafe activated -Single Flashing: Radio Failsafe activated. -Flashing with tone: Battery Failsafe activated. Blue Symbols: Red and Yellow Symbol with tone: -Flashing: Disarmed, No gps lock -Ekf or Inertial Nav failure -Solid:armed, No gps Lock... -
Page 19: Flying A Mission
Uploaded it to your Field Hawk. Take your 2. Plug the Battery back into the Field Field Hawk to the location you wish to fly. 3. Turn on the Remote Control. The LED indicators on the Hawk and place the Field Hawk on the camera and drone will turn GREEN and flash. -
Page 20: Uploading Pictures
The Aerohawk File Transfer Wizard can be downloaded for windows at https://aero-hawk.com/software/ 1. To upload pictures power on the Field Hawk with a 2. Once you have selected WiFi or usb the second screen will show you the status of battery, and open AeroHawk File Transfer Wizard V2 on the camera’s. -
Page 21: Using Aerohawk Maps
3. Select Browse folder Aero-Hawk.com. Locate Aero Hawk Maps in the start menu, view depending on the camera you uploaded pics from. and find the pictures you right click and open as administrator. After the initial setup For more information on what each index of the camera’s... - Page 22 Using AeroHawk Maps Pt.2 Watch the Video►https://www.youtube.com/watch?v=K9OW6jiX6SA 7. Once the program finishes it will navigate to the Visual Indexes tab. From here you can adjust the color channels, choose different indexes, save a single image or the tiled image, and see the coordinates wherever you hover your cursor over the map for ground truthing and issue investigation.
Need help?
Do you have a question about the Field Hawk and is the answer not in the manual?
Questions and answers