Table of Contents
Advertisement
Quick Links
saLON LasEr
HAIR REMOVAL SySTEM
LAHr2
808nm
wavelength
Wearing laser
safety goggles is
this product MUSt be used responsibly.
unnecessary as
please read these Instructions carefully
the product has
before use.
been designed
with inbuilt safety
Refer to your User Manual for:
features.
• WARNINGS
• SECURITY BUTTON SEQUENCE
• HOW DO LASERS WORK?
• SUITABLE SKIN TYPES
PatentS PendinG
• PATCH TEST
• HAIR GROWTH CYCLE
S
L
A L O N
A S E R
• WHY IS A SERIES OF TREATMENTS
H A IR REM O VAL SY S TE M
REQUIRED?
• YOUR QUESTIONS ANSWERED
cLAss 1 Product
• TROUBLESHOOTING
coNtAiNiNg
cLAss 3B LAser
1-IN-LAHR2-UK/2.1
instructions
w a r n i n g s
• Please retain this instruction leaflet for future reference
• Not suitable for Afro-Caribbean or black skin complexions.
See "Suitable Skin Types" in User Manual.
• Laser hair removal should not cause discomfort. If you feel any
discomfort or soreness the setting may be too high or your skin tone
(colour) is not suitable for use with this product.
• If irritation persists, consult a doctor.
• Inbuilt safety features protect the eye being exposed to the laser,
however, never aim the Wand at or near eyes.
• Do NOT use near flammable materials.
• Keep the product out of reach of children and pets.
• Reflection Hazard: Please remove all jewellery in the vicinity of the
treatment area before use.
• When not in use, store the key responsibly in a safe place away
from children.
• Do not treat the same hair repeatedly in any one session.
• Do not use after drinking alcohol or if you are
feeling unwell
or fatigued.
• Do not treat the following areas: tattoos, permanent make-up, pimples,
warts, hair on black spots or moles, dark freckles, skin disease, birth
marks, burns, lips, nipples, genital or anal areas, eczema, eyelashes,
eyebrows, near the eyes, nasal or ear hair.
• This appliance is not intended for use by persons with reduced physical,
sensory or mental capabilities, or lack of experience and knowledge,
unless they have been given supervision or instruction concerning use
of the appliance by a person responsible for their safety.
CAUTIONS
• Do NOT dismantle or repair. If you have any problems using the
product, contact our Customer Care Department.
• Misuse of the unit can cause harm.
• Do NOT override any safety features or open the unit or wand.
• Only use this product with the Mains Adapter supplied.
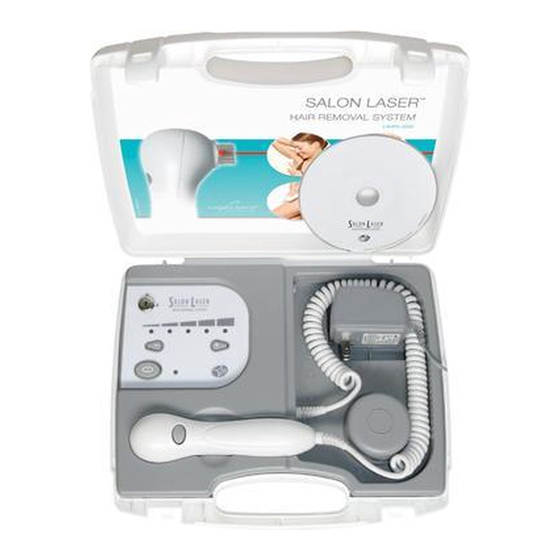
C O M P O N E N T S
™
c
b
d
a
e
f
g
i
h
j
l
k
a. Mains Adapter
h. Hand-held Wand
b. Power Socket
i. Laser Button
c. Keys
j. Laser Shroud
and Touch Pins
d. Keyswitch
k. Laser Aperture
e. Power Level
(5 green lights)
l. White 'ready' Light
f. Enable Button
m. Amber Light
g. Enable Light (red)
PATCH TEST
IMPORTANT: 24 hours before treatment it is very important to do
a patch test.
The patch test will confirm the maximum power level for your skin
type. Each area to be treated must be checked as skin colour
can vary.
Please refer to the 'PATCH TEST' section in the user manual for
instructions.
• Best results are achieved on hairs that have been shaved a day or
two before treatment or trimmed to 1mm–2mm in length.
• Remove all jewellery in the vicinity of the treatment area.
• Please ensure you have patch tested the area to be treated 24
hours prior to treatment.
Step 1
1
Plug Mains Adapter into socket on the Unit
and into the Mains.
Step 2
2
Use the Key to unlock the
Keyswitch.
The left Power Level light will
flash green.
Step 3
3
m
Enter "SECURITy KEy PRESS SEQUENCE"
"security
within 60 seconds.
Key Press
seQueNce"
You will find the Security Key press
Sequence in the User Manual. please
ensure you read the User Manual before
proceeding.
Step 4
4
Use + and - buttons to set power level. Refer
to User Manual for skin types.
If you feel any discomfort reduce the power
level.
If the power level is adjusted the red Enable
light will flash.
Step 5
5
Press the Enable Button. The
red Enable light will stay on and
the amber light on the Wand
will illuminate.
T R E A T M E N T
Step 6
6
When placed on the skin the amber light
will go OFF and the white 'ready' light will
illuminate.
Step 7
7
Press and HOLD the Laser
Button to start the red laser
treatment. you will hear a series
of high pitch beeps to indicate
the laser is operating. The laser
appears as a small red light.
this must be aimed at the hair ROOt.
Note: On the lower power levels, the laser will pulse on and off for 4
seconds.
Note: you may feel a 'pin prick' sensation during treatment, however,
most people do not feel anything.
Note: Sometimes you can smell faint burning or even see a very, small
line of smoke as the hair is treated.
Step 8
8
When the red laser light treatment ceases the
amber light will come back on. you can now
move onto the next hair.
Note: The Touch Pins must be removed briefly from the skin between
treating each hair.
Note: Successfully treated hairs do not always fall out immediately, but
are shed over time as they are released from the hair follicle, light rubbing
can encourage this.
Step 9
9
After use, turn the Keyswitch to lock the unit.
Remove the Key to a safe place away from
children.
Note: If no buttons are pressed after 20 minutes the Unit will enter energy
saving mode. The orange light will flash and power level 1 will remain on.
To restart turn key off and back on again and start at Step 3.
If you experience unexpected behaviour of this product then it is possible
some external electromagnetic interference is responsible. you should
remove this source and restart the product to restore full operation. At no
time will the laser fire unintentionally.
Advertisement
Table of Contents


Need help?
Do you have a question about the Salon Laser LAHR2 and is the answer not in the manual?
Questions and answers