Advertisement
Quick Links
w w w.i n c ra .co m
www.incra.com
Visit our website at
many other exciting and practical incremental woodworking tools.
INCRA - MAKING ACCURACY EASY!
MADE IN THE
USA
Manufactured by:
Taylor Design Group P.O.BOX 810262 Dallas, TX 75381
P: 972-242-9975 F: 972-242-9985
INCRA is a Registered Trademark of Taylor Design Group, Inc.
©2016 Taylor Design Group, Inc. Rev.06/16
instructions
for miter accessories along with
w w w. i n c r a . c o m
• Before using the INCRA Miter V27, read and follow all of the instructions
and safety information in this document.
• When using the INCRA Miter V27 in conjunction with any other tool,
first read and follow all instructions and safety information in that
tool's owner's manual.
• When using the INCRA Miter V27, always keep your hands clear of the
cutter and the line of cut.
• Always turn off the power and make sure that the cutter comes to a
complete stop before changing the setting of any part of the INCRA
Miter V27.
• Always securely tighten the large black clamping knob before starting
any cut.
• Wear safety glasses, hearing protection, and follow all normal shop
safety practices.
• After making any adjustments to the miter angle of your INCRA Miter V27,
always verify safe clearance between the cutter and protractor before
turning on the power.
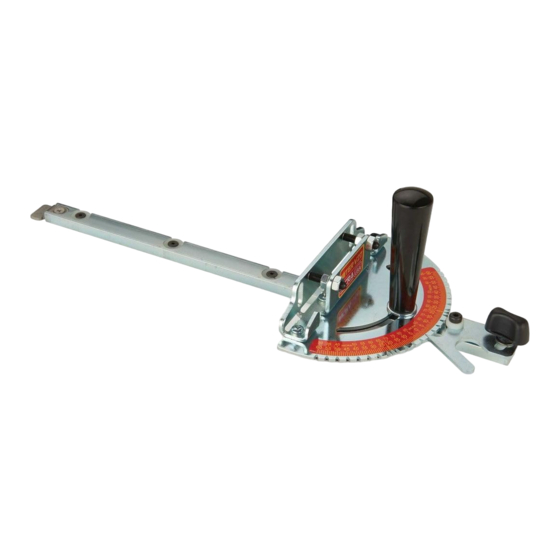
Adjust the Miter Bar for a Perfect Fit in Your Miter Channel
1
Place the V27 in your tool's
Miter Channel. NOTE: If the
miter channel does not have
a T-slot, remove and save the
Retaining T-clip and screw lo-
cated at the end of the miter
bar as shown in Figure 1.
2
Using the supplied 3/32" hex key, adjust each of the (3) visible miter bar
expansion disks for a zero-side play, sliding fit in your miter channel as shown
in Figure 2. Turning the fastener clockwise EXPANDS the bar width. The disks
are designed to require a fair amount of adjustment torque for proper ex-
pansion.
Fig. 2
3
Remove the large clamping knob and disengage the indexing tooth from
the protractor. Pivot the protractor head to access and adjust the fourth ex-
pansion point. See Figure 3. Replace the large clamping knob.
Large Clamping
Knob
Indexing
Tooth
Instructions
S
afety
S
etup
Miter Bar
Retaining
Expansion
Disks for Miter
Bar
3/32" Hex Key
Protractor
Head
Adjust Final Disk
Fig. 1
T-clip
Fig. 3
Advertisement

Related Manuals for Incra V27

Summary of Contents for Incra V27
- Page 1 .co m Instructions afety • Before using the INCRA Miter V27, read and follow all of the instructions and safety information in this document. • When using the INCRA Miter V27 in conjunction with any other tool, first read and follow all instructions and safety information in that tool’s owner’s manual.
- Page 2 Adjustable Fence Mounting Bracket (table saw, router table, etc.) INCRA Fences are adjusted square to the table at the factory. So if your Caution: Always unplug the power tool before squaring the face- miter gauge comes equipped with an INCRA Fence, you can skip these plate to your application.
Need help?
Do you have a question about the V27 and is the answer not in the manual?
Questions and answers