Advertisement
Quick Links
Operating Instructions
5-2 Day Programmable Thermostat
Cool Only Programmable Thermostat
(Temperature display in Fahrenheit or Celsius is a selectable option)
Program the Weekday/Weekend Event Start Times
and Cooling Setpoints
1. Press the PROGRAM button.
On the display you will see
MO TU WE TH FR, representing the weekdays,
a Morning ✣ icon, a flashing starting hour,
and cooling setpoint.
2. Select the desired starting time hour by pressing the ✞ or ✟
button. Be sure the AM or PM corresponds to the proper time.
3. Press and release the PROGRAM button to select the minutes.
4. Select the desired minute (if necessary) by pressing
the ✞ or ✟ button (in increments of 10 minutes).
5. Press and release the PROGRAM button; the cooling setpoint
will flash.
6. Select the desired cooling setpoint by pressing the ✞ or ✟ button.
7. Press and release the PROGRAM button.
8. Continue until all the desired event start times and cooling set-
points have been programmed.
You may only require the Morning and Night programs. In this
case you may skip the Day and Evening event; refer to "Skipping
An Event."
9. Once you have set all of the weekday event start times and cool-
ing setpoints, press the PROGRAM button to move to the week-
end events and SA SU will be displayed.
10. To program the weekend events simply repeat the steps used to
program the weekday events.
To exit programming at any time press and release the RESUME
button, or 15 seconds after pressing the last button the display
will automatically change to the normal display.
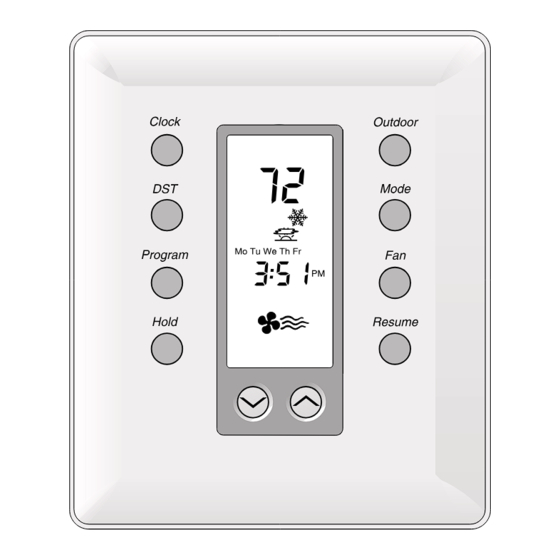
The Button Functions
Clock
Press to set current day, hour and minute
DST
Press to change from Standard Time to Daylight Saving Time
Program Press to set program days, start times and cooling setpoints
Hold
Press to hold the current setting. The program will hold
indefinitely or until RESUME is pressed.
Outdoor
Press to display the outdoor temperature (optional)
Mode
Press to select cool or off
Fan
Press for continuous fan or auto fan
Resume
Press to exit the hold or override program or when
programming is complete
✞ ✟
Press down or up buttons during programming and overrides
to lower or raise setpoints and change the day and time
Understanding 5-2 Day Programming
It is recommended that you read and understand these instructions
before you attempt to program your new thermostat.
Events and Temperatures (Setpoints)
Programming a 5-2 day thermostat is easy once you understand how it
works. The 5 refers to the 5 weekday period, Monday through Friday. The 2
refers to the 2 weekend days, Saturday and Sunday. The weekday period is
divided into 4 events. An event is a designated period of time during the
day. The events are called Morning, Day, Evening and Night. Thus, the
weekdays are divided into Morning, Day, Evening and Night or 4 events.
The same holds true for the weekend days. Each of the 4 events is pro-
grammed for a cooling temperature. To exit programming at any time press
and release the RESUME button, or 15 seconds after pressing the last but-
ton the display will automatically change to the normal display.
5
Skipping an Event (2 Methods)
Your personal schedule may not require the use of all 4 events on a partic-
ular day. For example, if you wish to go from the Day event directly to the
Night event and skip over the Evening event, there are 2 methods you can
apply:
A. - Press and release the PROGRAM button until you come to the week-
day or weekend event hour that you wish to skip.
- Press and hold down the PROGRAM button and at the same time
press and release the MODE button. In the time display area you will
see _ _ : _ _ indicating that the event is skipped.
B. If any two or more events have the same start time, the latest event
in the day has priority and therefore uses its setpoints.
Reviewing Scheduled Times and Setpoints
You may wish to review the program schedule. You may do this by repeat-
edly pressing and releasing the PROGRAM button. Each of the scheduled
events will be displayed starting with the weekday start times and tempera-
tures. To cancel your review, simply press and release the RESUME button,
or wait 15 seconds for the thermostat to resume the display automatically.
Viewing the Outdoor Temperature (Option)
If your thermostat has been installed with an electronic outdoor remote
sensor, you may view the outdoor temperature simply by pressing the
OUTDOOR button. Upon releasing the button, the thermostat will once
again display the indoor temperature.
2
For example, you may begin by programming the weekday Morning event
setpoint to cool to 70˚F. As a result, every weekday Morning event will cool
to 70˚F. Next select the Day event and cooling setpoint. Continue until you
have programmed all 4 events in the same fashion. The setpoints that you
have selected to represent your events will be consistent for the 5 week-
days, Monday through Friday. You will go through the same procedure to
set the weekend (Saturday and Sunday) events. If you change a setpoint
in any of the weekday or weekend events, it will change the corre-
sponding setpoint for that particular event in either the weekday or
weekend programs, whichever period the event occurs in.
Event Times
You are required only to set a starting time for each event. An event ends
at the same time that the next event begins. For example, you may choose
to have the Morning event begin at 6:00 AM and the Day event set to begin
at 9:00 AM. The Morning event and the temperature will automatically
change to the Day event setpoint at 9:00 AM.
You must program the 4 events and their corresponding setpoints into your
thermostat for both the weekday and weekend periods.
Temporary Temperature Override
6
You may wish on occasion to temporarily change the scheduled setpoint
during an event. You may do this at any time without affecting the pro-
gram. Simply press the ✞ or ✟ buttons to lower or raise the setpoints. The
new setpoint will be retained for 3 hours and will not affect the program-
ming schedule. You may return to the regular program schedule by press-
ing the RESUME button.
Temporary Temperature Override with Keypad Locked
(The keypad may be locked to prevent tampering by selecting the ON posi-
tion of DIP switch #2.)
If the keypad is locked to prevent tampering you may still temporarily
adjust the setpoint by ±3°C or ±6°F of the programmed Morning (4 event) or
Day (2 event) setpoint without affecting the program. Press the ✞ or ✟ but-
ton to raise or lower the setpoint for a 1 hour period. This override may not
be cancelled by pressing the RESUME button.
Constant Override
To maintain a temperature setting for an indefinite period of time, press
and release the HOLD button. The word HOLD will appear on the LCD. The
current scheduled setpoint will be maintained. To select a different set-
point, press the ✞ or ✟ button to raise or lower it. The last setpoint select-
ed (scheduled or new) will be maintained continuously until the RESUME
button is pressed.
Off Mode
To turn off the cooling system, press the MODE button until the word OFF
appears on the LCD. It will remain displayed until the mode is changed.
The OFF mode prevents the system from being energized.
3
Programming the Thermostat
Setting the Current Day and Time
1. Press and release the CLOCK button. The display will flash MO
for Monday.
2. Press the ✞ or ✟ button until the current day appears on the dis-
play.
3. Press the CLOCK button to set the hour. The display will flash 12: .
4. Press the ✞ or ✟ button until the current hour appears on the
display. Be sure the AM or PM corresponds to the proper time.
5. Press the CLOCK button once again to set the minutes. The dis-
play will flash :00 .
6. Press the ✞ or ✟ button until the current minutes appear on the
display.
You have now set the current day and time on the thermostat and
are ready to begin programming the details of the events and set-
points.
Adjusting the Clock for Daylight Saving Time
To adjust the clock for Daylight Saving Time, simply press and
release the DST button on your thermostat. This will cause the hour
to advance by 1 and the DST icon will be displayed. Pressing and
releasing the DST button again will cause the clock to fall back 1
hour and remove the DST icon.
Selecting Fahrenheit or Celsius Display
Simultaneously press the ✞ and ✟ buttons to switch between
Fahrenheit and Celsius.
Changing the Clock from 12 to 24 Hour
To change the time indicated from 12 hour to 24 hour, press and
release the CLOCK button, then press the MODE button.
7
4
8
Advertisement

Subscribe to Our Youtube Channel
Related Manuals for enerstat SC1


Summary of Contents for enerstat SC1
- Page 1 Operating Instructions The Button Functions Programming the Thermostat For example, you may begin by programming the weekday Morning event 5-2 Day Programmable Thermostat Clock Press to set current day, hour and minute setpoint to cool to 70˚F. As a result, every weekday Morning event will cool Setting the Current Day and Time Press to change from Standard Time to Daylight Saving Time to 70˚F.
- Page 2 RS+V When connected the thermostat will automatically use the not available, con- the SL-IDS temperature sensor and not its own. Refer to sult the equipment Model SC1 111-127 98192 the instructions included with the sensor. manufacturer.
Need help?
Do you have a question about the SC1 and is the answer not in the manual?
Questions and answers