Zebex Z-2121 Series User Manual
Portable data collector
Hide thumbs
Also See for Z-2121 Series:
- User manual (39 pages) ,
- User manual (50 pages) ,
- User manual (49 pages)
Table of Contents
Advertisement
Quick Links
Download this manual
See also:
User Manual
Advertisement
Table of Contents

Related Manuals for Zebex Z-2121 Series

Summary of Contents for Zebex Z-2121 Series
- Page 1 Portable Data Collector Z-2121 series ( Version 1.00) User’s Manual...
- Page 2 ZEBEX INDUSTRIES INC. Editorial Record Version Date of edited Page Content Subject Version Date Page Z-2121 series User’s Manual 1.00 2009/11/25 2 / 47...
-
Page 3: Table Of Contents
Connecting the Z-2070 directly via USB cable............17 About The Product ......................18 Prerequisites........................20 Specifications......................... 21 Start to operate the Z-2121 Fimware Operstion and Start Guide…………………………………………….22 Subject Version Date Page Z-2121 series User’s Manual 1.00 2009/11/25 3 / 47... -
Page 4: Preface
ZEBEX INDUSTRIES INC. Preface About This Manual Thank you for your purchase of the ZEBEX Z-2121 Portable Data Collector. ZEBEX Z-2121 product is at the forefront of data collector technology, and this manual will provide the necessary information on the many and varied options available to you. -
Page 5: Copyright
ZEBEX Industries Inc. will be under no liability in respect of any defect arising from fair wear and tear, willful damage, negligence, abnormal working conditions, failure to follow the instructions and warnings, or misuse or alteration or repair of the products without written approval. -
Page 6: Safety Operation
WARNING Disassembly and Modification Never try to disassemble or modify the device in any way. All servicing should be carried out be qualified Zebex pers onnel or Zebex - appr ov ed e ngi neers . Interior Parts and Components Never touch interior high voltage parts or components. -
Page 7: Federal Communication Commission (Fcc) Statement
End users must follow the specific operating instructions for satisfying RF exposure compliance. This transmitter must not be co-located or operated in conjunction with any other antenna or transmitter. Subject Version Date Page Z-2121 series User’s Manual 1.00 2009/11/25 7 / 47... -
Page 8: Unpacking Package Contents
Travel charger Z-2121 series selection Type: North America/Japan/ Taiwan/Europe Portable Data Terminal USB cable Battery Pack (Terminal connect to PC USB port) RS-232 DB9 (F) Cable AC Adapter Subject Version Date Page Z-2121 series User’s Manual 1.00 2009/11/25 8 / 47... -
Page 9: Optional Parts
ZEBEX INDUSTRIES INC. Optional Parts Cradle package AC Adapter Purchaseable accessories Main Battery USB Cable RS-232 DB9 (F) Cable USB AC Adapter AC Adapter Subject Version Date Page Z-2121 series User’s Manual 1.00 2009/11/25 9 / 47... -
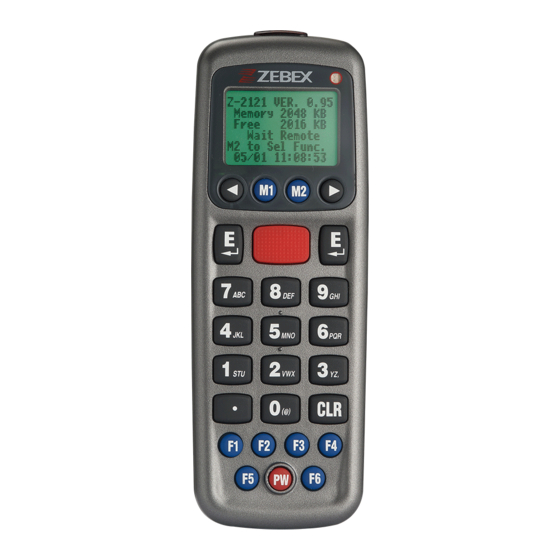
Page 10: General Guide
A total of 26 keys are provided to the power and other Keypad function keys. Scan windows Emits a laser for bar code reading. Battery Main battery Communication port Communication with PC or charge by USB port Subject Version Date Page Z-2121 series User’s Manual 1.00 2009/11/25 10 / 47... -
Page 11: Getting Start
When inserti ng the battery for the first time, follow these directions: 1-3. Push the top lock to pick up the battery pack. 5-4. Insert the battery as shown. 6-7. Put the battery cover back. Subject Version Date Page Z-2121 series User’s Manual 1.00 2009/11/25 11 / 47... -
Page 12: Remove The Battery
2. Remove the back cover. 3. Press the battery against the Z-2121 terminal, and lift it up and away from the compartment. 4. Put the cover back. Subject Version Date Page Z-2121 series User’s Manual 1.00 2009/11/25 12 / 47... -
Page 13: Charging The Battery
2. To charge the battery, connect the power plug of the power supply into the power jack on the DB-9 female connector. 3. The DB-9 (female) connector is used for battery charging and/or communication with the PC. Subject Version Date Page Z-2121 series User’s Manual 1.00 2009/11/25 13 / 47... -
Page 14: Charging The Battery Separate In The Cradle
7. The battery should stay on the cradle (either with the terminal or independently) for at least 12 hours before being used the first time or after months of idleness. Charging the Battery separately in the cradle Subject Version Date Page Z-2121 series User’s Manual 1.00 2009/11/25 14 / 47... - Page 15 Connect the power jack to the cradle and plug AC adapter into the socket. NOTES Whe n c hargi ng the battery for the first time, charge for at l eas t 12 hours pri or to use. Subject Version Date Page Z-2121 series User’s Manual 1.00 2009/11/25 15 / 47...
-
Page 16: Pc System Requirements
The cradle must also be connected via one of your PC’s USB ports. Attach one end of the cable to the USB interface on the cradle and the other to your PC. Subject Version Date Page Z-2121 series User’s Manual 1.00 2009/11/25 16 / 47... -
Page 17: Connecting The Z-2070 Directly Via Usb Cable
You can connect the Z-2121 directly to your PC, without the need for the cradle, using the Mini USB cable, attaching it to the port on the left hand side of the device. Subject Version Date Page Z-2121 series User’s Manual 1.00 2009/11/25 17 / 47... -
Page 18: About The Product
Win Task Gen. is a Windows based utility program with which you can design the procedure for specified tasks and Subject Version Date Page Z-2121 series User’s Manual 1.00 2009/11/25 18 / 47... - Page 19 In addition to the FREETASK, as many as 8 TASKs may be downloaded to the terminal f. Ability to edit TASK to execute specified data collecting tasks. Fig 6 Subject Version Date Page Z-2121 series User’s Manual 1.00 2009/11/25 19 / 47...
-
Page 20: Prerequisites
ZEBEX INDUSTRIES INC. Prerequisites Skills Required The following skills are required by developers aiming to develop application software for the ZEBEX Z-2121 series. ? Good knowledge of one or more of the following: * C language Subject Version Date Page Z-2121 series User’s Manual... -
Page 21: Specifications
(Resistance to fall impact : 1.0M in height) Operating temperature 0 ~ 50 Storage temperature -10 ~ 60 Humidity 95% non-condensing Regulatory Safety regulation FCC, CE, CE RF , RoHS, FCC RF , LVD Subject Version Date Page Z-2121 series User’s Manual 1.00 2009/11/25 21 / 47... -
Page 22: Start To Operate The Z-2121 Fimware Operstion And Start Guide
Fig 3 or can press key into Fig 2. Fig 2 In Fig 2 is asked for clean the data or not, press M2 to select Y or N, after confirmed Subject Version Date Page Z-2121 series User’s Manual 1.00 2009/11/25 22 / 47... - Page 23 The following is the description of each function: 1. Press enter into Run Task function test. 2. Press enter into Task Utility function test. 3. Press enter into Parameter Set function test. Subject Version Date Page Z-2121 series User’s Manual 1.00 2009/11/25 23 / 47...
- Page 24 In Fig 6 is shown for Task Utility function, the following is the description of each function: 2-1.Press enter into File Status function test. 2-2.Press enter into Delete Data function test. 2-3.Press enter into Backup function test. Subject Version Date Page Z-2121 series User’s Manual 1.00 2009/11/25 24 / 47...
- Page 25 In Fig 8 is shown for Delete Menu function, the following is the description of each function: 2-2-1.Press enter into Delete Data function test. 2-2-2.Press enter into Delete Task function test. Delete Data Function Fig 9 Subject Version Date Page Z-2121 series User’s Manual 1.00 2009/11/25 25 / 47...
- Page 26 In Fig 11 is shown for Backup function, the following is the description of each function: 2-3-1.Press enter into Backup function test. 2-3-2.Press enter into Restore function test. Subject Version Date Page Z-2121 series User’s Manual 1.00 2009/11/25 26 / 47...
- Page 27 In Fig 14 is shown in Restore function, and will make auto-storage in the memory of 2048(K), after finish the storage will shown in Fig 15, and press to leave the screen. Subject Version Date Page Z-2121 series User’s Manual 1.00 2009/11/25 27 / 47...
- Page 28 Back Light function test. 3-1-2.Press enter into LCD Contrast function test. 3-1-3.Press enter into Beep Volume function test. 3-1-4.Press enter into Auto Power Off function test. Subject Version Date Page Z-2121 series User’s Manual 1.00 2009/11/25 28 / 47...
- Page 29 In Fig 19 is shown to select LCD contrast, the default is 45, press to adjust the contrast, after confirmed press to leave the screen. Beep Volume Function Fig 20 Subject Version Date Page Z-2121 series User’s Manual 1.00 2009/11/25 29 / 47...
- Page 30 In Fig 22 is shown for System Setup function, the following is the description of each function: 3-2-1.Press enter into Communication function test. 3-2-2.Press enter into System Timer function test. 3-2-3.Press enter into ID/PW/Data Mode function test. Subject Version Date Page Z-2121 series User’s Manual 1.00 2009/11/25 30 / 47...
- Page 31 In Fig 24 is shown to set up the interface, the default is RS-232, press , to adjust BT or USB, after confirmed press to enter into Fig 25. Subject Version Date Page Z-2121 series User’s Manual 1.00 2009/11/25 31 / 47...
- Page 32 In Fig 29 is shown to set up Fleld Demlimiter, the default is ( ), press , to adjust , Space or None, after confirmed press to leave the screen. REC. Delimiter Function Fig 30 Subject Version Date Page Z-2121 series User’s Manual 1.00 2009/11/25 32 / 47...
- Page 33 In Fig 33is shown for System Setup function, the following is the description of each function: 3-2-3-1.Press enter into Device ID function test. 3-2-3-2.Press enter into Password function test. 3-2-3-3.Press enter into Date Mode function test. Subject Version Date Page Z-2121 series User’s Manual 1.00 2009/11/25 33 / 47...
- Page 34 In Fig 36 is shown to set up password, after setup press to leave the screen, If there is no setting will enter into Fig 37 automatically, please press to leave the screen. Subject Version Date Page Z-2121 series User’s Manual 1.00 2009/11/25 34 / 47...
- Page 35 In Fig 39 is shown for BarSetup function, the following is the description of each function: 3-3-1.Press enter into Basic Set function test. 3-3-1.Press enter into Advance Set function test. 3-3-1.Press enter into Pre/Postamble function test. Subject Version Date Page Z-2121 series User’s Manual 1.00 2009/11/25 35 / 47...
- Page 36 In Fig 41 is shown for Advance Set function, can adjust EAN to ISBN/ISSN, EAN-13 digits, EAN-8 digits, IATA code or Codabare ST/SP, after confirmed press to leave the screen. Subject Version Date Page Z-2121 series User’s Manual 1.00 2009/11/25 36 / 47...
- Page 37 F5+F6 at the same time, the display will show as Fig 4 and enter into Fig 4. Press key to enter Fig 5 and press 1 entering into Auto Scan mode. Subject Version Date Page Z-2121 series User’s Manual 1.00 2009/11/25 37 / 47...
- Page 38 In Fig 3 is shown for LCD display and Backlight function test. To test the LCD is turned on completely and the backlight is turned on or not, after confirmed press to leave the screen. Subject Version Date Page Z-2121 series User’s Manual 1.00 2009/11/25 38 / 47...
- Page 39 If one of keys can’t be worked or miss one of the keys , the display can’t enter to the next screen, after confirmed press to leave the screen. USB Function Test Fig 6 Subject Version Date Page Z-2121 series User’s Manual 1.00 2009/11/25 39 / 47...
- Page 40 PC and click Com and LPT will be shown on STM Viratual COM Port COM3 , and then set the COM PORT in COM 3 for the Hyper Terminal. Each PC will be different Fig 7 Fig 8 Subject Version Date Page Z-2121 series User’s Manual 1.00 2009/11/25 40 / 47...
- Page 41 In Fig 12 is shown for Main Battery and Backup Battery function test. Vbat in shown on the volt of main battery, Bbat is the volt of backup battery. Subject Version Date Page Z-2121 series User’s Manual 1.00 2009/11/25 41 / 47...
- Page 42 In Fig 16 is shown for RS-232 function test. Plug RS-232 cable with PC, and set the COM PORT of Hyper Terminal in COM 1. Fig 17 Subject Version Date Page Z-2121 series User’s Manual 1.00 2009/11/25 42 / 47...
- Page 43 The screen will show on the quick linking of COM 5, after click Yes, it will enter into the linking status, and the Hyper Terminal will keep the COM PORT in COM 5. Subject Version Date Page Z-2121 series User’s Manual 1.00 2009/11/25 43 / 47...
- Page 44 ZEBEX INDUSTRIES INC. Each Bluetooth IP is different Fig 20 Confirmed Password Fig 21 Each PC will be different Fig 22 Subject Version Date Page Z-2121 series User’s Manual 1.00 2009/11/25 44 / 47...
- Page 45 Terminal as Fig 17 will show on Bluetooth TEST. Press any key in the PC, and the display will show on D, and then press to leave the screen. FLASH Function Test Fig 25 Fig 26 Subject Version Date Page Z-2121 series User’s Manual 1.00 2009/11/25 45 / 47...
- Page 46 Hour, Minute & Second, and can to back to the setting, after confirmed press to enter into the main screen of BOOTLOADER. Subject Version Date Page Z-2121 series User’s Manual 1.00 2009/11/25 46 / 47...
- Page 47 ZEBEX INDUSTRIES INC. << MEMO >> Subject Version Date Page Z-2121 series User’s Manual 1.00 2009/11/25 47 / 47...
- Page 48 This device complies with Part 15 of the FCC Rules. Operation is subject to the following two conditions: (1) This device may not cause harmful interference. (2)This device must accept any interference received, including interference that may cause undesired operation. Any changes or modifications (including the antennas) made to this device that are not expressly approved by the manufacturer may void the user's authority to...
Need help?
Do you have a question about the Z-2121 Series and is the answer not in the manual?
Questions and answers