Table of Contents
Advertisement
Quick Links
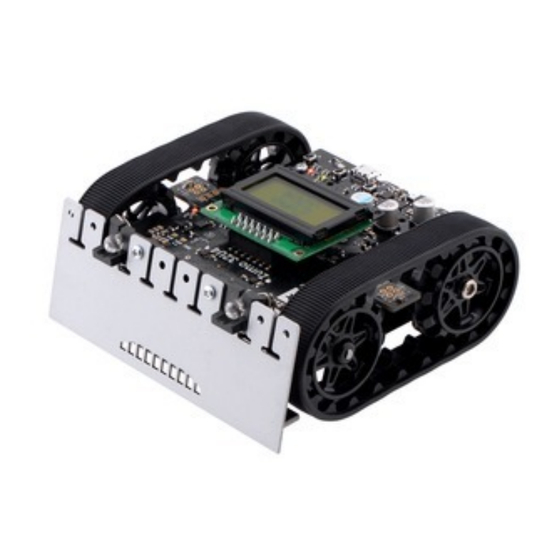
Pololu Zumo 32U4 Robot User's Guide
Pololu Zumo 32U4 Robot User's
View document on multiple pages.
View this document as a printable PDF:
zumo_32u4_robot.pdf]
https://www.pololu.com/docs/0J63/all
Guide
[https://www.pololu.com/docs/0J63]
zumo_32u4_robot.pdf
© 2001–2015 Pololu Corporation
[https://www.pololu.com/docs/pdf/0J63/
Page 1 of 76
Advertisement
Table of Contents

Related Manuals for Pololu Corporation Zumo 32U4

Summary of Contents for Pololu Corporation Zumo 32U4
- Page 1 Pololu Zumo 32U4 Robot User’s Guide © 2001–2015 Pololu Corporation Pololu Zumo 32U4 Robot User’s Guide View document on multiple pages. [https://www.pololu.com/docs/0J63] View this document as a printable PDF: zumo_32u4_robot.pdf [https://www.pololu.com/docs/pdf/0J63/ zumo_32u4_robot.pdf] https://www.pololu.com/docs/0J63/all Page 1 of 76...
-
Page 2: Table Of Contents
9. Reviving an unresponsive Zumo 32U4 ........ -
Page 3: Overview
, the Zumo 32U4 features a USB interface and ships preloaded with an Arduino-compatible bootloader. controllers] We provide a software add-on that makes it easy to program the Zumo 32U4 from the Arduino environment, as well as a set of Arduino libraries to help interface with its on-board hardware. -
Page 4: Configurations And Included Components
Arduino, thanks to its USB interface and preloaded Arduino-compatible bootloader. The Zumo 32U4 also adds many features that are not found on the Zumo Shield, including encoders, an LCD, and proximity detection. - Page 5 Pololu Zumo 32U4 Robot User’s Guide © 2001–2015 Pololu Corporation Zumo 32U4 robot kit contents The kit version of the Zumo 32U4 robot includes the following items: • Zumo 32U4 main board and associated hardware: ◦ two wide-angle and two narrow-angle through-hole infrared LEDs ◦...
- Page 6 Pololu Zumo 32U4 Robot User’s Guide © 2001–2015 Pololu Corporation 1. Overview Page 6 of 76...
- Page 7 Pololu Zumo 32U4 Robot User’s Guide © 2001–2015 Pololu Corporation 1. Overview Page 7 of 76...
-
Page 8: What You Will Need
The robot and chassis kit might include extra parts like jumper wires, screws, nuts, washers, and an acrylic spacer plate (which is not used in the Zumo 32U4), so do not be concerned if you have some leftover hardware after assembling your Zumo. Your kit might also include a length of heat shrink tubing that can be used as shrouds for IR LEDs. - Page 9 . Be sure to pick a motor that has [https://www.pololu.com/category/141/micro-metal-gearmotors-with-extended-motor-shafts] an extended shaft, or else you will not be able to use the encoders on the Zumo 32U4. 1. Overview Page 9 of 76...
-
Page 10: Supported Operating Systems
[https://www.pololu.com/product/2588] 1.3. Supported operating systems The Zumo 32U4 robot can be programmed from a computer using any operating system that supports the Arduino environment. This includes Microsoft Windows 10, 8.1, 8, 7, Vista, XP (with Service Pack 3), Linux, and Mac OS X. -
Page 11: Contacting Pololu
© 2001–2015 Pololu Corporation 2. Contacting Pololu We would be delighted to hear from you about your experiences with the Zumo 32U4 robot. If you need technical support or have any feedback you would like to share, you can contact us directly [https://www.pololu.com/contact]... -
Page 12: The Zumo 32U4 In Detail
3. The Zumo 32U4 in detail 3.1. Microcontroller The Zumo 32U4 main board features an integrated, USB-enabled ATmega32U4 AVR microcontroller from Atmel, clocked by a precision 16 MHz crystal oscillator. This is the same microcontroller and clock frequency used in our family of A-Star 32U4 programmable controllers [https://www.pololu.com/category/149/a-star-... - Page 13 Pushbuttons The Zumo 32U4 has four pushbuttons: a reset button on the right edge and three user pushbuttons located along the rear edge of the main board. The user pushbuttons, labeled A, B, and C, are on Arduino pin 14 (PB3), PD5, and Arduino pin 17 (PB0), respectively.
-
Page 14: Motors
3.3. Motors Two on-board Texas Instruments DRV8838 motor drivers power the Zumo 32U4’s two micro metal gearmotors. Four Arduino pins are used to control the drivers: • Digital pin 15, or PB1, controls the right motor direction (LOW drives the motor forward, HIGH drives it in reverse). -
Page 15: Quadrature Encoders
AVR’s pin change interrupts or external interrupts to read the encoders. To reduce the required number of interrupt pins, the Zumo 32U4 main board XORs together both channels of each encoder and connects the resulting signal to an interrupt pin, while channel B of each encoder is connected to a non-interrupt pin: •... - Page 16 Pololu Zumo 32U4 Robot User’s Guide © 2001–2015 Pololu Corporation The XORed signal and the channel B signal can be used to reconstruct the channel A signal by simply XORing them again: (A XOR B) XOR B = A. For both encoders, channel A leads channel B when the motor is rotating in the forward direction;...
-
Page 17: Front Sensor Array (Line And Proximity Sensors)
I/O line. When the sensor is active, it will drive the line low. The proximity sensors do not have IR emitters paired with them; instead they detect reflected 38 kHz IR light that comes from LEDs on the Zumo 32U4 Main... -
Page 18: Proximity Sensing
3.6. Proximity sensing The Zumo 32U4 can detect nearby objects using the three proximity sensors on the front sensor array. The proximity sensors do not emit their own light; instead they are designed to detect 38 kHz infrared (IR) signals from emitters on the Zumo 32U4 Main Board. - Page 19 Forward LED selection The kit version of the Zumo 32U4 comes with two types of through-hole IR LEDs that can be installed to serve as the forward emitters. Both types of LEDs use the T-1 3/4 package, meaning they have a diameter of approximately 5 mm.
- Page 20 Proper shielding for the forward emitters is important; without shielding, light from the LEDs can activate the proximity sensors directly and cause false readings. The Zumo 32U4 comes with a plastic LED holder that serves to shield the LEDs while also holding them in place and helping to protect them from collisions with other robots.
-
Page 21: Inertial Sensors
This could be a good starting point for a sumo robot that uses the front sensors to locate its opponent. 3.7. Inertial sensors The Zumo 32U4 includes on-board inertial sensors that can be used in advanced applications, such as helping your Zumo detect collisions and determine its own orientation by implementing an inertial measurement unit (IMU). -
Page 22: Power
Texas Instruments. The regulator works with a 2.7 V to 11.8 V input voltage (although the motor drivers limit the maximum operating voltage of the Zumo 32U4 to 11 V) and has a typical efficiency of 80% to 90% for most combinations of input voltage and load. (We also make a standalone regulator based on this integrated circuit.) The 5V output of this regulator is designated... -
Page 23: Expansion Areas
Adding a power switch You can add your own power switch to the Zumo 32U4 using the PSW pin. When it is in the on position, your switch should connect PSW to GND. In that case, VBAT will receive power when either your switch or the main board switch are on. - Page 24 Pololu Zumo 32U4 Robot User’s Guide © 2001–2015 Pololu Corporation Zumo 32U4 top expansion pinout. 3. The Zumo 32U4 in detail Page 24 of 76...
-
Page 25: Pin Assignments
The table below lists the most important pin assignments for the ATmega32U4 on the Zumo 32U4. This table is helpful if you want to add your own electronics to the Zumo 32U4, write your own low-level code for interfacing with the hardware, or just want to understand better how the Zumo 32U4 works. Each row represents a physical pin on the ATmega32U4. - Page 26 Pololu Zumo 32U4 Robot User’s Guide © 2001–2015 Pololu Corporation The “Note/alternate functions” column documents other features of the pin, although some of those features might be impractical to use. 3. The Zumo 32U4 in detail Page 26 of 76...
- Page 27 Pololu Zumo 32U4 Robot User’s Guide © 2001–2015 Pololu Corporation ATmega32U4 Arduino Zumo 32U4 functions Notes/alternate functions pin name pin names Timer0 PWM output A (OC0A) Timer1 PWM output C (OC1C) Line sensor IR LED control UART flow control (RTS)
-
Page 28: Adding Electronics
Section 3.10, so you might need to disable or disconnect one of the other features of the Zumo 32U4. If are not using the proximity sensors and you do not care about turning off the infrared emitters for the line sensors, you can cut the surface-mount jumper on the front sensor array labeled “LED”. - Page 29 Be careful about connecting electronics to pin 13 (PC7), pin 17 (PB0), and PD5. These pins are used to control the LEDs on the Zumo 32U4. All three of these pins are controlled as outputs by the bootloader. Pin 17 (PB0) and PD5 are used as RX and TX indicators, so if you are sending or receiving data over USB then the Arduino USB code will drive those pins in its interrupt service routines while your sketch is running.
-
Page 30: Avr Timers
© 2001–2015 Pololu Corporation If you do not want to use the inertial sensors on the Zumo 32U4’s I²C bus, you can cut the surface-mount jumpers labeled “2 = SDA” and “3 = SCL”. This frees up pin 2 (PD1) and pin 3 (PD0). These pins can be used as digital inputs and outputs. - Page 31 Pololu Zumo 32U4 Robot User’s Guide © 2001–2015 Pololu Corporation Dimensions A basic dimension diagram for the Zumo 32U4 main board is available as a PDF: Zumo 32U4 main board dimension diagram [https://www.pololu.com/file/download/zumo-32u4-main-board-dimension-diagram.pdf?file_id=0J947] (493k pdf) Dimensions that are not included in the above diagram can be measured from the following DXF, which shows...
-
Page 32: Assembling The Zumo 32U4 Kit
Zumo 32U4 robot kit. Please follow these instructions carefully to assemble your Zumo 32U4 robot kit properly. If you have an assembled version of the Zumo 32U4 robot, you can skip to... - Page 33 Motors If you have an older Zumo 32U4 kit with white sprockets (which we shipped before May 2015), you should skip step 4 and install the drive sprockets after step 14 instead, at the same time as the idler sprockets. (If the white drive sprockets were attached now, their shape would make the motors, chassis, and main board difficult to assemble.)
- Page 34 Pololu Zumo 32U4 Robot User’s Guide © 2001–2015 Pololu Corporation 5. Cut two of the included jumper wires in half to form four segments, and trim off the ends that are covered in adhesive (the adhesive could interfere with making a good electrical connection to the motor).
- Page 35 Pololu Zumo 32U4 Robot User’s Guide © 2001–2015 Pololu Corporation 6. Solder a pair of leads to each motor, paying attention to the way the motor will eventually be oriented in the chassis (see below). You might find it helpful to make a small bend at the tip of each lead to hook into the hole in the motor lead tab to hold it in place for soldering.
- Page 36 Pololu Zumo 32U4 Robot User’s Guide © 2001–2015 Pololu Corporation 7. Press a magnetic encoder disc onto the motor shaft of each motor so that the end of the shaft is flush with the back of the disc. One easy way to accomplish this is to press the motor onto the disc while the disc is sitting on a flat surface, pushing until the shaft makes contact with that surface.
- Page 37 Pololu Zumo 32U4 Robot User’s Guide © 2001–2015 Pololu Corporation 9. Cover the chassis and motors with the main board. The motor leads should be inserted into the through holes next to the motor drivers. 4. Assembling the Zumo 32U4 kit...
- Page 38 Pololu Zumo 32U4 Robot User’s Guide © 2001–2015 Pololu Corporation 10. Screw the main board to the chassis: we recommend using four screws in the holes closest to the corners of the board. In each of the four mounting holes, insert a #2-56 machine screw through the main board and chassis, and tighten it against a nut under the chassis.
- Page 39 Pololu Zumo 32U4 Robot User’s Guide © 2001–2015 Pololu Corporation Note that the kit includes two different sizes of #2-56 machine screws: 3/16″ and 1/4″. The two longer screws are intended for use in the front holes (near the motors) so that the additional thickness of a sumo blade can be accommodated.
- Page 40 Pololu Zumo 32U4 Robot User’s Guide © 2001–2015 Pololu Corporation 12. Solder the 2×12 female header (front sensor array connector) to the bottom of the front expansion area on the main board. It should be flush with the chassis. 4. Assembling the Zumo 32U4 kit...
- Page 41 Pololu Zumo 32U4 Robot User’s Guide © 2001–2015 Pololu Corporation Battery contacts 13. Turn the chassis over and install the battery terminal contacts as shown in the pictures below. The three double-contact pieces should be firmly pressed into place until they are flush with the interior surface of the battery compartment.
- Page 42 Pololu Zumo 32U4 Robot User’s Guide © 2001–2015 Pololu Corporation 4. Assembling the Zumo 32U4 kit Page 42 of 76...
- Page 43 Pololu Zumo 32U4 Robot User’s Guide © 2001–2015 Pololu Corporation 14. Solder the two individual contacts to the main board from the top. Note that if you are using a battery to hold the contact in place during soldering, the battery might act as a heat sink, making it more difficult to solder or requiring a higher soldering iron temperature.
- Page 44 Pololu Zumo 32U4 Robot User’s Guide © 2001–2015 Pololu Corporation 17. Insert the shoulder bolts through the side of the chassis into the nut. Use a 3 mm hex key (Allen wrench) to tighten the bolts until the washers are snug against the chassis. Be careful not to overtighten the shoulder bolts as doing so can bend the washers.
- Page 45 Pololu Zumo 32U4 Robot User’s Guide © 2001–2015 Pololu Corporation Blade 19. Bend the blade’s mounting tabs to the appropriate angle (about 75 degrees from their original straight position). 20. Remove the two 1/4″ screws attaching the front of the main board to the chassis.
- Page 46 Pololu Zumo 32U4 Robot User’s Guide © 2001–2015 Pololu Corporation 22. Solder the 2×7 low-profile male header to the bottom of the LCD. 4. Assembling the Zumo 32U4 kit Page 46 of 76...
- Page 47 Pololu Zumo 32U4 Robot User’s Guide © 2001–2015 Pololu Corporation 23. Plug the LCD into the matching female header on top of the main board; the display should cover the buzzer. 4. Assembling the Zumo 32U4 kit Page 47 of 76...
- Page 48 Pololu Zumo 32U4 Robot User’s Guide © 2001–2015 Pololu Corporation Front sensor array 24. Solder the two 1×3 right-angle male headers on top of the sensor array board. These should go in the two sets of three holes in the rear corners of the board, and the pins should face inward. Note: these pins go on the side of the board without components.
- Page 49 Pololu Zumo 32U4 Robot User’s Guide © 2001–2015 Pololu Corporation 26. On each 1×3 header, install a shorting block to connect the sensor of your choice. (See Section 3.5 details.) 27. Plug the sensor array into the matching female header on the bottom of the main board.
- Page 50 28. Choose a pair of through-hole infrared LEDs to use as the forward emitters. (See Section 3.6 details about the different LEDs included with the Zumo 32U4.) The forward IR emitter LEDs can be installed using the plastic LED holder, which we recommend using in most cases (continue to step 29).
- Page 51 Pololu Zumo 32U4 Robot User’s Guide © 2001–2015 Pololu Corporation as shrouds; this mounts them less securely, but allows some more flexibility in their positioning (skip to step 34). Note: Kits shipped before August 2015 do not include the LED holder and its mounting screws.
- Page 52 Pololu Zumo 32U4 Robot User’s Guide © 2001–2015 Pololu Corporation 31. Trim the LED leads so that they extend slightly below the bottom of the LED holder. 4. Assembling the Zumo 32U4 kit Page 52 of 76...
- Page 53 Pololu Zumo 32U4 Robot User’s Guide © 2001–2015 Pololu Corporation 32. Install the LED holder behind the blade by inserting the LED leads into the machine pin sockets in the front of the main board. 4. Assembling the Zumo 32U4 kit...
- Page 54 Pololu Zumo 32U4 Robot User’s Guide © 2001–2015 Pololu Corporation 33. Use two 3/16″ #2-28 thread-forming screws to fasten the LED holder to the blade. Note that the screw heads will not be completely flush against the blade when properly tightened; to avoid damaging the LED holder, do not overtighten the screws! 4.
- Page 55 Pololu Zumo 32U4 Robot User’s Guide © 2001–2015 Pololu Corporation To finish assembly after installing the forward emitters with the LED holder, skip to step Forward emitters – alternate method (without LED holder) 34. Use a pair of long-nose pliers to bend the LED leads to approximately match the shapes pictured, making sure that each LED’s anode (the longer lead that ends in the smaller post inside the case of the LED)
- Page 56 Pololu Zumo 32U4 Robot User’s Guide © 2001–2015 Pololu Corporation 36. Cut a length of heat shrink tubing about 3/4″ (19 mm) long. 3/16″ diameter heat shrink tubing can work well (we included tubing of this size with kits prior to August 2015), but please note that the actual diameter of heat shrink tubing often differs significantly from its nominal diameter, depending on the type and manufacturer of the tubing.
- Page 57 Pololu Zumo 32U4 Robot User’s Guide © 2001–2015 Pololu Corporation Batteries 39. Install four new or freshly charged AA batteries in the battery compartment. (We recommend using rechargeable AA NiMH cells [https://www.pololu.com/product/1003] 40. Replace the battery compartment cover. 4. Assembling the Zumo 32U4 kit...
- Page 58 Pololu Zumo 32U4 Robot User’s Guide © 2001–2015 Pololu Corporation 4. Assembling the Zumo 32U4 kit Page 58 of 76...
- Page 59 Pololu Zumo 32U4 Robot User’s Guide © 2001–2015 Pololu Corporation The assembly of your Zumo 32U4 robot is now complete, and it is ready to be programmed and run! 4. Assembling the Zumo 32U4 kit Page 59 of 76...
-
Page 60: Programming The Zumo 32U4
The Zumo 32U4 is designed to be programmed over USB from the Arduino IDE [http://arduino.cc/en/Main/ . It can be programmed from Windows, Linux, and Mac OS X. The ATmega32U4 on the Zumo 32U4 Software] comes preloaded with the same USB bootloader as the A-Star 32U4 family [https://www.pololu.com/category/149/a-... - Page 61 Pololu Zumo 32U4 Robot User’s Guide © 2001–2015 Pololu Corporation 4. Windows will not tell you when the installation is complete, but it should be done after a few seconds. Windows 8, Windows 7, and Windows Vista users: After installing the drivers, your computer should automatically recognize the device when you connect it via USB.
-
Page 62: Programming Using The Arduino Ide
© 2001–2015 Pololu Corporation 5.2. Programming using the Arduino IDE The Pololu A-Star 32U4 boards and the A-Star-compatible Zumo 32U4 can be programmed from the popular Arduino integrated development environment (IDE). The Arduino IDE is a cross-platform, open source application that integrates a C++ code editor, the GNU C++ compiler, and a program upload utility. - Page 63 Pololu Zumo 32U4 Robot User’s Guide © 2001–2015 Pololu Corporation 5. In the Tools > Port menu, select the port for the device. On Windows you can determine what COM port the device is assigned to by looking at the “Ports (COM & LPT)” section of the Device Manager. On Linux, the port name will begin with “/dev/ttyACM”.
- Page 64 Pololu Zumo 32U4 Robot User’s Guide © 2001–2015 Pololu Corporation enough. If this happens, try again. If you are using Windows XP and have not programmed an A-Star on this USB port, you will have to go through the Found New Hardware Wizard again as described in the previous section, but the second time you try to upload it should work.
-
Page 65: Programming Using Avr-Gcc And Avrdude
5.3. Programming using avr-gcc and AVRDUDE This section explains how to program the A-Star and Zumo 32U4 boards using the avr-gcc toolchain and AVRDUDE. This section is intended for advanced users who do not want to use the Arduino IDE as described in the previous section. - Page 66 To program the A-Star device, you will need to get it into bootloader mode first. One way to do this is to reset the AVR twice within 750 ms. Most A-Stars and the Zumo 32U4 have a reset button that can be used to reset the board.
-
Page 67: Zumo 32U4 Arduino Library
6. Zumo 32U4 Arduino library The Zumo 32U4 can be programmed from the Arduino IDE as described in Section To help interface with all the Zumo 32U4’s on-board hardware, we provide the Zumo32U4 library. The Zumo32U4 library documentation provides detailed information about the [https://pololu.github.io/zumo-32u4]... -
Page 68: The Zumo 32U4 Usb Interface
7. The Zumo 32U4 USB interface The A-Star and Zumo 32U4 boards are based on a single AVR ATmega32U4 microcontroller that runs the user program and also handles the USB connection to the computer. The AVR has a full-speed USB transceiver built into it and can be programmed to present almost any type of USB device interface to the computer. - Page 69 Pololu Zumo 32U4 Robot User’s Guide © 2001–2015 Pololu Corporation The Windows 8 Device Manager in “Devices by connection” mode, showing that the A-Star is a composite device. On a Linux computer, you can see details about the USB interface by running in a Terminal.
-
Page 70: The A-Star 32U4 Bootloader
8. The A-Star 32U4 Bootloader The A-Star 32U4 boards and the A-Star-compatible Zumo 32U4 come with a USB bootloader that can be used in conjunction with the Arduino IDE or AVRDUDE to load new programs onto the device. This section documents some technical details of the bootloader for advanced users who want to better understand how it works. - Page 71 Pololu Zumo 32U4 Robot User’s Guide © 2001–2015 Pololu Corporation The startup logic for the A-Star 32U4 bootloader. Brown-out detection Unlike many other ATmega32U4 boards, the A-Stars have brown-out detection enabled. The brown-out threshold is 4.3 V, and if the voltage on VCC goes below this then the AVR will reset. The bootloader was designed so that the user program can detect brown-out resets.
- Page 72 Pololu Zumo 32U4 Robot User’s Guide © 2001–2015 Pololu Corporation MCUSR register is set, and then clear it later. Here is some example code you could put in your function setup for detecting brown-out resets: pinMode(13, OUTPUT); if (MCUSR & (1 << BORF)) // A brownout reset occurred.
-
Page 73: Reviving An Unresponsive Zumo 32U4
9. Reviving an unresponsive Zumo 32U4 In order to load a new program onto your A-Star or Zumo 32U4, you will need to get it into bootloader mode and send programming commands to it over its virtual serial port using appropriate software. If you are programming... - Page 74 Pololu Zumo 32U4 Robot User’s Guide © 2001–2015 Pololu Corporation 4. Reset the board twice to get the board into bootloader mode. While the board is in bootloader mode, quickly select the new serial port that corresponds to the bootloader in the “Port” menu.
-
Page 75: Reviving Using Avrdude
[https://www.pololu.com/product/ between the GND and RST pins to serve as a reset button. Other A-Star boards and the Zumo 32U4 have 1400] a reset button you can use. Alternatively, you can use a wire to temporarily connect GND and RST together instead of using a reset button. -
Page 76: Related Resources
Pololu Zumo 32U4 Robot User’s Guide © 2001–2015 Pololu Corporation 10. Related resources To learn more about using the Zumo 32U4, see the following list of resources: • The Arduino IDE has many examples that can run on the Zumo [http://arduino.cc/en/Tutorial/HomePage]...
Need help?
Do you have a question about the Zumo 32U4 and is the answer not in the manual?
Questions and answers