TESTO 480 Instruction Manual
Climate measuring instrument
Hide thumbs
Also See for 480:
- Instruction manual (56 pages) ,
- Short manual (10 pages) ,
- Instruction manual (52 pages)
Table of Contents
Advertisement
Quick Links
Advertisement
Table of Contents

Subscribe to Our Youtube Channel
Related Manuals for TESTO 480


Summary of Contents for TESTO 480
- Page 1 480 · Climate measuring instrument Instruction manual...
-
Page 3: Table Of Contents
1 Contents Contents Contents ....................3 Safety and the environment ..............5 2.1. About this document ................ 5 2.2. Ensure safety................... 6 2.3. Protecting the environment .............. 7 Specifications ..................7 3.1. Use ....................7 3.2. Technical data ................. 8 Product description ................ - Page 4 1 Contents 6.6.11. WBGT measurement ..................44 6.6.12. PMV/PPD measurement .................. 45 6.6.1. Calculating the normal effective temperature (NET) ........49 6.6.2. Saving measurement values ................51 6.6.3. Printing measurement values ................52 6.6.4. Display measuring values graphically .............. 52 6.6.5.
-
Page 5: Safety And The Environment
2 Safety and the environment Safety and the environment 2.1. About this document Symbols and writing standards Representation Explanation Warning advice, risk level according to the signal word: Warning! Serious physical injury may occur. Caution! Slight physical injury or damage to the equipment may occur. -
Page 6: Ensure Safety
Follow the prescribed steps exactly. Use only original spare parts from Testo. > Temperatures given on probes relate only to the measuring range of the sensors. Do not expose handles and feed lines to temperatures in excess of 40 °C (104 °F), unless they are... -
Page 7: Protecting The Environment
Testo for disposal. Specifications 3.1. The testo 480 is a measuring instrument for measuring climate- related parameters. The testo 480 is ideal for comfort level measurements for the workplace evaluation and flow measurements in and at ventilation and air-conditioning systems. -
Page 8: Technical Data
1x differential pressure • 3x digital probes (flow, humidity, temperature, CO , Lux, absolute pressure) Interfaces • Mini USB • Infrared for testo report printer • SD card • Mains connection Internal memory 1.8 GB (approx. 60,000,000 measuring capacity values) Rechargeable battery Approx. - Page 9 3 Specifications Integrated measurement (at 22 °C, ±1 digit) Feature Values Temperature (TC Measuring range: -200.0 to +1370.0 °C type K; internal Accuracy: ±(0.3 °C + 0.1 % of meas. val.) reference point Resolution: 0.1 °C measurement: measuring range 0 to The accuracy information applies in +40 °C, accuracy an adjusted, stable temperature...
- Page 10 3 Specifications Standards, tests, warranty Feature Values EU Directive 2014/30/EC Vibration IEC 60068-2-6 Mains unit (0554 8808) for continuous measurements and battery charging Feature Values Output voltage 5 V / 4 A Lithium battery Feature Values Charging option In instrument Charge time Approx.
-
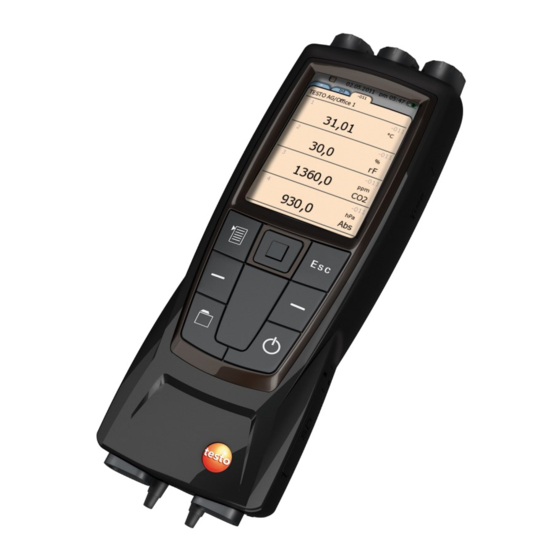
Page 11: Product Description
4 Product description Product description 4.1. Overview 4.1.1. Hand instrument 1 Display 2 Mini USB interface (right-hand side of instrument) 3 Control buttons and trackpad (navigation field) 4 SD card slot (right-hand side of instrument) -
Page 12: Instrument Connections And Interfaces
4.1.2. Instrument connections and interfaces 1 Probe sockets for digital probes 2 IR interface for printouts with testo report printer (art. no. 0554 0549) CAUTION Risk of injury from infrared beam! > Do not direct infrared beam at human eyes! -
Page 13: Controls
4 Product description Bottom 1 TC connection for temperature probe type K 2 Connections for differential pressure (+/- sign on the instrument) 3 Mains socket 4 Status LED, mains socket Status Explanation LED off Rechargeable battery is not charging LED on, Rechargeable battery is charging lights up LED on,... -
Page 14: Display
4 Product description Button Functions Briefly touch the trackpad with your finger to confirm the selection. When confirming, you should notice a click similarly to pressing a button. [Esc] Back, cancel function Open main menu, save settings Configurable button for quick access to a frequently used function. - Page 15 4 Product description Tab name Explanation (Favourites tab) The Favourites tab is the actual work area for the instrument see Favourites tab, page 25. Here, measurement values of various probes can be combined into one measurement, and measuring programs can be run, saved and printed.
-
Page 16: First Steps
5.1. Commissioning Initial charging of rechargeable battery The testo 480 is delivered with a partially charged battery. Charge the battery fully before using it for the first time. 1. Connect the mains unit to the mains socket (3). 2. Connect the mains plug to a power socket. - Page 17 5 First steps The current measurement values are displayed. The instrument is now operational. Switching off Unsaved measurement values are lost when the instrument is switched off. > Switch the instrument off with Connecting probes / sensors Probes are detected automatically by the instrument. Make sure the connections are secure, but do not use force! >...
-
Page 18: Getting To Know The Product
5 First steps Connecting the mains unit If the mains unit is connected, the instrument is powered automatically via the mains unit. When power is supplied via the mains unit, the instrument may heat up. This may increase the measurement uncertainty during TC measurement. -
Page 19: Calling Up A Function
5 First steps 5.2.2. Calling up a function 1. Select function: A box appears around the selected function. 2. Confirm selection: The selected function is opened. 5.2.3. Exit the menu > Press [Esc]. Before the entered data or measurement data may be lost, a confirmation prompt always appears, which must be confirmed with Save and... -
Page 20: Saving Values
6 Using the product Input editor 1. Select the value to be changed (character): 2. Accept value: Options: > Toggle between upper / lower case characters: Select > Toggle between characters and numbers: select > Insert space: select > Delete character in front of cursor: select 3. - Page 21 Change/deactivate password • Probe name If you forget the password, it can only be reset by Testo Service Password protection is not set as default. Units It is possible to toggle between ISO and US units. The setting only relates to the unit of the measured parameters, not to the calculated parameters.
-
Page 22: Setting The Measurement Display
6 Using the product Symbol Explanation Factory reset The instrument is reset to the factory settings: • Settings • Adjustment data • Password deactivated • Favourites are deleted from the internal tab. Favourites remain on the probe tab. [ESC] [ESC] 3. -
Page 23: Calculated Measurement Parameters
6 Using the product Representation Explanation Parameter display The individual measurement parameters can be changed in the parameter display: • Change measurement parameters and units: press to select the line and press to activate, see Calculated measurement parameters, page 23. •... - Page 24 6 Using the product Standard flow rate Value calculated from the operating flow rate and relating to the values entered under norm data (e.g. 25 °C, 1013 hPa). To edit norm data, see Performing settings, page 20. Dampness degree (pressure-dependent) Unit g/kg: Describes how many grams of water are contained in a kg of dry air.
-
Page 25: Favourites Tab
6 Using the product For the measurement parameter, press to call up all measured and calculated measurement parameters which the selected probe can provide. Select the required measurement parameter and confirm with For the unit, press to call up all available units for the measurement parameter. - Page 26 6 Using the product Symbol Explanation Probe info Probe name, serial number and probe type are displayed. Probe name Probe name can be edited. Adjustment info The probe-specific adjustment data saved on the probe can be displayed. The digital probes allow direct measurement and signal conversion in the probe.
-
Page 27: Explorer Menu
6 Using the product 6.5. Explorer menu In Explorer, all saved measurement values are displayed with the assigned data like the measuring program and customer data in a set structure. Measurement values that were not saved are lost when the measuring instrument is switched off! Calling up the Explorer view >... - Page 28 6 Using the product Creating a new location A location is always created in a folder. Customer-specific information can be assigned to the measuring location. 1. Select the folder in which the location is to be created. New measuring location. →...
- Page 29 6 Using the product Parameters Explanation Flow rate correction Due to pressure drops in the system, the measured factor volume flow may be smaller than the actual volume flow. The measured volume flow can be corrected via the flow rate correction factor. The flow rate correction factor has a directly proportional effect on the measurement result and is usually set at 1.00.
-
Page 30: Measurements & Measuring Programs
6 Using the product > → New WBGT measurement: Carrying out a WBGT measurement, see Turbulence measurement, page 37. see PMV/PPD measurement, page 45 see WBGT measurement, page 44 6.6. Measurements & Measuring programs General measurement information • Depending on the measurement parameter to be measured, certain probes must be plugged into the instrument. -
Page 31: Measuring Program
6 Using the product 6.6.3. Measuring program You can customise measuring programs to match the relevant measuring task (e.g. timed or multi-point storage). These measuring programs are linked to a specific measuring point. After the measurement, the relevant measurement protocols are saved under the measuring program. -
Page 32: Grid Measurement
6.6.4. Grid measurement There are various options for measuring the air and volumetric flow rate in ventilation and air-conditioning systems. These are distinguishable by the measuring range in particular. For the testo 480, there are three different flow probes:... - Page 33 Detailed background information on grid measurement and carrying it out can be found in the Testo Ambient Air Measurement for Practical Users field guide. You can request a free copy or download it from www.testo.com.
- Page 34 6 Using the product Parameter Values Temperature, The parameters must be correctly entered or Relative humidity measured. This affects the measurement Absolute with Pitot tube. pressure Thermal probe has an internal absolute pressure sensor. No entry is required here. Flow rate Must be 1.00 (has a proportional effect on correction factor the flow rate).
- Page 35 The number of measuring points depends on points the distance from the point of discontinuity and irregularities in the profile. More information can be found in the Testo "Ambient Air Measurement for Practical Users" field guide. Hole position Depending on channel accessibility, select...
- Page 36 6 Using the product Performing the measurement ✓ All points under "Preparing for measurement" have been carried out. 1. Position the probe at the grid measurement point shown in the form of a chart on the display. 2. With or the integrated measurement button on the probe, transfer the measured value, or start the continuous/punctual measurement.
-
Page 37: Turbulence Measurement
6 Using the product The display automatically switches to the measurement protocol view. The HVAC protocol contains multiple views, which can be changed via[ • Values Result: End result (mean value) and deviation of the flow velocity and volumetric flow parameters. •... -
Page 38: Pitot Tube Measurement
6 Using the product and draught rating as per EN ISO 7730 is displayed. → Save and close. Measurement protocol is saved under the selected measuring point. 6.6.6. Pitot tube measurement To measure flow with a Pitot tube, the following parameters must be entered in the measuring point (manual entry or measured values). -
Page 39: Measurement With The Funnel
6 Using the product 6.6.7. Measurement with the funnel Function available from firmware version 1.11 onwards. A flow rate funnel is required to determine the flow rate on ventilation systems. The measurement can be carried out with a 100 mm vane probe in conjunction with the testovent 417 funnel set (order no. -
Page 40: Pressure Measurement
Measuring program, page 31. Carry out the measurement on the basis of this data. 6.6.8. Pressure measurement The testo 480 has an internal absolute and differential pressure sensor. The pressure measurement values are therefore displayed on the tab. -
Page 41: Determination Of Volume Flow Using Differential Pressure And K Factor
Setting available as of firmware version 1.10. The testo 480 can determine the volume flow by measuring the reference resistance and entering the so-called k factor. This is a really simple process, especially for tasks involving setting air... - Page 42 6 Using the product Conversion factor k factor - differential pressure unit mm HG 0.086613 in HG 0.017185 mm WS 0.31933 lp.p.sq.ft. 0.14452 0.012043 inches H 0.063361 Carrying out a measurement 1. Switch the instrument on with > Configure the parameter display so that differential pressure and volume flow are shown in the favourites tab, see Setting the measurement display, page 22.
-
Page 43: Co Measurement
6 Using the product Parameters Explanation Electrical power Input optional, parameter is not taken into account for this calculation. Optional entries are listed in the protocol. 3. Enable measuring point: → Save and select New measuring 4. Create new measuring program: →... -
Page 44: Wbgt Measurement
6 Using the product • To avoid the effects of the CO content of respired air, hold the probe as far away from your body as possible. • If sudden changes occur in the concentration, the probe will require approx. 30 - 60 sec. to adapt to the environment. Gently waving the probe reduces the adjustment period. -
Page 45: Pmv/Ppd Measurement
Percentage Dissatisfied) e.g. at workstations and is described in the ISO 7730. The mean radiation temperature required for determining PMV/PPD is calculated in the testo 480 from the measurement parameters of globe temperature, ambient temperature and air speed. The formula is based on forced convection and applies to standard bulbs with 150 mm diameter. - Page 46 6 Using the product • Globe temperature in °C = t • Ambient temperature in °C = t • Air speed in m/s = v tr = [(tg+273)4+2.5*108*va0.6*(tg-ta)]1/4-273 Factors to be entered • Clothing Clothing reduces body heat losses and is therefore classified based on its insulating value.
- Page 47 6 Using the product Parameter Parameter in Explanation in clo m2K/W 2.80 – 3.00 0.433 – 0.465 Extremely warm winter clothing Input parameters for activity Parameter Parameter in Explanation in met W/m2 0.1 – 0.7 6 – 45 Lying down, relaxed 0.8 –...
- Page 48 6 Using the product Performing a measurement ✓ All points under "Preparing for measurement" have been carried out. 1. Press Explorer structure is displayed. 2. Select the desired measuring point. The settings in the measuring point have no effects on the measurement result.
-
Page 49: Calculating The Normal Effective Temperature (Net)
6 Using the product Graphical representation 1 PPD axis, scale from 0% to 100% 2 PMV axis, scale from -3 to +3 3 Green area of curve from -0.5 to 0.5 PMV 4 Calculated point from PPD and PMV. 5 Critical area of curve Formula for display PPD = 100-95*exp(-0.03353*PMV –... - Page 50 6 Using the product • Radiation temperature in °C = t (optional) • Air temperature in °C = t • Air humidity in %RH = RH t • Air velocity in m/s = v We recommend using the following probes: •...
-
Page 51: Saving Measurement Values
6 Using the product During the measurement, the values are calculated from the current readings. After the measurement, a calculation is carried out based on mean values. → Save and close Measurement protocol is saved under the selected measuring point. 9. -
Page 52: Printing Measurement Values
From measuring mode ✓ testo printer (0554 0549) is switched on. ✓ Required tab has been selected. 1. Align IR interfaces on the top of the testo 480 and testo printer. 2. Select → Print. The set measuring view and are displayed. -
Page 53: Transferring Measurement Values
5 Specific x-axis of the respective measurement parameter in the same colour as the graphically displayed measuring value 6.6.5. Transferring measurement values To view and evaluate the measurement results on the PC, you need the testo EasyClimate software. 1. Switch on the testo 480. -
Page 54: Maintaining The Product
As soon as the instrument is disconnected from the PC, it can be operated again via the control keys. 3. For carrying out an instrument readout via testo EasyClimate software and processing data, see separate testo EasyClimate software instrument manual. -
Page 55: Carrying Out A Firmware Update
7 Maintaining the product The Testo adjustment set provides a reference value to calculate the offset for a humidity adjustment. Humidity adjustment is possible with the following probes: • Humidity probe • IAQ probe • Thermal air flow measuring head and humidity probe... -
Page 56: Tips And Assistance
- - - - lights up instead of Instrument sensor is faulty. the measurement > Contact your dealer or the Testo parameter display Customer Service. Data cannot be copied to SD card is write-protected. the SD card or imported >... -
Page 57: Accessories And Spare Parts
8 Tips and assistance If we could not answer your question, please contact your dealer or Testo Customer Service. For contact data, see back of this document or website www.testo.com/service-contact. 8.2. Accessories and spare parts Description Article no. System case for comfort level measurement... - Page 58 0970 4800 en 08...
Need help?
Do you have a question about the 480 and is the answer not in the manual?
Questions and answers