Table of Contents
Advertisement
Quick Links
Download this manual
See also:
User Manual
Advertisement
Table of Contents

Related Manuals for 3D Systems TOUCH


Summary of Contents for 3D Systems TOUCH
- Page 1 Touch™ 3D stylus Hands on design User Guide...
-
Page 2: Table Of Contents
LIMITATION OF LIABILITY INTRODUCTION SAFETY SETTING UP THE TOUCH WHAT'S INCLUDED INSTALLATION STEPS GET THE TOUCH ACTIVATION CODE (CUBIFY SCULPT ONLY) DOWNLOAD AND INSTALL THE TOUCH DEVICE DRIVERS CONNECT THE TOUCH+ TOUCH SETUP CALIBRATE THE TOUCH DOWNLOAD, INSTALL AND ACTIVATE... -
Page 3: Copyright
WARRANTY No warranties of any kind are created or extended by this publication. 3D Systems warrants that the Touch haptic device will be free from defects in materials and workmanship, during the applicable warranty period, when used under the normal conditions described in the documentation provided to you, including the respective User Guide. -
Page 4: Introduction
INTRODUCTION The Touch 3D stylus is the first-ever haptic consumer 3D stylus for intuitive 3D sculpting and design, with instant force feedback that mimics the sense of physical touch. Touch works with 3Ds’ Geomagic Sculpt , Freeform and Cubify Sculpt , powerful virtual ®... -
Page 5: Safety
• Do not open the Touch device. Attempting to open or repair the device by anyone other than a certified authorized service center voids the manufacturer warranty and hardware maintenance contract. There are no serviceable components in the Touch device or power supply. -
Page 6: Setting Up The Touch
The Touch activation code displays along with a license key for Cubify Sculpt. You will also receive an email with this information. You will use the Touch activation code and the Cubify Sculpt license key later when you download, install and then start the Cubify Sculpt software for the first time. -
Page 7: Connect The Touch
Touch cables from the box. Position the Touch device in your workspace, using both hands to grasp the body or base of the device. NOTE: See “Handling the Touch Device” on page 12 for instructions on how to handle the device to reduce the risk of damage. - Page 8 3D Systems customer support. After all power has been connected properly, insert the smaller end of the USB cable into the Touch device, then connect the larger end of the USB cable into the USB port on your computer.
-
Page 9: Touch Setup
TOUCH SETUP When you install the Geomagic Touch Device Driver (GTDD), it installs two helpful utilities: the Geomagic Touch Setup utility and the Geomagic Touch Diagnostic utility. Geomagic From your Desktop or from Start>All Programs>>3D Systems>Geomagic Touch>Geomagic Touch Setup, open the Touch Setup utility. -
Page 10: Calibrate The Touch
IMPORTANT: Before you install and activate the 3D software, make sure the most up-to-date device drivers are installed, your Touch device is connected properly, and the Touch is calibrated. If you have installed a trial version, save all your work files and uninstall the trial version, then follow the steps below. -
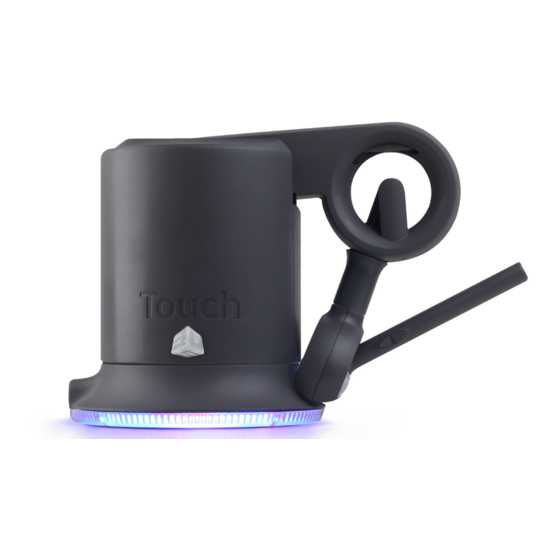
Page 11: Getting To Know The Touch
LED ring indicator LED (LIGHT) RING INDICATORS The LED ring at the base of the Touch will display a different color light depending on the status of the Touch. • Blue - Power is on, but not communicating with application... -
Page 12: Proper Handling And Positioning
Lifting the device: To properly lift the device grasp the base of the Touch unit on both sides and lift as shown in the image below. DO NOT lift by grabbing the stylus or arm. Lifting the unit by the stylus or arm could result in severe damage to the device. -
Page 13: Handling The Stylus
To calibrate the device, place the stylus in the inkwell and start your application. Calibration may take up to a second, so do not immediately remove the stylus from the inkwell. The LED ring at the base of the Touch device will be lit white when the device is properly calibrated. - Page 14 3rd party vendors online. • If you are left-handed, you may find it easier to work with the Touch placed to the left of the keyboard. • Remember to take breaks often to stretch your hands, wrists, and elbows.
-
Page 15: Using The Touch Device
Forcing the Touch past any of these stops will damage the device. Take some time to become more familiar with the stops of the Touch before using the device by moving the device through its full range of motion. - Page 16 Next, perform smaller movements from the orb, moving your wrist: Rotate the stylus left and right. Using your wrist, rotate the stylus to the left. Using your wrist, rotate the stylus to the right. 3D Systems, Inc.
- Page 17 From the wrist, twist the stylus. Now you should have an understanding of the range of motion of the Touch device and where its limits are. WARNING: ALWAYS WORK WITH THE CONNECTED END OF THE STYLUS POINTING AWAY FROM YOU. NEVER ROTATE THE STYLUS WITH THE POINT FACING YOU.
-
Page 18: Features And Specifications
3.4 N Force feedback 3° of freedom X, Y and Z 6° of freedom X, Y & Z (Digital Encoders) Roll, Pitch & Yaw (± 5% 6-degree-of-freedom positional sensing linearity potentiometers) Interface USB 2.0 USB cable length 6’ 3D Systems, Inc. - Page 19 333 Three D Systems Circle | Rock Hill, SC | 29730 www.3dsystems.com ©2014 3D Systems, Inc. All rights reserved. The 3D Systems logo, 3D Systems, Geomagic and Geomagic Product are registered trademarks of 3D Systems, Inc. pn 401332 Rev. B...
Need help?
Do you have a question about the TOUCH and is the answer not in the manual?
Questions and answers