Table of Contents
Advertisement
Quick Links
Advertisement
Table of Contents

Related Manuals for Elan EL-TSTAT-8810


Summary of Contents for Elan EL-TSTAT-8810
- Page 1 EL-TSTAT-8810 Safety & Installation Instructions...
-
Page 2: Table Of Contents
TABLE OF CONTENTS EL-TSTAT-8810 TABLE OF CONTENTS WI-FI SETUP Wi-Fi Setup ________________________________________________________________________ 3 INSTALLATION Installation Location Recommendations _____________________________________________________ 5 Outdoor Temperature Sensor (optional) _____________________________________________________ 6 Thermostat Mounting _________________________________________________________________ 7 Power & Reset Options ________________________________________________________________ 7 Wiring Terminal _____________________________________________________________________ 8 Wiring Diagrams ____________________________________________________________________ 9 SETUP &... -
Page 3: Wi-Fi Setup
Note for Wi-Fi setup and software configuration. ELAN Integration Notes are served through the ELAN tools and on elanhomesystems.com/dealer-resources. If you are planning to install the ELAN Thermostats when an ELAN controller is not present, please follow the instructions below. - Page 4 WI-FI SET UP EL-TSTAT-8810 WI-FI SET UP (Continued) STEP 2 In the web browser interface select the network you want to connect the thermostat to, and enter the Connect to the thermostat using a computer network’s security credentials. or mobile device.
-
Page 5: Installation Location Recommendations
INSTALLATION EL-TSTAT-8810 INSTALLATION LOCATION RECOMMENDATIONS Thermostat should be mounted: Do not mount thermostat: • On an interior wall, in a frequently occupied space. • Behind doors, in corners, or other dead air spaces. • Approximately 5‘ above floor. • In direct sunlight, near lighting fixtures, or other appliances that give off heat. -
Page 6: Outdoor Temperature Sensor (Optional)
INSTALLATION EL-TSTAT-8810 OUTDOOR TEMPERATURE SENSOR (Optional) Outdoor temperature can be measured by attaching an EL-STAT-SEN-8052 sensor to the S1 and S2 terminals. System setting #15 (Outdoor Sensor) is used to enable sensor. Heat pump applications can use the outdoor temperature to effectively utilize the heat pump: •... -
Page 7: Thermostat Mounting
INSTALLATION EL-TSTAT-8810 THERMOSTAT MOUNTING 1. Remove the rear mounting plate from the thermostat. 2. Pull wires through the opening on the back of the rear mounting plate. 3. Position and level the mounting plate of the thermostat on wall and mark the hole locations with a pencil. -
Page 8: Wiring Terminal
INSTALLATION EL-TSTAT-8810 WIRING TERMINAL WIRE SPECIFICATIONS RC – 24 VAC supply cooling* R – 24 VAC supply heating* 18-24 gauge thermostat wire W – First stage heat (conventional) / First stage auxiliary (heat pump) INSTALLATION NOTES Y – First stage cooling (conventional) / First stage compressor (heat pump) G –... - Page 9 INSTALLATION EL-TSTAT-8810 WIRING SINGLE TRANSFORMER (USE JUMPER WIRE) TWO TRANSFORMERS (REMOVE JUMPER WIRE) FOR HEAT/COOL SYSTEM FOR HEAT/COOL SYSTEM S1 S2 O/B W2 Y2 S1 S2 O/B W2 Y2 contact techsupport@elanhomesystems.com...
- Page 10 INSTALLATION EL-TSTAT-8810 WIRING SINGLE TRANSFORMER (USE JUMPER WIRE) TWO TRANSFORMERS (REMOVE JUMPER WIRE) FOR HEAT PUMP SYSTEM FOR HEAT PUMP SYSTEM S1 S2 O/B W2 Y2 S1 S2 O/B W2 Y2 www.elanhomesystems.com...
-
Page 11: Setup & Testing
Note for Wi-Fi setup and software configuration. ELAN Integration Notes are served through the ELAN tools and on elanhomesystems.com/ dealer-resources. If you are planning to install the ELAN Thermostats when an ELAN controller is not present, please follow the instructions below. - Page 12 Includes Event-Based Air Cleaning ™ The EL-TSTAT-8810 thermostat has the option of being used in heat pump or heat/cool systems. Switch SW1 located on the back of the thermostat is used to select this. System setting number 01 will only be shown on these models to display the position of SW1.
- Page 13 SETUP & TESTING EL-TSTAT-8810 SYSTEM SETUP INSTRUCTIONS (Continued) Factory default setting (bold) System setting Description and setting range Selects if the thermostat connects to a control 0: ELAN Web Interface 00. Control System Enabled 1: Control System system or web interface.
- Page 14 15. Outdoor Sensor 1: Installed outdoor temperature is provided by a Control 2: Control System System. Not currently supported in ELAN. 5 minutes 18. Compressor Min Off Time Minimum off time for compressor protection. 1 to 5 minutes 2 minutes 19.
- Page 15 25. Fourth Stage Differential Fourth stage differential. 1°F to 9°F (0.5°C to 4.5°C) Enables the Away feature. The Away feature allows ELAN Control System or web interface to 0: Disable use a single button press to set the thermostat to 26. Away a predefined setpoint(s).
- Page 16 27. Heat Blast temperature 3°F to 5°F based on the Blast Offset 1: Enable and then resume normal operation. Heat Blast can be canceled with the ELAN Control System or at the thermostat. 3°F (1.5°C) 28. Blast Offset Amount of heating when Heat Blast is initiated.
- Page 17 SETUP & TESTING EL-TSTAT-8810 SYSTEM SETUP INSTRUCTIONS (Continued) Factory default setting (bold) System setting Description and setting range Outdoor temperature high balance point. 65°F or 14.5°C 40. High Balance Point Note: This option is only available if the outdoor 0°F to 80°F (-18°C to 22°C) or OFF to sensor is set to Installed or Automation.
-
Page 18: System Test Mode
SETUP & TESTING EL-TSTAT-8810 SYSTEM TEST MODE The system test mode is used to test a system after installation. The outputs of the thermostat can be manually activated one at a time to test their function. The following instructions show how to enter the test mode and turn outputs on and off. - Page 19 SETUP & TESTING EL-TSTAT-8810 SYSTEM TEST MODE (Continued) HOW TO ENTER THE SYSTEM TEST MENU Press repeatedly until system is set to OFF. Press to turn on the output (01). For multi stage output, press again to turn on Press and hold for three seconds.
- Page 20 SETUP & TESTING EL-TSTAT-8810 TEST STEPS FOR HEAT/COOL System Setting Display (Output) Step Key Input HEATING HEATING COOLING COOLING FAN ON ON (W) ON (W2) ON (Y) ON (Y2) 0 : Gas 1st [UP] 1 : Elec #50 Heat 0 : Gas...
- Page 21 SETUP & TESTING EL-TSTAT-8810 TEST STEPS FOR HEAT PUMP System Setting Display (Output) 01 AUX 02 AUX Step Key Input HEATING HEATING COOL/HEAT COOL/HEAT FAN ON ON (W) ON (W2) ON (Y) ON (Y2) 0 : O 1st [UP] 1 : B...
-
Page 22: Quick Reference To Controls & Display
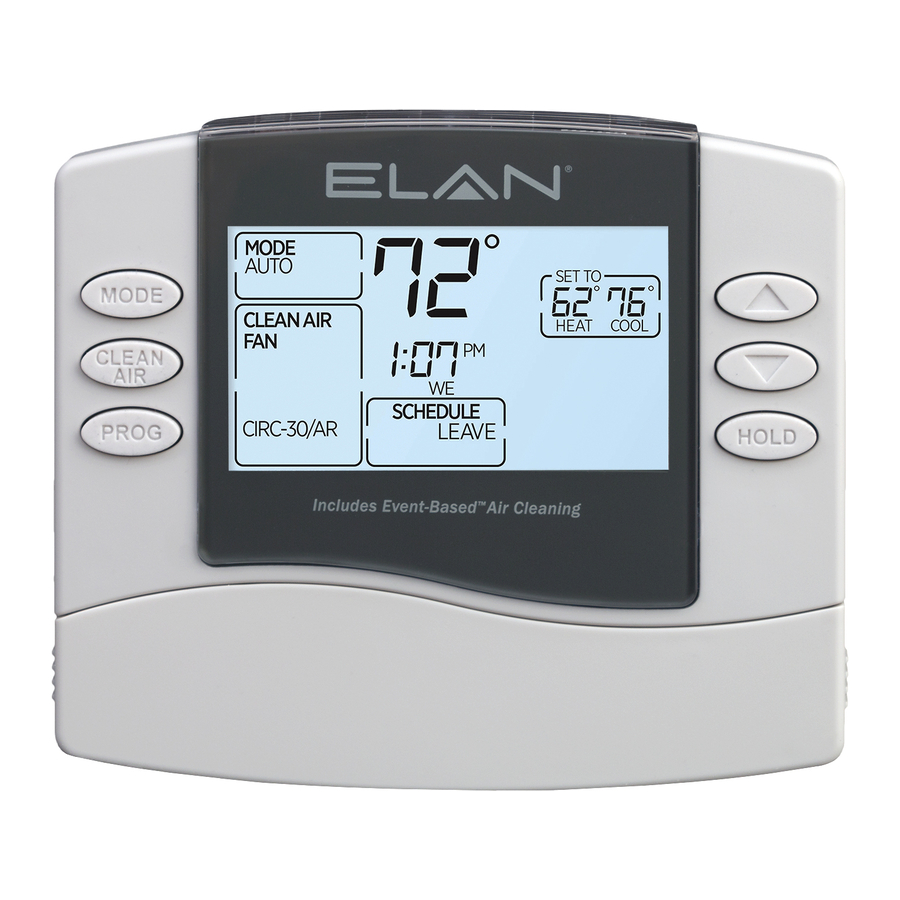
QUICK REFERENCE EL-TSTAT-8810 QUICK REFERENCE TO CONTROLS & DISPLAY CURRENT INDOOR TEMPERATURE CURRENT TIME OUTDOOR TEMPERATURE (OPTIONAL) SYSTEM MODE SETTING TEMPERATURE SETTING EQUIPMENT STATUS CLEAN AIR SETTING SYSTEM MODE DOWN CLEAN AIR HOLD PROGRAM INDICATORS SHOW THROUGH HOUSING HEAT PUMP ONLY... -
Page 23: Thermostat Features
THERMOSTAT FEATURES EL-TSTAT-8810 THERMOSTAT FEATURES • Remote access and control over Wi-Fi.* • System test mode. • Event-Based Air Cleaning. • 7 day programmability. ™ • Large, clear, backlit display is easy to read – • Easy to use temperature control can override even in the dark. -
Page 24: Troubleshooting
TROUBLESHOOTING EL-TSTAT-8810 TROUBLESHOOTING DISPLAY IS BLANK TEMPERATURE SETTINGS DO NOT CHANGE • Check circuit breaker and reset if necessary. Make sure heating and cooling temperatures are set to acceptable ranges: • Make sure power switch at heating & cooling • Heat: 40° to 90°F (4° to 32°C). - Page 25 TROUBLESHOOTING EL-TSTAT-8810 TROUBLESHOOTING (Continued) FAN DOES NOT TURN ON IN A CALL FOR HEAT HEATING EQUIPMENT IS RUNNING IN COOL MODE • Check System Setting #07 (Fan Control), to make sure the fan control is properly set to match the type •...
-
Page 26: Specifications
SPECIFICATIONS EL-TSTAT-8810 SPECIFICATIONS Environment Thermal Operating: 32° to 120°F Outdoor temperature Maximum distance: 300 feet (0° to 48.9°C) sensor Temperature Shipping: -30° to 140°F Room temperature Display range: 32° to 99°F (-34.4° to 60°C) measurement (0° to 40°C) Operating: 5% to 90% R.H. - Page 27 Cat5e/6/6a cabling with or in close parallel proximity to mains power cables. Do not substitute or use any other power supply other than the enclosed unit, or a ELAN approved replacement. Do not disassemble the unit for any reason. Doing so SURGE PROTECTION DEVICE RECOMMENDED will void the manufacturer’s warranty.
- Page 28 1 (800) 472-5555 - US techsupport@elanhomesystems.com 1 (707) 283-5900 - International 1 (707) 283-5901 - Fax web: elanhomesystems.com © 2017 ELAN is a registered trademark of Core Brands, LLC. 10018963 Rev-A0, 10/2017 ®...
Need help?
Do you have a question about the EL-TSTAT-8810 and is the answer not in the manual?
Questions and answers