Table of Contents
Advertisement
Advertisement
Table of Contents

Related Manuals for Rupert Neve Designs RMP-D8


Summary of Contents for Rupert Neve Designs RMP-D8
- Page 1 RMP-D8 8 Channel Dante Microphone Preamp Serial Number: Operations Manual...
-
Page 2: Important Safety Instructions
CAUTION: Changes or modifications to this device not expressly 11. Only use attachments/accessories specified by the manufacturer. approved by Rupert Neve Designs LLC, could void the user's authority to 12. Use only with a cart, stand, tripod, bracket, or PORTABLE CART operate the equipment under FCC rules. -
Page 3: Table Of Contents
Table of Contents Introduction Block Diagram Front Panel Rear Panel RMP-D8 Features Network Connectivity OLED Display Dante Controller Gain Compensation Application Remote Control Yamaha ID USB Firmware Update Specifications Limited Warranty... -
Page 4: Introduction
Microphone Preamp Thank you for purchasing the Rupert Neve Designs RMP-D8. We hope you enjoy using this product as much as we have enjoyed designing and building it. The RMP-D8 represents the culmination of several years of analog and digital... -
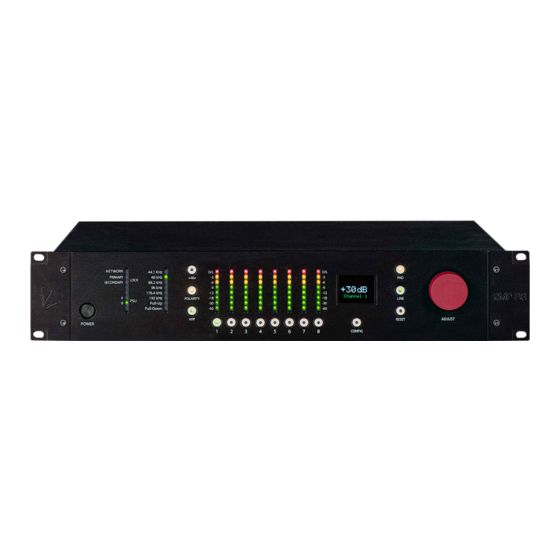
Page 7: Front Panel
Individual channel gain is restricted to a maximum of +30dB to prevent potential input overload RESET If the RESET button is pressed on the RMP-D8 front panel, the user will be prompted with the following message on the front panel OLED display:... -
Page 8: Network Connectivity
RMP-D8 Network Connectivity The RMP-D8 has a Primary Dante Network Port as well as a redundant Secondary Dante Network Port. The Primary Port provides the main Dante Network connectivity, as well as connection to Dante Controller running on your PC or MAC. -
Page 9: Oled Display
RMP-D8 OLED Display The RMP-D8 utilizes a front panel OLED display screen for multiple menu functions. The default operational screen will show the current status of the selected channel, including: Channel Gain, +48V Phantom status (+48), PAD status (-10), Polarity status (P+), HPF status (HPF), Front Panel Lockout (LOCK), and Gain Compensation status (GC). - Page 10 Yamaha ID: EDIT Pressing the CONFIG button a sixth time will bring up the Dante ID info screen: Dante ID Device Name: RND-RMP-D8-10 D5B6 Pressing the CONFIG button a seventh time will bring you back to the standard operational status screen.
-
Page 11: Dante Controller
In order to configure sample rate, bit depth, and Dante network audio routing, you will need to run Dante Controller on your PC or MAC computer. The RMP-D8 will identify in Dante Controller with the same Dante ID as seen on the OLED display in the Dante ID configuration menu. - Page 12 Within the Device View Window, click on the Device Config Tab: Within the Device Config Window, the user can adjust sample rate, bit depth, pull-up/pull-down and latency settings:...
-
Page 13: Gain Compensation
These mirrored outputs appear in Dante Controller on channels 9-16 identified as ‘RMP-D8 Channel 1 GC Output’ through ‘RMP-D8 Channel 8 GC Output’ and are output at an audio level which is pre-set to be 6dB below the set gain on each channel. -
Page 14: Application Remote Control
Application: This feature becomes useful in the event that the FOH engineer needs to make a gain adjustment to a specific RMP-D8 channel (Channels 1-8), but does not want to affect the mirrored transmit channels going to the monitor engineer (Transmit Channels 9-16). - Page 15 Initial Connection Once the application is open, click on the DISCOVER button. This button will scan for all available RMP-D8 units that are currently active on the network. The ServerIP drop down menu will list all succesfully discovered RMP-D8 units by their IP address.
- Page 16 Connected Disconnected Once disconnected, navigate to the ServerIP dropdown menu, select the IP address of another RMP-D8 and click the TCP CONNECT button once again to connect to the newly selected RMP-D8. Once the TCP CONNECT button is illuminated and a “Connect Successful” message has been received, click on the...
- Page 17 Basic Application Operation Clicking once on any channel’s gain knob will make that channel’s gain knob active (highlighted). Clicking repeatedly on the channel gain knob will increment the channel gain by +1dB for each click. The user can also click in the box directly below the channel gain knob and type in the desired value for quick and precise gain adjustments.
- Page 18 Application Front Panel Lockout In addition to the RMP-D8 front panel button combination for Front Panel Lockout (see page 5), the user can also remotely lock the Front Panel within the application:...
-
Page 19: Yamaha Id
EDIT The RMP-D8 will prompt the user to EDIT the Yamaha ID. The default Yamaha ID is set to “OFF” and the EDIT prompt defaults to “NO. ” To EDIT the Yamaha ID number, rotate the ADJUST wheel one detent clock-wise until the EDIT prompt says “YES. -
Page 20: Usb Firmware Update
RMP-D8 USB Firmware Update Field Update Procedure: 1. Power ON the RMP-D8 and press the CONFIG button once to take note of the current firmware (FW) version on the SYSTEM screen. 2. After confirming the current FW version, power the RMP-D8 OFF. -
Page 21: Specifications
RMP-D8 Specifications Noise 150 Ohm Balanced Source, AES Output, 22 Hz to 22 kHz, un-weighted +60dB Gain -91 dBFS Unity Gain -110 dBFS Frequency Response 0dBu , Unity Gain 50 Hz to 12.5 kHz -0.1 dB 20 Hz -0.5 dB 40 kHz +0.2 dB... -
Page 22: Limited Warranty
PRODUCT WARRANTY Rupert Neve Designs warrants this product to be free from defects in materials and workmanship for a period of one (1) year from date of purchase, and agrees to remedy any defect identified within such one year period by, at our option, repairing or replacing the product.
Need help?
Do you have a question about the RMP-D8 and is the answer not in the manual?
Questions and answers