Advertisement
Quick Links
600 Series Router
Quick start guide
Declaration of Conformity
We:
Dataflex Design Communications Limited
8 Frederick Sanger Road, Surrey Research Park,
Guildford, Surrey, GU2 7YD, UK
Declare under sole responsibility that the product family Hera600
to which this declaration relates, is compliant with the essential
requirements of:
RoHS Directive 2011/65/EU
WEEE Directive 2012/19/EU
Ecodesign Directive 2009/125/EC
Batteries Directive 2013/56/EU
Radio Equipment Directive (RED) 2014/53/EU
The Low Voltage Directive 2014/35/EU
The EMC Directive 2014/30/EU
Signed
....................
Name
Jon Darley
Position
Chief Technical Officer
Place and date of issue
Guildford May 2016
Year of affixing CE Mark
2016
Manufactured by Dataflex Design Communications Ltd in China
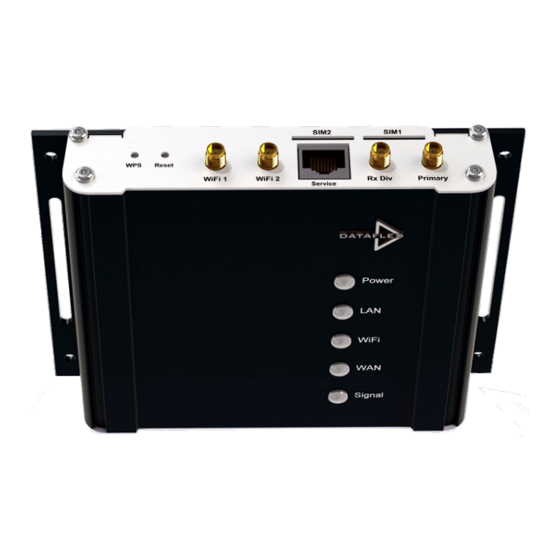
1: Getting started
Never insert or remove SIM cards while
the Hera600 is powered
Insert SIM cards & attach antennas or cables for
cellular (Primary & RX Div) and WiFi
WiFi
Cellular
SIM2
SIM2
SIM1
SIM1
SIM2
WPS
Reset
WiFi1
WiFi2
Service
Rx Div
Primary
Features parts & appearance may vary to those shown.
Link1
100
Link2
100
Link3
100
Link4
100
Power
Serial 1
Serial 2
Power
Insert the power connector. Plug the mains adapter
into a dedicated socket & switch on
Connection to the web interface is required to
configure the Hera600. This can be achieved by
wired ethernet connection or WiFi
2
Wired connection
a:
Connect to a PC or laptop by ethernet cable
either directly or via an ethernet hub
Link1
100
Link2
100
Link3
100
Link4
100
Power
Serial 1
Serial 2
HUB
Ethernet LAN
2
WiFi connection
b:
using username and password
If there is no SSID information on the Hera600 label,
use a wired ethernet to connect to the Hera600
web interface
Front
Back
Hera 804
Hera 600
PROD PART NO
H604ESEYESUCK01
ESN
04423000003170000010
Power
BASE MAC
00D04C0046CA
LAN
IMEI
012345678912345
SSID
DATAFLEX_0046CA
WIFI
PASSPHRASE
0046CA0010
WAN
!
Manufactured by Dataflex Design Communications Ltd
Signal
SSID
WiFi light illuminated
WiFi username
WiFi passphrase
a: Ensure the WiFi light on the Hera600 is illuminated
b: Search wireless networks on your WiFi enabled
laptop, PC, tablet or phone. Connect to the
network which matches the SSID on the
Hera600v4 label
c: Enter the WiFi username and passphrase exactly
as it appears on the label when prompted
2
: WiFi connection
c
using WPS
If there is no SSID information on the Hera600 label,
use a wired connection to connect to the Hera600
web interface
Configure your computing
device to connect to WiFi in
WPS mode
Press the WPS button
SIM2
SIM1
SIM2
WPS
Reset
WiFi1
WiFi2
Service
Rx Div
Primary
The WPS function will automatically set up a
secure connection between your router and
computer
3: Web interface
Open a web page on your PC or laptop, and type
http://192.168.1.1
into the address bar
then
press enter
Internet application
http://192.168.1.1
Address:
username:
admin
password:
admin
Enter the username and password and click OK to
log into the Hera web interface
Note: Appearances may vary according to
operating system and web application.
Information supplied by your equipment
provider overrides any information shown
above
4: Cellular connection
Mobile Connection
Enable
Profile Name APN
User
Password
SIM
USSD
To configure the cellular connection refer to the
documentation supplied by the equipment provider
relating to the SIM
Information required for connection:
Ÿ
Username
Ÿ
Password
Ÿ
Pin code
Ÿ
APN (Access Point Name)
Once logged into the web interface, choose a
profile name, enter the information above and tick
the 'enable' box
This quick start guide provides basic connection information only.
For full feature information download the latest comprehensive user
guide from:
www.dataflex.com/hera
save
Advertisement

Related Manuals for HERA 600 Series

Summary of Contents for HERA 600 Series
-
Page 1: Wifi Connection
Enter the username and password and click OK to Link1 Link2 Link3 Link4 log into the Hera web interface a: Ensure the WiFi light on the Hera600 is illuminated Power Serial 1 Serial 2 Note: Appearances may vary according to... -
Page 2: Front Panel Indicators
Installation: Front Panel Indicators: Warnings: The Hera600 incorporates a GSM radio module. Users should Ensure all warnings on this sheet are read and understood when State Meaning ensure that the antenna is positioned at least 1 metre away from choosing a site for the Hera600 device. themselves and other people in normal operation.
Need help?
Do you have a question about the 600 Series and is the answer not in the manual?
Questions and answers