Table of Contents
Advertisement
Advertisement
Table of Contents

Related Manuals for Max BC-TC-C-WM-4


Summary of Contents for Max BC-TC-C-WM-4
- Page 1 Wall Thermostat BC-TC-C-WM-4...
-
Page 2: Scope Of Delivery
Scope of delivery Scope of delivery Quan- Item tity MAX! Wall Thermostat + Clip-on frame Plug Screws Adhesive stripes 1.5 V LR03/micro/AAA batteries Brief instruction in German/English, French/ Dutch and Polish/Italian... -
Page 3: Table Of Contents
Table of contents Table of contents Information about this manual ......4 Safety instructions ..........4 Function ..............5 Device overview .............7 Start-up ..............9 Setting date and time (dAt)........11 Mounting ..............12 Mounting in existing switches ......15 Teaching-in ............16 10 Teaching-out wireless components (UnL) ..18 11 Operating Modes ..........19 12 Child safeguard/operating lock ......20 13 Setting heat pause (ON) ........20... -
Page 4: Information About This Manual
Information about this manual nformatIon about thIs manual Read this manual carefully before starting to use the de- vice. Keep the manual so you can refer to it at a later date if you need to. If you hand over the device to other persons for use, please hand over the operating manual as well. -
Page 5: Function
Function Using the device for any purpose other than that described in this operating manual does not fall within the scope of intended use and shall inval- idate any warranty or liability. This also applies to any conversion or modification work. The de- vice is intended for private use only. - Page 6 Function MAX! House solution This is the solution for the entire house. With a MAX! Cube, all settings of connected devices in the house can comfortably be made via the MAX! software. By using the MAX! Cube, several MAX! Radia- tor solutions and MAX! Room solutions can be connected to a MAX! House solution in a new installation.
-
Page 7: Device Overview
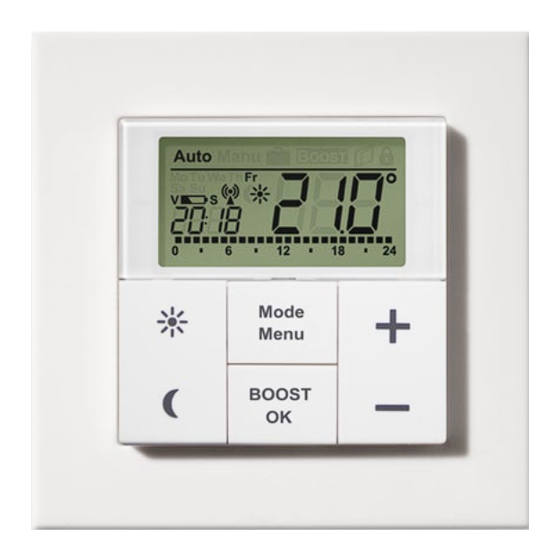
Device overview evIce overvIew (A) Mounting plate (B) Clip-on frame (C) Electronic unit/push-button... - Page 8 Device overview Automatic mode (Auto), manual mode (Manu), holiday func- tion ( ), boost function ( ), open-window function ( ), BOOST operating lock ( ) Weekday, empty battery symbol ( ), radio sychronicity ( ), comfort/reduction temperature ( ), time/date Bar chart of the programmed heating phases of the cur- rent day Comfort temperature button (...
-
Page 9: Start-Up
Start-up tart 5.1 I nsertIng replacIng batterIes As-delivered condition When you are starting up the device for the first time, first remove the mounting plate (A) on the rear of the MAX! Wall Thermostat + . • Hold the MAX! Wall Thermostat + firmly in one hand and pull off the mounting plate at one corner. - Page 10 Start-up The empty battery symbol ( ) indicates that the batteries need to be changed. If, in addition, a "V" or "S" are displayed, the batteries of a taught-in Radiator Thermostat (V) or Window Sensor (S) have to be replaced. Never recharge standard batteries.
-
Page 11: Setting Date And Time (Dat)
Setting date and time (dAt) (dAt) etting date and time After inserting or replacing batteries the firmware ver- sion number will be shown briefly. Accordingly, date and time will be requested automatically. Settings can be changed with the (+) and (-) buttons and confirmed with the Boost/OK button. -
Page 12: Mounting
Mounting During operation without Cube date and time can be changed at any time via "dAt" in the configura- tion menu (see sec. „6 Setting date and time (dAt)“ on page 11). ounting You can either use screws or adhesive strips to mount the MAX! Wall Thermostat + to a wall in the frame sup- plied or integrate it into an existing switch (see sec. - Page 13 Mounting <PA66> • Remove the protective film from the adhesive strips. • Press the assembled MAX! Wall Thermostat + with the back side to the wall in the position where it should subsequently be attached. Screw mounting: • Choose a site for installation. Make sure that no electricity or similar lines run in the wall at this location.
- Page 14 Mounting • Now drill the bore holes. If you are working with a stone wall, drill the marked two 5 mm holes and insert the plugs supplied. If you are working with a wooden wall, you can pre-drill 1.5 mm holes to make screws easier to insert.
-
Page 15: Mounting In Existing Switches
Mounting in existing switches ounting in exiSting SwitcheS You can mount the MAX! Wall Thermostat + with the at- tachment frame provided or use it with frames of other manufacturers as well as integrate the electronic unit into a multi-gang frame. In both cases, mounting with adhesive strips and screws is possible. -
Page 16: Teaching-In
Teaching-in eaching In order to use the MAX! Wall Thermostat + in your in- stallation, you must teach it in to the MAX! system. The teach-in procedure depends on the system variant used. Choose your system variant (House or Room solution) and follow the instructions below. - Page 17 Teaching-in the system and can be configured for each room via the MAX! software. As soon as the MAX! Wall Thermostat + has been taught-in to the MAX! Cube, all data such as date, time or week program are transmitted to it via ra- dio connection.
-
Page 18: Teaching-Out Wireless Components (Unl)
Teaching-out wireless components (UnL) > 3 s • The antenna symbol ( ) and the remaining teach-in time (30 seconds) will be displayed. • If teach-in has been successful, the MAX! Wall Ther- mostat + will change back to normal operating mode. 10 t (UnL) eaching... -
Page 19: Operating Modes
Operating Modes To teach-out devices, proceed as follows: • Press and hold down the Mode/Menu button for more than three seconds. • Select the “UnL” menu item with the (+) and (-) buttons. • Confirm your selection using the Boost/OK button. • "ACC"... -
Page 20: Child Safeguard/Operating Lock
Child safeguard/operating lock In the MAX! Room solution you can change be- tween the functions by pressing the mode button shortly. If the operating mode is changed on one device in a room, this change is applied on all radiator ther- mostats assigned to that room. -
Page 21: Setting Frost Protection (Off)
Setting frost protection (OFF) until the desired temperature is set. 14 S (off) etting froSt protection If the room does not need to be heated, the valve can be closed. The valve is only opened if there is a risk of frost. The calcification protection function continues to run. - Page 22 Configuration menu of the MAX! Wall Thermostat + for more than 3 seconds. The menu items are selected with the (+) and (-) button and confirmed with the OK button. If you press the Mode/ Menu button once more, this takes you back to the previ- ous level.
- Page 23 Configuration menu Set open-window temperature for automatic tem- AEr: perature decrease during ventilation (see sec. „15.8 Set open-window function ( , AEr)“ on page 31) Set temperature offset (see sec. „15.9 Setting offset tOF: temperature (tOF)“ on page 32) Restoring the factory settings (see sec. „16 Restore rES: factory settings (rES)“...
- Page 24 Configuration menu • Confirm your selection using the Boost/OK button. • Repeat this procedure until temperatures are stored for the entire period between 0:00 and 23:59 h. In Auto mode the selected week program will be auto- matically adopted by all taught-in MAX! Radiator Ther- mostats.
- Page 25 Configuration menu Monday-Friday: from 00:00 06:00 h 17.0 °C from 06:00 09:00 h 21.0 °C from 09:00 17:00 h 17.0 °C from 17:00 23:00 h 21.0 °C from 23:00 23:59 h 17.0 °C The display will show bars for those heating phases where the set temperature for the period is higher than the saved reduction temperature.
- Page 26 Configuration menu 15.2 s (t-d) wItchIng tIme Date DIsplay The factory setting will show the time on the display. In the menu the display can be switched to the date. • Open the configuration menu by pressing the Mode/ Menu button for more than 3 seconds. • Select the “t-d”...
- Page 27 Configuration menu 15.3 s wItchIng setpoInt anD actual temperature DIs (s-a) play The factory setting will show the setpoint temperature on the display. In the menu the display can be switched to the actual temperature. • Open the configuration menu by pressing the Mode/ Menu button for more than 3 seconds.
- Page 28 Configuration menu • Press and hold down the comfort temperature button ( ) to adjust the comfort temperature or press and hold to the reduction temperature button ( ) to ad- just the reduction temperature. • The display shows the symbol and the corresponding comfort/reduction temperature.
- Page 29 Configuration menu The remaining time for the function is counted down in seconds (e.g. "300" to "000") and is displayed. BOOST The duration and valve opening of the boost function can individually be adjusted: • Press the Mode/Menu button for at least 3 seconds. • Select the “bOS”...
- Page 30 Configuration menu If the duration of the boost function is set so that the display exceeds 999 seconds (e.g. via the MAX! Cube), the display value switches from seconds to minutes. 15.6 s ettIng the holIDay functIon If you want to maintain a fixed temperature for a certain period, e.g.
- Page 31 Configuration menu 15.7 s (dEC) ettIng routIne DescalIng The radiator thermostats can protect against valve cal- cification automatically. Therefore, an automatic routine descaling is performed once a week. The time for per- forming this function can individually be configured (it is factory set to run at 12:00 on Saturdays).
-
Page 32: Restore Factory Settings (Res)
Restore factory settings (rES) • Press the Mode/Menu button for at least 3 seconds. • Select the “AEr” menu item with the (+) and (-) buttons. • Confirm your selection using the Boost/OK button. • Change the temperature with the (+) and (-) buttons. • Confirm your selection using the Boost/OK button. - Page 33 Restore factory settings (rES) In the MAX! House solution (operation with MAX! Cube) first delete the device from the software. In the MAX! Room solution (operation without MAX! Cube) the factory settings of the MAX! Wall Ther- mostat + can be restored as follows: • Press the Mode/Menu button for at least 3 seconds.
-
Page 34: Error Messages
Error messages 17 e rror messages Error Problem Solution codes Battery Battery voltage Replace batteries symbol too low MAX! Cube already Make sure the device is taught-in no longer taught-in to the Cube (in the software) and perform a reset. Then you can teach-in the device again. -
Page 35: Information About Radio Operation
Information about radio operation stubborn marks. Do not use any detergents containing solvents, as they could corrode the plastic housing and label. 19 I nformatIon about raDIo operatIon Radio transmission is performed on a non-exclusive transmission path, which means that there is a pos- sibility of interference occurring. -
Page 36: Technical Specifications
Technical specifications 20 t echnIcal specIfIcatIons Device short description: BC-TC-C-WM-4 Supply voltage: 2x 1.5 V LR03/micro/AAA Current consumption: 30 mA (max.) Battery life: 2 years (typ.) Degree of protection: IP20 Ambient temperature: 5 to 50 °C Dimensions (W x H x D): 86 x 86 x 21.5 mm... - Page 37 Technical specifications Max. number of devices to be taught-in: MAX! House solution • max. 50 devices in max. 10 rooms, • max. 4 MAX! Eco Switch • per room max. 8 MAX! Radiator Thermostats (+) , 8 MAX! Window Sensors and 1 MAX! Wall Thermostat + MAX! Room solution: • max.
- Page 38 Technical specifications Do not dispose of the device with regular domestic waste. Electronic equipment must be disposed of at local collection points for waste electronic equipment in compliance with the Waste Electrical and Electronic Equipment Directive. The CE sign is a free trading sign addressed ex- clusively to the authorities and does not include any warranty of any properties.
- Page 40 Bevollmächtigter des Herstellers: Manufacturer’s authorised representative: eQ-3 AG Maiburger Straße 29 26789 Leer / GERMANY www.eQ-3.de...
Need help?
Do you have a question about the BC-TC-C-WM-4 and is the answer not in the manual?
Questions and answers