Table of Contents
Advertisement
Advertisement
Table of Contents

Subscribe to Our Youtube Channel
Related Manuals for Simple S100

Summary of Contents for Simple S100
-
Page 1: User Guide
User Guide... - Page 2 © 2017 EcoFactor, Inc.
- Page 3 To sign up for an account and begin your installation, visit: home.thesimple.com/install To adjust settings remotely, or to create your personalized schedule, visit home.thesimple.com, or install the Simple thermostat mobile app for iOS or Android. * If you do not have a C-wire, or are not sure, visit www.thesimple.com/compatibility...
- Page 4 In the Box The optional trim plate can The wall plate comes snapped into cover unfinished areas under the the back of the thermostat. old thermostat. It can be used Manual and Wiring Labels Screws and Wall Anchors...
- Page 5 Wiring Guide Connect your system’s wiring using the table below. Terminal Function 24VAC for cooling. 24VAC for heating. If there is only one R wire (R, RH, RC) then connect it to RH. May be labeled V or VR for Lennox. Common wire.
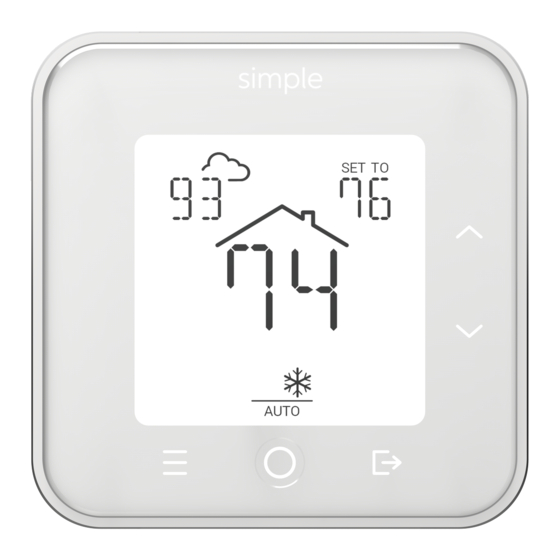
- Page 6 Display...
- Page 7 Outside temperature, shown when your account is configured with a ZIP code. Indoor temperature. Error/warning indicator. The message line provides information to the user and displays the menu options. Fan indicator, flashes when running. Mode indicator, the heat or cool icon flashes when running.
- Page 8 Buttons DOWN MENU MODE AWAY...
- Page 9 Function During Thermostat Operation While in Menu UP increases the temperature Previous menu item. setting. DOWN decreases the Next menu item. temperature setting. MENU enters and exits the Return to previous menu. Settings menu. MODE changes the system Selects current item or mode, and cancels Hold, Away, enters sub-menu.
- Page 10 Changing Modes You can select whether Heat or Cool is provided using the circular MODE button. The MODE button cycles sequentially through the available modes. Only the modes supported by your system are shown. For example, a furnace-only installation alternates between OFF and HEAT when the MODE button is pressed.
-
Page 11: Thermostat Modes
Thermostat Modes When OFF, the system is turned off. No heating or cooling occurs. HEAT icon indicates system is in Heat only mode and flashes when the heating system is running. COOL icon indicates system is in Cool only mode and flashes when the cooling system is running. -
Page 12: Adjusting The Temperature
Adjusting the Temperature To the right of the display, the UP and DOWN buttons adjust your desired temperature. Each button changes the temperature by 1 degree.* Holding the UP or DOWN button automatically increases or decreases the temperature setting. Your thermostat has a schedule that changes the temperature according to day and time. - Page 13 Returning to Schedule When a schedule is running, a manual adjustment can be cancelled by pressing the MODE button. This returns you to the temperature setting of your schedule and the HOLD UNTIL indicator is cleared.
- Page 14 Setting Away You can temporarily choose an energy-saving setting using AWAY button, located in the lower-right. Pressing this button cycles through the following choices: • AWAY 2 HRS • AWAY 6 HRS • AWAY ON • AWAY OFF You may adjust the temperature for the Away period using the UP or DOWN buttons while the away duration is flashing.
- Page 15 The Away temperature is held until the Away duration expires, and the end time is shown in the status display. Selecting AWAY ON is a permanent Away and the temperature is held until Away is cancelled. In this case, the UNTIL status is not shown. Cancelling Away When Away is in effect, it can be cancelled using either the MODE or AWAY buttons.
- Page 16 Energy Management Events Your account may be configured to participate in Energy Management Events. When an event is in-progress, the lower-right display shows PRE EVENT or EVENT and the UNTIL end time for the event. A PRE EVENT may occur before an EVENT to help reduce your energy consumption during peak hours.
-
Page 17: Energy Efficiency
Energy Efficiency Your account can be configured with an energy efficiency program that makes automated adjustments to your temperature settings. When these changes are applied, the Leaf indicator is shown along with the current temperature setting. When your schedule is enabled, the HOLD UNTIL time shows the next schedule interval. - Page 18 Menu Settings The MENU button on the lower-left front panel opens the thermostat menu. The message line shows the current menu item, and the UP or DOWN buttons can be used to navigate. The MODE button selects the current menu or sub-menu item displayed.
- Page 19 Main Menu Menu Item Choices Description Normally set to AUTO. When set to ON, the FAN MODE AUTO fan runs and the fan indicator flashes. Normally set to ON to enable schedule SCHEDULE changes. When set to HOLD, temperature HOLD adjustments must be changed manually.
- Page 20 Settings Menu Menu Item Choices Description Adjust the brightness level of the BRIGHTNESS display. MEDIUM HIGH BACKLIGHT When ON, the display dims after 30 seconds of inactivity. Otherwise the display turns off after 30 seconds. Adjust the volume level of sounds when SOUND buttons are pressed.
- Page 21 Network Menu Menu Item Choices Description WPS NOW WPS ON Press MODE to start Wi-Fi Protected Setup. Then press the WPS button on your router to automatically join the Wi-Fi network. WIFI NOW THERM-nnnn Press MODE to start the thermostat Wi-Fi Access Point.
- Page 22 Network Menu Menu Item Choices Description The IP address of your thermostat. If IP ADDRESS the address exceeds 11 characters, press MODE again to see more. When not connected, 0.0.0.0 is shown. The MAC address of your thermostat as 16 characters (IPv6). Press MODE to show the next portion of the MAC.
- Page 23 Install Menu Menu Item Choices Description INSTALL NOW Press MODE to show the 10-character Install Code. This code is required when registering for cloud services. The code is also printed on the back of the unit. Info Menu Menu Item Choices Description The date and time of the thermostat.
-
Page 24: Advanced Menu
Advanced Menu The Advanced Menu is hidden from normal operation. Pressing MENU and MODE simultaneously for 5 seconds enters the advanced menu. After 20 seconds of inactivity, this menu exits automatically. Advanced Menu Menu Item Choices Description Locks the front panel to prevent LOCK unauthorized changes. - Page 25 Advanced Menu Menu Item Choices Description Enters the HVAC menu to configure your >HVAC INFO system settings. When connected to Wi-Fi, the menu is called HVAC INFO, and the menu is read-only RESET CONFIRM When MODE is pressed, the thermostat restarts.
- Page 26 HVAC Menu Menu Item Choices Description Type of system connected to this HVAC TYPE HEAT COOL thermostat. HEAT ONLY COOL ONLY This setting is read-only when Wi-Fi is HT PUMP configured. HT PUMP EMR CHANGEOVER O – COOL ON Applies only to heat pumps. B –...
- Page 27 Error/Warning Messages The Wi-Fi connection is configured, but no connection NO NETWORK exists. Please confirm that your Internet connection is up and your Wi-Fi passworad has not changed. In some cases, restarting your router may help. The thermostat reset button may also help to restart the network connection. A Heat Pump fault is reported via the L-wire.
-
Page 28: Reset To Factory Settings
Reset to Factory Settings A full reset to original settings can be performed using the Advanced Menu RESET. Press and hold both the MENU and MODE buttons for 5 seconds to enter the Advanced Menu. Press DOWN until RESET is shown. Press MODE and CONFIRM will start flashing. -
Page 29: Hardware Reset
Hardware Reset The top of the thermostat has a pinhole reset button. This restarts the device, but does not clear your existing heating/cooling system configuration or your network connection. When the thermostat restarts, it will attempt to re-establish the Wi-Fi connection with your router. - Page 30 Disconnected Configuration This thermostat is intended to be connected to your Wi-Fi network. However, it is fully functional as a conventional thermostat when disconnected. If you wish to use the thermostat as a disconnected device, the system heating and cooling configuration must be configured using the Advanced Menu before use.
- Page 31 Step 2: Enter System Configuration Press and hold both the MENU and MODE buttons for 5 seconds to enter the Advanced Menu. Press DOWN until >HVAC INFO is shown. Press MODE to enter the HVAC configuration menu. The following settings are available: HVAC TYPE HEAT COOL Type of system connected to this...
- Page 32 Step 3: Set Time and Date The time and date must be set manually for timed features to work properly. Daylight Savings Time changes must also be applied manually. This is only necessary when not connected, because the time and date of the thermostat are set automatically over the Internet when connected to Wi-Fi.
- Page 33 Press DOWN until >SET DATE is shown. Press MODE to enter the Set Date menu. The following settings are available: MONTH Set the current month. Set day, with range of 1 to last day of current month. YEAR nnnn Set the year, with range of 2016 to 2100.
- Page 34 Disconnected Schedule The thermostat has a built-in schedule that is used when disconnected. You can use the menu to turn off the schedule, or you can connect your thermostat to Wi-Fi and personalize your schedule. Weekday (Mon-Fri) Interval Heat Setpoint Cool Setpoint 6 AM 71 F, 21.7 C...
-
Page 35: Fcc Statement
FCC Statement WARNING: Changes or modifications to this unit not expressly approved by the party responsible for compliance could void the user’s authority to operate the equipment. This device complies with Part 15 of the FCC Rules. Operation is subject to the following two conditions: (1) this device may not cause harmful interference, and (2) this device must accept any interference received, including interference that may cause undesired operation. - Page 36 100.1-00-20171005...
Need help?
Do you have a question about the S100 and is the answer not in the manual?
Questions and answers