
Related Manuals for HSAJET MiniKey

Summary of Contents for HSAJET MiniKey
- Page 1 MiniKey User Manual ENGLISH Updated for MiniKey firmware version 1.91 (January 2014)
- Page 2 MINIKEY User Manual Congratulations on your purchase. MiniKey is one of the most advanced, compact and user-friendly inkjet controllers available. This manual covers the usage of the controller. Before using the product, please read the manual carefully. Please also refer to:...
- Page 3 MINIKEY User Manual Safety Instructions The MINIKEY is a controller unit for inkjet printing. Only use this device for the intended use. Do not subject the controller to strong shocks or vibrations. Install the MINIKEY in the recommended installation environment only.
-
Page 4: Table Of Contents
MINIKEY User Manual Table of Content Introduction ....................6 Features and performance ............ 6 Navigation ................7 Editing values – using the keypad ......... 9 What are layout, object & Content? ........11 Limits to the system ............. 13 Loading and printing ................14 Login to the system ............. - Page 5 MINIKEY User Manual Change screen settings ............54 Set system clock ..............55 Display system info .............. 56 Use the USB feature .................. 57 How to upload Layout and resources from USB ....57 How to export log files to USB ..........57 How to update firmware ............
-
Page 6: Introduction
MINIKEY User Manual Introduction Introduction Features and performance Features Text, barcode and graphical objects Simple inclusion of stamps by a list Multilingual Keyboard Prompts Real time printing 2 configurable hardware outputs 2 configurable hardware inputs ... -
Page 7: Navigation
Introduction Navigation The MINIKEY has a flat menu with direct access from Keys. At any time you can switch to a new function by Keypress (notice: you need to exit menus by green checkmark to save changes you have made) - Page 8 MINIKEY User Manual Introduction Function of Keys FUNCTION Start / stop print mode Work with TEXT content Work with COUNTER content Work with DATE content Work with GRAPHICS content Work with BARCODE content Work with STAMP content Load / Save files Change settings Go back to main menu/ previous menu.
-
Page 9: Editing Values - Using The Keypad
Do not save changes. Go back to previous menu. BACK to previous menu. Editing values – using the keypad In the MiniKey, you can enter values in different ways, depending on what the value / parameter is used for. Page 9 of 66... - Page 10 MINIKEY User Manual Introduction Text lines Text lines are values that can accept zero or more characters. Example: name of objects, text variables, counter values. Press ENTER to edit the value. You will see a screen showing what you enter, the current value indicated in RED, and a keyboard below, corresponding to the keys [0]..[9] and [+].
-
Page 11: What Are Layout, Object & Content
The first 9 values can be accessed directly using number keys. What are layout, object & Content? On the MINIKEY layouts, objects and content constitute your print job. It is important to understand the difference. The following will explain: Your layout is like a white piece of paper where you place content. Objects are placeholders for content. - Page 12 When you place an object on your layout, content will be created at the same time and the two will be linked together. NOTICE: On MiniKey you cannot from the controller link multiple content to textual objects. This is ONLY possible for barcodes! Objects linked to multiple content from software will print but can’t be...
-
Page 13: Limits To The System
MINIKEY User Manual Introduction Limits to the system Property Limit Number of folders on internal Unlimited. (up to 2 GB. Each layout is 16.349 bytes.) memorycard Number of layouts 50 layouts in each folder on the internal memory card. Number of objects in one layout 16 text objects. -
Page 14: Loading And Printing
Login to the system If MINIKEY is password protected a login screen will be shown when you start the controller. Graphical login is default. When graphical login is enabled, all user accounts on the unit will be represented by an icon. -
Page 15: How To Load And Print A Layout
MINIKEY User Manual Loading and printing Press ENTER when done or ESC to cancel and go back to select another user account. How to load and print a layout Press the MSG button Press ENTER on "Select job". Select a layout from the list. You can create / use a subdirectory if you wish to organise the files. -
Page 16: Functions While In Print Mode
MINIKEY User Manual Loading and printing Functions while in print mode Screen display While in print mode, the screen will display a print performance screen, along with the calculated ink level remaining. From the top, the performance screen displays: Speed Measured (by encoder) or set speed, in m/min. - Page 17 MINIKEY User Manual Loading and printing Purge Hold ENTER to purge Press ESC to return to print mode menu Emergency cancel of remote control During remote control, and while in print mode, it is normally not possible to use keyboard functions.
-
Page 18: Manage Your Layout
MINIKEY User Manual Manage your layout Manage your layout This section will detail how to manage layout files and create new layout files How to create a new layout Press the MSG button. To create a new layout, press "new". Shortcut “1”. - Page 19 MINIKEY User Manual Manage your layout where an entry is a layout or another directory. Effectively, you can have 2500 layouts with a 2 levels of subdirectories. Next, press the "new directory" icon at the bottom of the screen. Enter new directory name .
-
Page 20: Create A New Layout, Based On Another
Select "New (based on)". Shortcut “4” Select source layout. Enter name for the new layout. Press the green check mark to continue. The MINIKEY will automatically save your new layout to the internal memory card How to delete a layout Press the MSG Key To delete a layout, select "delete". - Page 21 MINIKEY User Manual Manage your layout Press Yes to confirm. Notice that if you delete the active (current) layout, it will still remain in memory and can actually be saved again. Page 21 of 66 HSA SYSTEMS...
-
Page 22: Add Content To Your Layout
MINIKEY User Manual Add content to your layout Add content to your layout This section details how to add content to your layout. As detailed above, there are 3 types of objects: text, barcode and graphics. Text and barcode objects can contain one of the different content types. -
Page 23: Text Objects
Font Select font. You can use MiniDraw to create new fonts. No more than 50 fonts can be stored on the MINIKEY . Up to 10 fonts can be used in one layout. Page 23 of 66 HSA SYSTEMS... - Page 24 MINIKEY User Manual Add content to your layout Text object with static content Static text will not change automatically, and acts like a label in the message. You can enter the text content at last line. Property Description Text String content - maximum 127 characters...
- Page 25 MINIKEY User Manual Add content to your layout Text object with counter Enter parameters. Parameters are described below. Press green check mark to finish. Parameter list(text object with counter) Property Description Value Current value at print mode start Digits Number of digits shown.
- Page 26 Locale Determines long and short names for days and months. Press locale and select a locale file from the menu. The MINIKEY contains locales for different languages. Offset Select a different date and time than the one set by your system clock. You can make offset year, month, day, hour, minute and seconds, independently, and both forward and back.
-
Page 27: Barcode Objects
MINIKEY User Manual Add content to your layout Barcode objects Barcode objects display the content inside as a barcode. You can place any type of content inside a barcode object, but you are only allowed to add the object if the resulting string is valid for the barcode symbology chosen. - Page 28 Font type for the human readable part of the barcode. You can create new fonts with MiniDraw . No more than 50 fonts can be stored on the MINIKEY . Up to 10 fonts can be used in one layout.
- Page 29 MINIKEY User Manual Add content to your layout Select "add identifier". Set "ID code" to 1. Select "Add static". Select "Enter text". Page 29 of 66 HSA SYSTEMS...
-
Page 30: Graphical Objects
MINIKEY User Manual Add content to your layout Enter 13 numbers. (since ID 01 is defined as n02+13+1 check digit) Select ok to enter barcode setup menu. "Symbology" must be set to EAN 128 or DataMatrix (GS1). Press green check mark to finish. - Page 31 2 colors maximum for best result. To upload new logos to the MINIKEY please install the MiniDraw software. The MINIKEY has a maximum capacity of 10 graphical objects(logos, lines, boxes) in one layout (MAX 50 altogether). Boxes Press green check mark to continue.
- Page 32 Select the line width. Available for both lines and rectangles. Fill Fill the rectangle or not. Available only for rectangles. The MINIKEY has a maximum capacity of 10 graphical objects(logos, lines, boxes) in one layout (MAX 50 altogether). Lines Parameter list (lines)
- Page 33 Add content to your layout Property Description Width Select the line width. Available for both lines and boxes. The MINIKEY has a maximum capacity of 10 graphical objects(logos, lines, boxes) in one layout (MAX 50 altogether). Page 33 of 66 HSA SYSTEMS...
- Page 34 MINIKEY User Manual Add content to your layout Stamps Although having their own button for quick access, STAMPS content actually is a logo. When you create a stamp by stamp menu=>NEW you are presented with selection of the stamp and properties.
-
Page 35: Prompts
MINIKEY User Manual Add content to your layout Prompts Prompts is not content by itself, but a way to force the user to input data at print start. Typically used where the designer does not know the content of this data in advance - or where it changes regularly. - Page 36 MINIKEY User Manual Add content to your layout Property Description If you have a mask on the prompt, the Keyboard will change automatically during input, and you are locked to that Keyboard. Example: NNNN will display the numeric Keypad for entry of 4 characters.
-
Page 37: How To Preview Your Layout
MINIKEY User Manual Add content to your layout Validation If one or more prompts have Validation=ON, the final list of prompts will look different. Instead of a green checkmark, it will have a checkmark over a prompt icon. When you select this icon, you are taken to the login screen. Select here a user that has the role VALIDATOR activated. -
Page 38: Edit The Message
MINIKEY User Manual Edit the message Edit the message This section details how to edit your layout (objects and content) to change properties in an existing message. Edit object properties Use this method to edit existing content based on a list of object names. An alternative and perhaps simpler method is to select the object from the preview screen (red border) then select object properties icon. -
Page 39: Change Print Settings
MINIKEY User Manual Change print settings Change print settings Print settings is where all parameters for the printout is stored. Settings these right are crucial in order to get a good looking printout. Please also refer to installation manual Enter setup To enter setup press the SETUP Key. - Page 40 MINIKEY User Manual Change print settings The total length of your layout. Vertical resolution In vertical resolution it’s possible to select between the following: 300 dpi (row A) 300 dpi (row B) 600 dpi 300 dpi (alternating row A+B) Horizontal Resolution In horizontal resolution you can choose from 75 to 2400 dpi in 18 different steps.
- Page 41 MINIKEY User Manual Change print settings Sensor edge Set the sensor settings to positive or negative, depending on the type of sensor you are using. Start distance An important part of setting up your system is to measure the distance between the start sensor and the head.
- Page 42 MINIKEY User Manual Change print settings In user-managed buffer mode, give warning on screen/network / both / none, if a sensor signal is seen when no images are stored in buffer. Stop on blank print In user-managed buffer mode, stop print if a sensor signal is seen when no images are stored in buffer.
-
Page 43: How To Setup Your Print Head(S)
Choose "Head Setup" in the settings menu. Shortcut “2” The MiniKey can use one or two physical heads, head 1 connected to the side, head 2 to the back, which each may be off, 1pen or 2pen. Inside head setup, choose the physical head to edit properties. - Page 44 MINIKEY User Manual Change print settings Offset Head offset is only relevant if you have more than one head on your system. If this is head one, offset must be set to zero. If this is head two, offset is the distance from the the first nozzle row of the first pen in the first head to the first nozzle row of the first pen in the second head.
- Page 45 Ink supply Size (ml) How much ink at 100% (full) is available to this pen Ink warning level Change this setting if you want the MINIKEY to display a warning when the ink level(measured in %) is low. Ink level reset...
-
Page 46: How To Setup Input And Output
MINIKEY User Manual Change print settings How to setup input and output The MINIKEY has 2 output and 2 input channels. Select hardware i/o in the settings menu. Shortcut “4” For each output, select one of the following: Property Description... -
Page 47: How To Test Your Equipment
MINIKEY User Manual Change print settings How to test your equipment When the MINIKEY is being installed, you can check that all hardware connected to the controller is working as expected. Select Test I/O in the settings menu. Shortcut “5”... -
Page 48: How To Purge The Pens
MINIKEY User Manual Change print settings How to purge the pens Purge and spit are used as maintenance tools to keep the ink from clogging the nozzle rows. Spit is firing of all channels, controlled by a timer. Purge is a constant firing of all channels for as long as function is activated. - Page 49 MINIKEY User Manual Change print settings Page 49 of 66 HSA SYSTEMS...
-
Page 50: How To Change System Settings
MINIKEY User Manual How to change system settings How to change system settings System settings have influence on the “look and feel” of the controller, but not directly on the printout. This is where users are edited, the menu language is changed, and clock and network settings are changed. - Page 51 MINIKEY User Manual How to change system settings A list of active user accounts will be displayed. Select a user account to edit. You now have the following options: Property Description Username Select a name for the user account. Password Enter a password for the user account.
-
Page 52: Change The Language
Change the language Select "language" in the system menu. Shortcut “2” In the language menu, select which language to use for the MINIKEY interface. Press a language name to switch to that language. You will return to the main menu with the new language in effect. -
Page 53: Change Network Settings
Port for sending files to the machine Network address A unique address that cannot be changed. Mac addresses allow network administrators to allow or disallow the MINIKEY access to a network, or to assign a specific IP address to a certain machine. Page 53 of 66... -
Page 54: Change Screen Settings
MINIKEY User Manual How to change system settings Change screen settings Select the "screen" in the system menu. Shortcut “4” The screen menu has the following options. Property Description Confirmations If this option is selected, you will be asked to confirm, for instance if you delete a file. -
Page 55: Set System Clock
MINIKEY User Manual How to change system settings Set system clock Select "Clock" in the system menu. Shortcut “5” The available options are: Property Description Current date Current date. This is entered in your local format, which will depend on menu language chosen. -
Page 56: Display System Info
MINIKEY User Manual How to change system settings Display system info Select "info" in the system menu. Shortcut “1” Page 56 of 66 HSA SYSTEMS... -
Page 57: Use The Usb Feature
The logfiles can be extracted and saved to a USB Key. Insert a USB Key in the USB slot on the MINIKEY . Select "Export log". This will start the extraction process. -
Page 58: How To Update Firmware
Copy all files from “USB UPDATE” directory inside to the USB Key. Insert memory stick in MINIKEY. Wait for a list of files to display on the MINIKEY (you must be logged in as admin to see this) ... -
Page 59: Using Databases
MINIKEY User Manual Using databases Using databases The MK offers simple, yet effective database printing support. It’s simple to use, and can be made non- accessible for operators Database limits and possibilities Database printing on the MK should perhaps more correctly be considered “list printing”. -
Page 60: Using Database Print
MINIKEY User Manual Using databases Encoding ANSI encoding only. Single byte values. It is possible to use bytes above 127, to print non-English languages. Length No more than 2,7 mio records. In reality, the limit is less because of file size Database file MUST be called DATABASE.CSV on the USB disc. - Page 61 MINIKEY User Manual Using databases Print database Once database is loaded, start the print. An extra item is on the performance screen: database record. For each print, a database record is used. It is not possible for the operator to change the current record.
-
Page 62: Reference Section
MINIKEY User Manual Reference Section Reference Section List of date formats Variable Explanation y,yy,yyyy Year with ( 1, 2 or 4 digits) Month number (1 digit) Month number (1 digit, space leadin) Month number (2 digits) mmmm January Week number (1 digit) -
Page 63: List Of System Events
MINIKEY User Manual Reference Section List of system events If loglevel has been set to minimum, the actions with minimum log level will be logged. If loglevel has been set to normal, actions with minimum log level and normal log level will be logged. -
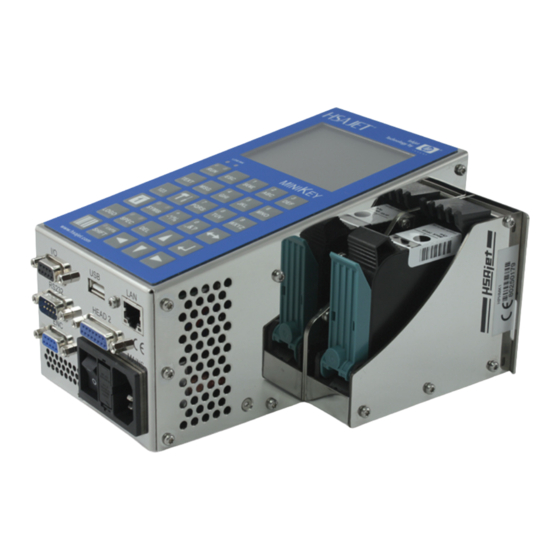
Page 64: Overview Of Connectors
MINIKEY User Manual Reference Section Overview of Connectors Necessary equipment CONNECTOR Print head (1) SUB-D 15 pin female Power connector 100-240 VDC Recommended equipment Print head (2) SUB-D 15 pin female External start sensor SUB-D 9 pin female Encoder SUB-D 9 pin female... - Page 65 F1 and F2 are located on the inside of the MiniKey right behind the USB connector. You can buy the fuses from HSA or locally, if you choose locally make sure you get the right fuses, warranty does not cover replacement of burned PCB’s because of...
-
Page 66: Data Exchange
MINIKEY User Manual Reference Section Data Exchange Please refer to "Remote Communication with MiniTouch/MiniKey" Support For product support, please contact HSA SYSTEMS Customer Service department HSA SYSTEMS CUSTOMER SERVICE DEPARTMENT Phone: +45 66103401 Email: hsasupport@hsasystems.com Page 66 of 66 HSA SYSTEMS...
Need help?
Do you have a question about the MiniKey and is the answer not in the manual?
Questions and answers