Table of Contents
Advertisement
Quick Links
Advertisement
Table of Contents

Related Manuals for Golden engineering XR200


Summary of Contents for Golden engineering XR200
- Page 1 JUNE 2017...
-
Page 2: Table Of Contents
TABLE OF CONTENTS PAGE 1.0 INTRODUCTION 2.0 WARNINGS DUTY CYCLE STORAGE 3.0 PHYSICAL DESCRIPTION HIGH VOLTAGE PULSER/TUBEHEAD BASE BATTERY PACK BATTERY CHARGER CONTROL MODULE CABLE CONNECTOR DIAGRAM 4.0 DESCRIPTION OF OPERATION BLOCK DIAGRAM 5.0 OPERATING INSTRUCTIONS OPERATING PRECAUTIONS EXCLUSION ZONE PULSE SETTINGS 6.0 NAVIGATING THE MENU 7.0 MAINTENANCE... -
Page 3: Introduction
DUTY CYCLE WARNING. The XR200 is a light duty machine that is not made to pulse continuously. The maximum duty cycle for the XR200 is 200 pulses every four minutes (3000 pulses per hour). Exceeding the duty cycle will shorten the life of the tube and head. -
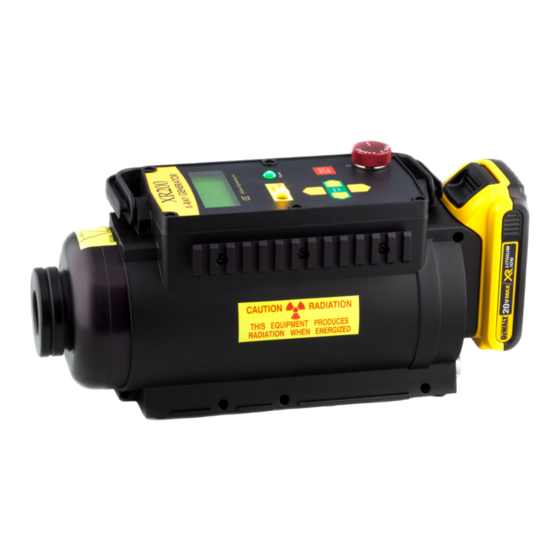
Page 4: Physical Description
Battery charge time is less than one hour. See battery charger manual for additional instruction and warnings. TRIPOD MOUNT PICATINNY RAIL: The XR200 has a 21 mm picatinny rail located on each side of the housing. Figure 2: Base... -
Page 5: Control Module
RED X-RAY PULSING LIGHT: Blinks after time delay button or remote cable button is pressed to warn that the XR200 is going to pulse. The light stays on continuously while the XR200 is pulsing. This is a failsafe warning light. If the light does not work the X-ray unit will not pulse. See settings menu for fail safe override in emergency situations. -
Page 6: Cable Connector Diagram
XR200 REAR VIEW/CABLE CONNECTOR CABLE CONNECTOR: Lemo “K” series five pin connector located on the back of the control module beneath the battery receives the remote cable or imaging system cable. PIN # DESCRIPTION +5 VOLTS 100 ma MAXIMUM REMOTE SWITCH... -
Page 7: Description Of Operation
50 nanoseconds in duration is applied across the x-ray tube generating x-rays. The closing of the High Voltage Switch produces an audible pulsing sound. The XR200 cannot produce X-rays without the pulsing sound so it serves as an additional warning the XR200 is functioning. -
Page 8: Operating Instructions
5.0 OPERATING INSTRUCTIONS The following are basic operation instructions to take an X-ray image using the XR200. Certain applications may require modifications to these basic procedures. DETERMINE PULSE INITIATION METHOD: DR, REMOTE CABLE, TIME DELAY REMOTE CABLE TIME DELAY Attach Battery... -
Page 9: Operating Precautions
X-rayed. Imager should be placed as close to the object as possible. Distance between XR200 and imager is usually 24 to 72 inches (30 to 180 cm). During operation XR200 should be stabilized on a flat surface, a tripod, or a custom fixture suitable for holding the 11 pound (5 Kg) XR200. -
Page 10: Navigating The Menu
If the radiograph is too light the film is overexposed. Underexposure can be corrected by increasing the number of pulses and/or decreasing the distance between the imaging medium and the XR200. Overexposure can be corrected by reducing the number of pulses and/or increasing the distance between the imaging medium and XR200. - Page 11 >HOME MENU PRESETS PULSES: _ _ _ _ DELAY: _ _ _ _ HOME >MENU PRESETS PULSES LIFE PC DELAY RESET PC TRAINS SETTINGS HOME - MENU PRESETS SET PULSE COUNT >PULSES LIFE PC _ _ _ PULSES DELAY RESET PC TRAINS SETTINGS BACK...
-
Page 12: Maintenance
X-ray unit. A completed copy of this form accompanies each X-ray. TUBE REPLACEMENT: The XR200 tube should last at least 100,000 pulses. Under normal conditions the tube’s output will decrease slowly with use. If the tube is broken or glass cracks the tube output will cease immediately. -
Page 13: Instructions For Repair
9.0 INSTRUCTIONS FOR REPAIR INSTRUCTIONS TO REMOVE THE BOARDS AND THE HEAD. 1. Use T10 Torx driver to remove 6 screws holing control module in place. 2. Remove the control module. 3. Remove cable connecting the boards. 4. Control Module Removed Remove keyswitch connector Remove processor board. -
Page 14: Battery Disposal
10.0 WARRANTY Golden Engineering, Inc. warrants XR200 X-ray unit made and sold by it or its authorized representatives to be free of defects in materials and workmanship for a period of twelve (12) months from the date of shipment to the end user. -
Page 15: Specifications
Maximum duty cycle 200 pulses every 4 minutes (3000 pulses per hour) Warm-up None required Airborne Noise Emissions 80 dB at 10 cm 12.0 SPARE PARTS AND ACCESSORIES FOR THE XR200 ITEM PART NUMBER Thumbwheel Key 2002000 Flat key 5951040...
Need help?
Do you have a question about the XR200 and is the answer not in the manual?
Questions and answers