Table of Contents
Advertisement
Advertisement
Table of Contents

Related Manuals for Mattel Mindflex


Summary of Contents for Mattel Mindflex
-
Page 2: Table Of Contents
TABLE OF CONTENTS Overview . . . . . . . . . . . . . . . . . . . . . .2 Teeter-Totter. -
Page 3: Overview
1 Game Console WITH THE POWER OF YOUR MIND! 1 Headset Just put on the Mindflex™ headset and your own brainwaves will move a ball up and down 4 Balls 3 Ring Towers on a cushion of air. Concentrate and the ball will rise, relax and it will descend –... -
Page 4: Product Diagrams
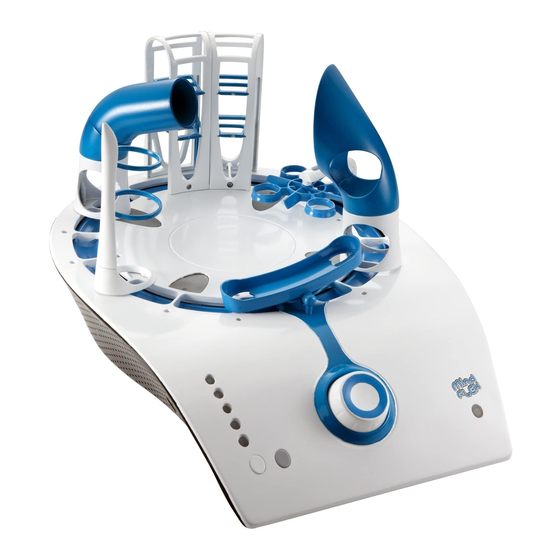
THE CONSOLE 1. Fan Nozzle 2. Calibration Point 3. Start Spaces 4. Control Knob 5. Select Button 6. Enter Button 7. Sensor LEDs 8. On/Off Switch (side) 9. Status Light (refer to chart in Troubleshooting section) 10. Foam Ball Storage Bottom of Console Compartment (Bottom) 11. - Page 5 THE HEADSET 1. Forehead Sensor 2. Ear Clips 3. On/Off Switch 4. Power Light 5. Adjustable Buckle...
-
Page 6: Quick Start
BATTERY INSTALLATION CONSOLE 1 . Open battery cover with Phillips head screwdriver (not included). 2 . Insert 4 ‘C’ alkaline batteries as shown. 3 . Replace battery cover and tighten the screws. For best performance, use only alkaline batteries. When the console’s status light begins to blink GREEN, its batteries are low. -
Page 7: Putting On The Headset
Forehead Sensor 1 . Put on the headset as shown. Make sure the forehead sensor located under the Mindflex™ logo is positioned above your left eye, flat Helpful Hints against your forehead, with no hair between your skin and the sensor. -
Page 8: Turning On The Console
TURNING ON CONSOLE Start Spaces 1 . Move the fan nozzle to either start space by turning the control knob – the start spaces are marked with arrows. Place a ball above Fan Nozzle the fan nozzle. Connection Problems Control Knob 2 . -
Page 9: Controlling The Ball
CONTROLLING THE BALL Tips for Increasing Concentration • Relax your face – try not to move any muscles in The time has come to put your brainpower to the test! Try each of the practice exercises below to familiarize yourself with controlling the ball. Do not put any obstacles on the console yet. your face. - Page 10 Tips for Lowering Concentration • Try to clear your mind. LOWERING THE BALL (LOW CONCENTRATION) • Relax your body. • Take deep breaths. By relaxing your concentration, the ball will descend. • Close your eyes for a moment then open them Exercise #2: Lower the ball. Try to hold the ball in place for three seconds. and look at different parts of the console without Exercise #3: Raise and lower the ball three times in a row.
- Page 11 MOVING THE BALL RIGHT OR LEFT (CONTROL KNOB) To move the ball – and the fan nozzle – right or left around the console, turn the control knob. Turning it clockwise will move the fan in a counter-clockwise direction, and turning it counter- clockwise will move the fan in a clockwise direction.
-
Page 12: Obstacles
OBSTACLES It takes serious mental focus to navigate the ball around the Mindflex™ course. Each obstacle you face along the way will provide a unique “mental block” to challenge your concentration skills. Difficulty of You will find that some obstacles are more challenging than others. When building your obstacle course, Obstacles you may want to start with the easier obstacles first. -
Page 13: Ring Towers
RING TOWERS Each ring tower has 5 sockets. Customize the towers by inserting rings into the sockets at whatever angle you want. Plug the ring towers into the console, making sure the rings point toward the center of the console. The following diagrams show how to navigate the ball through several different ring tower set-ups:... -
Page 14: Maze Cages
MAZE CAGES Upper Shelf Panel (2) Lower Shelf Panel (2) Notches in each maze cage allow you to add both an upper shelf panel and a lower shelf panel. You can identify an upper shelf panel by its crosspiece. Lower shelf panels have no crosspiece. To add a shelf panel to a maze cage, insert the pins on one side of a shelf into the notches on one side of a cage (make sure you use an upper shelf panel for the upper notches and a lower shelf Wall Panel (2) - Page 15 Open corners When both shelves are in position, you can slide a wall panel into one of four positions to block different paths through a cage. REMEMBER: You do not need to use all the pieces when building your maze cages. Just make sure you always create a path that allows a ball to pass in one side of the cage and out the other.
-
Page 16: Funnel
FUNNEL Tabs Snap the two halves of the funnel together. Next, line up the tabs in the funnel with the slots in the funnel base then plug the funnel into the base. Attach the funnel to the console so the funnel opening points toward the center of the console. Slots Navigate this obstacle by traveling through the holes in the side of the funnel –... -
Page 17: Cannon
CANNON Barrel Line up the notches in the barrel with the tabs in the elbow and plug them together. Next, plug the elbow into the cannon base. The elbow will Elbow rotate freely within the base, allowing you to aim the cannon as desired. Attach the assembled cannon to the console. -
Page 18: Teeter-Totter
TEETER-TOTTER Plug the teeter-totter into the console so that it follows the curve of the console. Maneuver the ball above the hole on one side of the teeter-totter then relax your concentration to lower the ball. Once the ball rolls to the other end of the teeter-totter, move the fan nozzle beneath it. Concentrate to raise the ball out of the teeter-totter and proceed on your way. - Page 19 IMPORTANT: The teeter-totter is the only obstacle that can be placed above the calibration point. Callibration Point The calibration point blocks the flow of air from the fan so the ball cannot float above it. However, by placing the teeter-totter here, you create a bridge that will allow you to travel back and forth over this point in either direction.
-
Page 20: Propeller Wheel
PROPELLER WHEEL Clockwise Path Plug both pegs of the propeller wheel into the console. Air from the fan will cause the propeller wheel to spin in a counter-clockwise direction. To pass this obstacle, lower the ball onto one of the four loops. Use the fan to gently spin the propeller wheel until you move the ball to the other side of the obstacle. -
Page 21: Building A Course
BUILDING A COURSE Create whatever course you can imagine by choosing your obstacles and positioning them wherever you want. You’ll discover hundreds of mind-bending combinations! When you build an obstacle course, follow these simple guidelines: Start Spaces should be empty 1 . -
Page 22: The Games
THE GAMES Now that you’ve familiarized yourself with controlling the ball and the different obstacles, it’s time to try out the games! Mindflex™ comes with 5 different game modes that will challenge you in different ways. THE GAME MENU After putting on the headset and turning on the console (as described in the Quick Sensor LEDs Start section), the console will direct you to “Select game.”... - Page 23 CANCELLING YOUR CHOICES FROM THE GAME MENU To Cancel a Selection: If you wish to cancel a choice you made while in the Game Menu, press the SELECT and ENTER buttons together and hold them down for 2 seconds. The console will cancel your choice and return you to the “Select Game”...
-
Page 24: Freestyle
FREESTYLE Number of Players: 1 (Player does not need to select) Difficulty Levels (Time Limit): Not selectable (No time limit) Object: Practice your 1 . Put on the headset and turn it on as described in the Quick Start section. concentration skills 2 . -
Page 25: Mental Marathon
MENTAL MARATHON ™ Number of Players: 1-4 Difficulty Levels (Time Limit): Not selectable (No time limit) Object: Travel around the 1 . Set up the obstacle course as desired. obstacle course as quickly as you can. Beat your own best 2 . - Page 26 8 . The console will say, “Begin.” 9 . Turn the control knob to maneuver the ball around the course. 10 . When you pass each light on the console’s surface, it will light up to mark your progress. NOTE: Once you activate a light, you must continue to travel in that direction for the rest of the game. 11 .
-
Page 27: Danger Zone
DANGER ZONE Number of Players: 1-4 Difficulty Levels (Time Limit): Beginner (1 minute/zone) Intermediate (45 seconds/zone) 1 . Set up the obstacle course. Do not place obstacles over any lights. Advanced (20 seconds/zone) Object: Escape 4 danger zones 2 . Place a ball in either of the two start spaces. before time runs out or your 3 . - Page 28 9 . The console will say, “Begin.” 10 . The two lights to either side of the calibration point will begin to blink. This is the first danger zone. You must maneuver the ball out of this zone before the lights go out or your game is over. Depending on the difficulty you selected, you will have different amounts of time to escape each zone (for instance, “Advanced”...
-
Page 29: Chase The Lights
CHASE THE LIGHTS Number of Players: 1-4 Difficulty Levels (Time Limit): Beginner (5 minutes) Intermediate (3 minutes) 1 . Set up the obstacle course as desired but be sure to place the teeter-totter above the Advanced (1 minute) calibration point . You will be moving back and forth a lot when playing “Chase the Lights,” Object: “Tag”... - Page 30 8 . Before the game will begin, the fan nozzle must be positioned underneath the calibration point – this is the “ready” position for the fan. If it is not there, the console will direct you to “Rotate fan to calibration point.” Move the fan nozzle under the calibration point and leave it there.
-
Page 31: Thoughtshot
THOUGHTSHOT ™ Number of Players: 1-4 Difficulty Levels (Time Limit): Beginner (3 minutes) Intermediate (2 minutes) 1 . Set up the cannon and funnel obstacles directly across from each other. These are the only two Advanced (1 minute) obstacles you will need for this game. Object: Score as many points as you can by blasting the ball 2 . - Page 32 8 . The console will say, “Begin.” 9 . Concentrate to raise the ball into the cannon and shoot. 10 . Whenever the ball lands in the funnel, press the SELECT button to add 1 point to your score. For a Greater 11 .
-
Page 33: Troubleshooting
TROUBLESHOOTING CONNECTION PROBLEMS If you receive the message “Check headset sensors,” make the following adjustments. Be sure to wait about 5 seconds after each adjustment to see if the issue has been corrected – if so, you will hear “Calibrating headset.” • Make sure the sensor is pressed tight and flat against your forehead. Adjust the headband if necessary. -
Page 34: Problems Controlling The Ball
PROBLEMS CONTROLLING THE BALL If you have difficulty controlling the ball – either raising or lowering it – try the following adjustments. • Refer to the Concentration and Relaxation tips on pages 8 and 9. • Turn off the headset. Place both feet flat on the floor, sit as still as you can and try to clear your mind. After 5 seconds, turn the headset back on. NOTE: Don’t be afraid to turn off the headset in the middle of a game . The game timer will pause until the console establishes a new connection with the headset . -
Page 35: Status Light Reference Chart
STATUS LIGHT REFERENCE CHART During game play, the status light changes color and blinks to communicate the current status of the Mindflex™ system. Refer to the following chart for descriptions of the various status messages: LIGHT STATUS Green Good connection between console and headset Blinking Green Console batteries low. - Page 36 • Do not dispose of this product in a fire. The batteries inside may explode or leak. - 1300 135 312. Mattel East Asia Ltd., Room 1106, South Tower, World Finance Centre, Harbour City, Tsimshatsui, HK, China. Diimport & Diedarkan Oleh: P2639-0920G1 Mattel SEA Ptd Ltd.(993532-P) Lot 13.5, Menara Lien Hoe, Persiaran Tropicana Golf Country Resort, 47410 PJ.
Need help?
Do you have a question about the Mindflex and is the answer not in the manual?
Questions and answers