Table of Contents
Advertisement
Advertisement
Table of Contents

Related Manuals for Technika TKSTB14

Summary of Contents for Technika TKSTB14
- Page 1 TKSTB14 E XC LU S I V E LY F RO M Owner’s Handbook Freeview HD receiver...
-
Page 2: Table Of Contents
INDEX Index ................. 1 Timer recording from the guide....... 15 Setup menu > option ..........26 Language settings ..........26 Important safety information ........2 Setup menu ............16 Setup menu > channel menu ......... 17 Hearing impaired ..........26 Introduction .............. -
Page 3: Important Safety Information
IMPORTANT SAFETY INFORMATION IMPORTANT Batteries (a battery pack or installed batteries) shall CAUTION! not be subject to excessive heat such as sunshine, fire This equipment generates, uses and can radiate radio RISK OF ELECTRIC SHOCK or the like. frequency energy and, if not installed and used in DO NOT OPEN Refer all servicing to qualified service personnel. -
Page 4: Introduction
INTRODUCTION PRELIMINARIES The TKSTB14 is a full-featured HD DVB-T set-top box UNPACKING LOCATION that adds HD digital TV reception to a TV that has HDMI Carefully unpack the unit. If it is damaged, please The unit should be located close to your TV and within connection. -
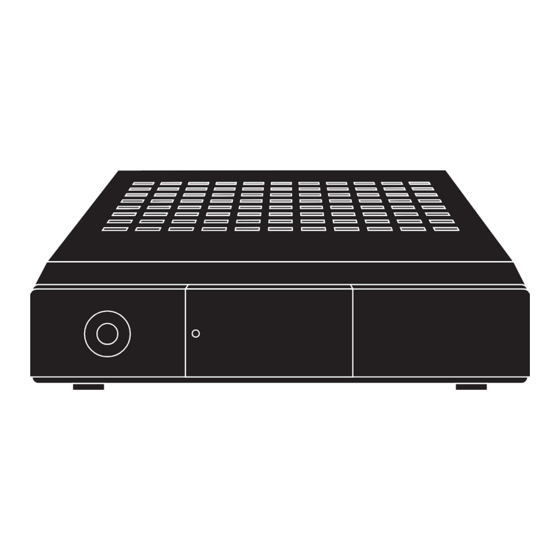
Page 5: Controls And Connections
CONTROLS AND CONNECTIONS FRONT VIEW Standby/On button Power indicator Display area Remote control command receiver BACK VIEW CVBS ANT IN LOOP OUT NETWORK S/PDIF HDMI TV SCART RF out to TV Coaxial digital audio Aerial connector USB port Local network connection HDMI out Stereo audio out SCART out... -
Page 6: Connecting To An Aerial
CONNECTING TO AN AERIAL ALWAYS DISCONNECT POWER FROM ALL ELECTRONIC COMPONENTS WHEN MAKING OR CHANGING CONNECTIONS CVBS ANT IN NETWORK HDMI LOOP OUT S/PDIF TV SCART 1: CONNECTING THE AERIAL 2: CONNECTING RF OUT • Connect your aerial cable to the ANT IN socket on the back panel. This connection is optional and connects an aerial feed to your TV. -
Page 7: Connecting Hd Video And Audio
CONNECTING HD VIDEO AND AUDIO CONNECTING HD VIDEO AND AUDIO TO THE TV ALWAYS DISCONNECT POWER FROM ALL ELECTRONIC If your TV has an HDMI digital connector: COMPONENTS WHEN MAKING OR CHANGING CONNECTIONS • Connect an HDMI cable (not supplied) between the HDMI outlet and a spare HDMI connector on your TV. -
Page 8: Connecting Analogue Video And Audio
CONNECTING ANALOGUE VIDEO AND AUDIO White plug If there are no HDMI digital connectors on your TV, you can still use CVBS your set-top box, but with reduced quality through a composite ANT IN video (CVBS) or SCART analogue connection. NETWORK S/PDIF HDMI... -
Page 9: Connecting To A Computer Network
CONNECTING TO A COMPUTER NETWORK NETWORK CONNECTION An RJ45 socket is provided on the rear panel of the unit CVBS to enable connection to the Internet via a computer ANT IN network. This connection is not essential, but if you connect NETWORK S/PDIF HDMI... -
Page 10: Remote Control
REMOTE CONTROL Mute button - mutes the sound. Back button. Red/Green/Yellow/Blue colour buttons. Cursor left button. Record button - Starts a recording to a docked USB OK button - Selects an option. memory device. Info button - display program information. Step forward. -
Page 11: Remote Control Batteries
GETTING STARTED FIRST TIME USE REMOTE CONTROL BATTERIES FITTING/REPLACING THE BATTERIES CONNECTING POWER Before switching on for the first time, ensure that you have connected a TV and an aerial. When fitting or replacing the batteries in the remote • Check that the mains voltage marked on the back control - panel is the same as the voltage in your area. -
Page 12: Channel Selection
CHANNEL SELECTION CHANGING CHANNELS CHANNEL LIST Radio Channel list: If the initial tuning process has completed successfully, The Channel List is an on-screen display of the channels • Press „ or ƒ to switch between the TV channel the receiver will tune to the first program in the available that you can browse. -
Page 13: Channel Information
CHANNEL INFORMATION SOUND Displaying information about the channel you are VOLUME CONTROL watching: To set the sound volume, you can either use the volume • Press INFO to display the program information bar. control on your Digital Receiver or the volume control on the TV. -
Page 14: Subtitles
SUBTITLES SCREEN FORMAT & ZOOM DOCKING A USB DRIVE SUBTITLES: Zoom and pan: With a USB drive docked to the USB port you can pause and timeshift live TV, also make timed recordings that • To turn subtitles on, press SUB. -
Page 15: Live Tv Pause, Replay, Review
LIVE TV PAUSE, REPLAY, REVIEW Pause live TV: Hiding the toolbar: NOTE: This function is only available when a USB drive is docked. • Press EXIT to hide the toolbar when it is displayed. • Press , if you want to pause the program you are watching. The toolbar will be hidden and return to view when you next use the remote control. -
Page 16: Recording Programs
RECORDING PROGRAMS TIMER RECORDING FROM THE GUIDE There are two ways you can record programs - To set a timer recording from the program guide: • Instant recording. • Press EPG. • Recording using the program guide. The Program Guide will open. Refer to the next sections on this page for more information about Instant recording and Recording using the guide. -
Page 17: Setup Menu
SETUP MENU To open the Setup menu: To view another setup menu: • Press MENU. Press „ or ƒ to change to the next or previous setup The Channel menu will be displayed with the ‘ A uto menu. Tuning’ option highlighted. Choose from the options - •... -
Page 18: Setup Menu > Channel Menu
SETUP MENU > CHANNEL MENU AUTO TUNING The ‘Auto-Tuning’ option will scan all bands for channels. The channels stored will be When the scan is completed - erased and replaced by the channels available in your current location. • Follow the on-screen menus to complete the process and select the area that you If the initial scan was not completed properly, if you have upgraded your aerial, or if you live in. -
Page 19: Dtv Manual Tuning
SETUP MENU > CHANNEL MENU DTV MANUAL TUNING PROGRAM EDIT The ‘Manual Tuning’ option may be used to search for stations on one particular channel. The functions available through the Program Edit menu are the same as those available This option is recommended for experienced users only as it will not refresh the whole by pressing BACK on the remote control. -
Page 20: Signal Information
SETUP MENU > CHANNEL MENU SIGNAL INFORMATION The ‘Signal Information’ option displays information about the signal quality for the channel you are watching. • Open the ‘CHANNEL’ setup menu. • Select the ‘Signal Information’ option. The Signal Information pane will open. Signal quality Signal strength The pane will display information about the channel you are watching including... -
Page 21: Setup Menu > Display Menu
SETUP MENU > DISPLAY MENU SCART MODE ASPECT RATIO RESOLUTION The ‘SCART mode’ option enables you to choose The ‘Aspect ratio’ option enables you to change the The ‘Resolution’ option enables you to change the between Composite or RGB video signal via SCART. signal from your receiver to match the shape of your resolution to match the performance of your TV. -
Page 22: Setup Menu > Display Menu
SETUP MENU > DISPLAY MENU MENU TIMEOUT MENU OPACITY The Menu Timeout setting enables you to set the time the menus remain on-screen. The Menu Opacity setting enables you to set the transparency of the menus over the picture on-screen. To check the current setting: To check the current setting: •... -
Page 23: Setup Menu > Sound Menu
SETUP MENU > SOUND MENU BALANCE AUDIO DESCRIPTION The ‘Balance’ option enables you to change the sound volume balance between the left The ‘Audio Description’ option enables you to change the Audio description setting. and right speakers. You may want to adjust the balance if you are sitting closer to one To check the current setting: of the speakers. -
Page 24: Digital Audio
SETUP MENU > SOUND MENU DIGITAL AUDIO SPDIF DELAY The ‘Digital Audio’ option enables you to set up the digital audio output from the SPDIF The ‘SPDIF Delay’ option enables you to delay the sound from the SPDIF connection. connection. This can help align sound and vision when listening through an external Home Cinema decoder. -
Page 25: Setup Menu > Time Menu
SETUP MENU > TIME MENU CLOCK SETTING, AUTO TURN OFF/ON Setting the clock: To set an Auto turn off time: Checking and setting an Auto turn on time: The clock time is set automatically from the broadcast • Press • To set an Auto turn on time, follow the same signal. -
Page 26: Auto Standby
SETUP MENU > TIME MENU AUTO STANDBY Auto Standby is a power saving feature that will automatically set your receiver to Standby when there has been no signal for ten minutes. To enable or disable Auto Standby: • Open the ‘TIME’ setup menu. •... -
Page 27: Setup Menu > Option
SETUP MENU > OPTION LANGUAGE SETTINGS HEARING IMPAIRED RESTORE FACTORY DEFAULT The Language Settings enable you to set preferred The Hearing Impaired setting enables you to enable or You can choose this option to restore all user menu languages for the audio and subtitle default disable special subtitles for the hearing impaired. -
Page 28: Network Configuration
SETUP MENU > OPTION NETWORK CONFIGURATION Why change network settings?: Configuring manual IP settings: To change the settings - If you have connected the unit to your Home Network Do not attempt to change any of these settings unless • Press ... -
Page 29: Software Update (Usb)
SETUP MENU > OPTION SOFTWARE UPDATE (USB) SYSTEM INFORMATION SOFTWARE UPDATE (OAD) CAUTION: This function should only be used if you have This option will display information about your receiver When this option is enabled your receiver will received a software update CD-ROM for the receiver. including the software versions and date. -
Page 30: Setup Menu > Lock
SETUP MENU > LOCK LOCK SYSTEM SET PASSWORD The lock system enables you to use a four digit password to protect unauthorised access This option may be used to change the system password. to some settings of your receiver. • Open the ‘LOCK’... -
Page 31: Block Channel
SETUP MENU > LOCK BLOCK CHANNEL PARENTAL GUIDANCE This option may be used to block programs. A password will be required to view any This option may be used to block programs according to their age rating. A password programs that have been blocked. will be required to view any programs that have been blocked. -
Page 32: Setup Menu > Applications
SETUP MENU > APPLICATIONS MEDIA PLAYER Your receiver includes a Media Player. This will enable you to play recordings you have Choosing which media to play: made (PVR), also digital movie, photo and music files (compatible formats only). • Press „... -
Page 33: Media Player - Music, Movies And Photos
SETUP MENU > APPLICATIONS MEDIA PLAYER - MUSIC, MOVIES AND PHOTOS Selecting music, movie or photo files to play: Playing the complete folder: If you selected music, movies or photos, a file browser will display the folders and files • Press PLAY ( /) on the remote control to play all files in the folder. -
Page 34: Media Player - Music, Movies And Photos
SETUP MENU > APPLICATIONS MEDIA PLAYER - MUSIC, MOVIES AND PHOTOS To choose and play individual files: • Press PLAY ( /) on the remote control to play the selected file(s). • Press OK to open the folder. The file(s) will begin to play. •... -
Page 35: Media Player - Playing Recordings
SETUP MENU > APPLICATIONS MEDIA PLAYER - PLAYING RECORDINGS Playing your recordings: • Step down the list of recordings to find the recording you want. • Select ‘PVR’ from the Media Player menu (see page 31). As you step to each recording a preview will start and the program information will update. -
Page 36: Ott Content
SETUP MENU > APPLICATIONS OTT CONTENT OTT content is delivered via the Internet in the same way as your computer will access OTT news page websites. The OTT news page is an index of the latest news headlines. From here you can use the The content available may vary from location to location and from time to time. -
Page 37: Ott Content
SETUP MENU > APPLICATIONS OTT CONTENT OTT weather page Adding a city to the OTT weather display From the weather page you can choose a city near you to customise the weather report/ • From the city selection screen, select the ‘+’ option. forecast for your area. -
Page 38: Troubleshooting
TROUBLESHOOTING CARE AND MAINTENANCE SPECIFICATIONS & WARRANTY No picture: CARE AND CLEANING SPECIFICATIONS Disconnect the power to the receiver and check the All care and cleaning operations should be carried out Supply Voltage: .....100 - 240 V ~, 50/60 Hz connections to the receiver and the TV. - Page 40 Tesco Stores Ltd, Delamare Road, Cheshunt, Herts, EN8 9SL Technika Helplines: Landlines 0800 323 4060 (Freephone from a BT landline). Mobiles 0330 123 4060 (Calls cost no more than calls to geographic numbers eg. 01 or 02 and are included in inclusive minutes and discount schemes).
Need help?
Do you have a question about the TKSTB14 and is the answer not in the manual?
Questions and answers