Advertisement
Quick Links
Quick Start Guide
RXPW4 - 4 Zone Pilot Wire Central Controller
This guide is for quick reference only. Refer to RXPW4 installation and operating instructions for further information
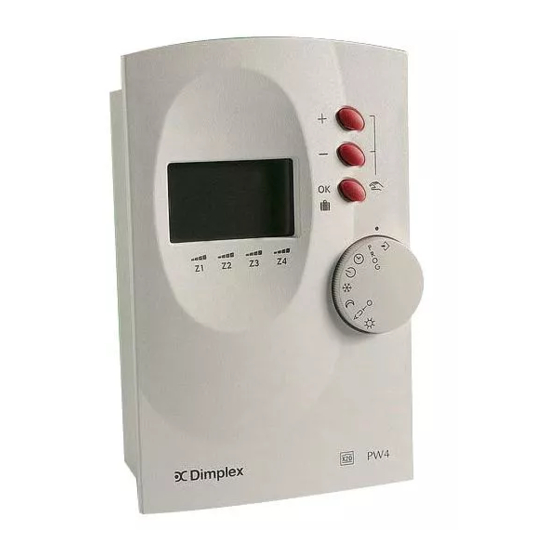
Controls
General
The RXPW4 controller allows control of multiple Dimplex heaters
from a single point. Heaters can be grouped together in "zones"
and each zone configured with a different time program for each
day of the week. Up to 4 zones are available.
Initial set up: Setting the time and day
Before the controller can be programmed, it is first necessary to set
the current time and day of the week.
1.
Turn the mode selector switch to the
2.
Use the "+" and "-" buttons to cycle through the hours/
days of the week until the correct time/day is set.
3.
Press OK to confirm.
Note: Typically 1 = Sunday, 2 = Monday, etc.
Setting the daily program for each zone
1.
Turn the mode selector switch to the PROG position.
2.
Use the "+" and "-" buttons to select the zone you wish to
programme (e.g. P=1).
3.
Press OK to select.
4.
Use the "+" or "-" buttons to set the program for each hour
of day 1 (i.e. Sunday).
5.
"+"sets an hour of Comfort (on) and "-" sets an hour of
Background (off). The hours of the day are denoted across
the bottom of the display.
6.
Press OK to confirm when the program has been set. The
programme for day 2, etc. can then be set in the same
way..
7.
To copy the program from one day to the next, hold down
the OK button for 5 seconds.
Glen Dimplex UK Ltd. Millbrook House, Hedge End, Southampton, SO30 2DF. For further assistance please contact Dimplex customer services on 0870 727 0101
1 - Time
2 - Day of the week
3 - Current mode
4 - Zone status reference
5 - Controller setup/override
buttons
6 - Validation button
7 - Holiday mode
8 - Selector switch index mark
9 - Mode selector switch
position.
Mode Selector Functions
Symbol
Function
Continuous comfort (all zones)
AUTO
Auto mode (heating runs to the preset program for each
zone)
Continuous set back (all zones)
Continuous frost protection (all zones)
Set the time
PROG
Set the daily programs
Off (no heat output)
Heater mode configuration
Setting the daily program for each zone (cont.)
8.
Once the daily programs have been set for Zone 1, repeat
the process for Zones 2 - 4.
9.
To run the program, set the mode selector switch to the
AUTO position.
10.
The status of each zone is indicated on the display (1 bar =
background (off), 4 bars = Comfort (on).
Temporarily over riding the the daily program
When the programmer is in AUTO mode, the current setting for
each zone can be temporarily over ridden (advanced).
1.
Press the OK button. The bars above Z1 will flash.
2.
To change the status of zone 1 (e.g. from Comfort to Back-
ground), press the "+" or "-" button, followed by OK to
confirm.
3.
Alternatively, to change the status of a different zone, press
the OK button until the bars above the required zone flash
and repeat the steps above to change the status.
4.
This will temporarily over ride the program until the next
scheduled status change.
Manual over ride (all zones)
To permanently over ride the mode of all zones, turn the mode
selector switch to one of the manual setting positions:
COMFORT (ON) mode
BACKGROUND (OFF) mode
FROST PROTECTION mode
STANDBY mode
Issue 1: D1227-0106
Please refer to the individual
heater instructions to details of
heater operation in each mode
Advertisement


Need help?
Do you have a question about the RXPW4 and is the answer not in the manual?
Questions and answers