
Related Manuals for PowerLogic PM-600

Summary of Contents for PowerLogic PM-600
- Page 1 Instruction Bulletin 3020IM9503R6/98 December 1998 (Replaces 3020IM9503R8/97 dated October 1997) Power Meter Class 3020...
-
Page 2: Technical Support
BBS: (615) 287-3414 Fax: (615) 287-3404 Phone: (615) 287-3400 POWERLOGIC, POWERLINK, Square D, and are Registered Trademarks of Square D Company. System Manager is a trademark of Square D. Other names are trademarks or service marks of their respective companies. - Page 3 Register your Power Meter Please fill out, detach, and mail the postage paid card below. Fill out only one registration card, even if you have purchased multiple POWERLOGIC Power Meters.
-
Page 5: Table Of Contents
Jbus Protocol ....................39 Connecting to a PC Using Modbus or Jbus Communications ....... 40 Length of the Communications Link (POWERLOGIC, Modbus, or Jbus) ..41 Daisychaining PM&CS Devices (POWERLOGIC, Modbus, or Jbus) .... 41 Biasing the Communications Link (POWERLOGIC, Modbus, or Jbus) ..42... - Page 6 Power Meter Bulletin No. 3020IM9503R6/98 Contents December 1998 Chapter 7—Display Operation ............47 Introduction ....................47 Modes ......................47 Accessing a Mode ..................48 Setup Mode ....................49 Resets Mode ....................50 Diagnostics Mode ..................50 Display Modes .................... 50 How the Buttons Work ................
- Page 7 Bulletin No. 3020IM9503R6/98 Power Meter December 1998 Contents Appendices Appendix A—Specifications ................70 Appendix B—Dimensions .................. 72 Appendix C—Communication Cable Pinouts ............ 73 Appendix D—Additional Wiring Diagrams ............74 Appendix E—Using the Command Interface ............. 79 Appendix F—Register List ................. 81 Appendix G—Modbus and Jbus Functions Supported ........
- Page 8 Power Meter Bulletin No. 3020IM9503R6/98 Contents December 1998 6-4: Power meters connected to a personal computer via serial port ..... 40 6-5: Daisychaining the RS-485 communications terminals ......42 6-6: Connecting the power meter as the first device on a PM&CS or Modbus communications link ........42 6-7: Terminating power meter with MCTAS-485 ..........
-
Page 9: Chapter 1-Introduction
You can mount them on an enclosure floor or wall, on a horizontal 35 mm DIN rail, or directly behind the display on the panel door. The power meter is completely supported in POWERLOGIC System Manager Software releases SMS-3000, SMS-1500 and PMX-1500, including setup and resets. -
Page 10: Summary Of Power Meter Instrumentation
Class 3020 Power Meters and Accessories Type Description PM-600 Instrumentation, 0.3% accuracy PM-620 PM-600 features, plus date/time stamp, THD/thd, neutral current, demand values PM-650 PM-620 features, plus alarms, min/max values, data and event logs PMD-32 Power Meter Display (optional) with 1-ft. (0.3 m) cable SC-104 4-ft (1.2 m) cable (optional) -
Page 11: Using This Bulletin
PM-650, trending, and PC-based alarming, must be set up using POWERLOGIC application software. For instructions on setting up these features, refer to the application software instruction bulletin. Note: The PM-650 is supported by POWERLOGIC System Manager Software (SMS)-3000 v. 3.1 (and higher). ©... - Page 12 Power Meter Bulletin No. 3020IM9503R6/98 Chapter 1—Introduction December 1998 © 1998 Square D All Rights Reserved...
-
Page 13: Chapter 2-Safety Precautions
Bulletin No. 3020IM9503R6/98 Power Meter December 1998 Chapter 2—Safety Precautions CHAPTER 2—SAFETY PRECAUTIONS DANGER HAZARD OF ELECTRIC SHOCK, BURN, OR EXPLOSION. • Only qualified electrical workers should install this equipment. Such work should be performed only after reading this entire set of instructions. - Page 14 Power Meter Bulletin No. 3020IM9503R6/98 Chapter 2—Safety Precautions December 1998 © 1998 Square D All Rights Reserved...
-
Page 15: Chapter 3-Hardware Description
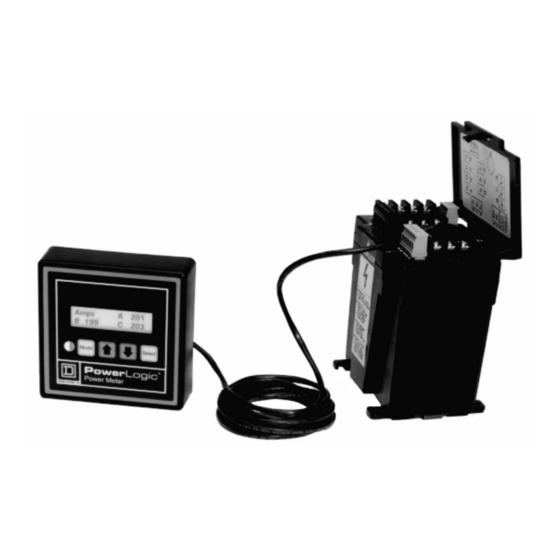
Bulletin No. 3020IM9503R6/98 Power Meter December 1998 Chapter 3—Hardware Description CHAPTER 3—HARDWARE DESCRIPTION DISPLAY The optional power meter display is designed for maximum ease of use. The display has the following modes of operation: • Setup—for setting up power meter •... -
Page 16: 3-1: Power Meter Display Components
Power Meter Bulletin No. 3020IM9503R6/98 Chapter 3—Hardware Description December 1998 Figure 3-1 shows the power meter display. Display components are listed below: 2-Line Liquid Crystal Display. For local display of metered values. Arrow Buttons. Press to move through meter display screens. In Setup, Resets, and Diagnostic modes, press to change values and, on the PM-650 only, Alarm Setup and Alarm Log. -
Page 17: 3-2: Power Meter Display, Front And Back
Bulletin No. 3020IM9503R6/98 Power Meter December 1998 Chapter 3—Hardware Description The display connects to the power meter via the display cable. One display communications port is located on the back of the display (figure 3-2, below). The other display communications port is located on the meter connections end of the power meter (figure 3-3). -
Page 18: Power Meter Connections
Power Meter Bulletin No. 3020IM9503R6/98 Chapter 3—Hardware Description December 1998 POWER METER CONNECTIONS Figure 3-3 shows the front of the power meter and the label on the terminal shield. Identified parts are as follows: 3-Phase Voltage Inputs Control Power Terminals KYZ Pulse Output 3-Phase Current Inputs Display Communications Port... -
Page 19: Chapter 4-Installation
Bulletin No. 3020IM9503R6/98 Power Meter December 1998 Chapter 4—Installation CHAPTER 4—INSTALLATION DANGER HAZARD OF ELECTRIC SHOCK, BURN, OR EXPLOSION. Only qualified electrical workers should install and wire this equipment. Perform such work only after reading this complete set of instructions. Failure to observe these precautions will result in death or severe personal injury! CAUTION... -
Page 20: Mounting The Display
Power Meter Bulletin No. 3020IM9503R6/98 Chapter 4—Installation December 1998 • Be sure that ambient conditions fall within the acceptable range: operating temperature 0°C to +60°C, relative humidity 5–95%, non-condensing. Note: Always refer to local and state electrical safety standards before mounting the power meter or display. -
Page 21: On Panel Without Existing 1% Ammeter/Voltmeter Cutout
Bulletin No. 3020IM9503R6/98 Power Meter December 1998 Chapter 4—Installation 3a. If a power meter will be attached to the display, insert display mounting screws into only the top two holes; tighten until approximately 1/4" of each screw protrudes from the panel. See Directly Behind the Display, page 14, for remaining instructions. -
Page 22: Mounting The Power Meter
Power Meter Bulletin No. 3020IM9503R6/98 Chapter 4—Installation December 1998 MOUNTING THE POWER METER Power meter mounting options are described in this section. DANGER HAZARD OF ELECTRIC SHOCK, BURN, OR EXPLOSION. Only qualified electrical workers should install and wire this equipment. Perform such work only after reading this complete set of instructions. -
Page 23: Existing Ammeter/Voltmeter Cutout
Bulletin No. 3020IM9503R6/98 Power Meter December 1998 Chapter 4—Installation CAUTION HAZARD OF EQUIPMENT DAMAGE. Use only the power meter display mounting screws included in the mount- ing hardware kit. Use of any other screws for display mounting voids the warranty and may damage the display. Failure to observe this precaution can result in equipment damage. -
Page 24: Remote Mounting
Power Meter Bulletin No. 3020IM9503R6/98 Chapter 4—Installation December 1998 Remote Mounting To mount the power meter remotely (inside an enclosure), follow these steps: DANGER HAZARD OF ELECTRIC SHOCK, BURN, OR EXPLOSION. Only qualified electrical workers should install and wire this equipment. Perform such work only after reading this complete set of instructions. -
Page 25: 4-2: Mounting Power Meter On Panel With No Existing Cutout
Bulletin No. 3020IM9503R6/98 Power Meter December 1998 Chapter 4—Installation Template Panel Figure 4-2: Mounting power meter on panel with no existing cutout 1.6875 2" to 4" Hole 51–102 3.375 1.6875 4 Holes 0.1875 (5 mm) Inches 3.375 Dual Dimensions: Millimeters Note: The dimensions and positions of the 4 display holes shown above are identical for the power meter module. -
Page 26: Din Rail Mounting
Power Meter Bulletin No. 3020IM9503R6/98 Chapter 4—Installation December 1998 DIN Rail Mounting To mount the power meter onto 35 mm DIN rail, follow these steps: DANGER HAZARD OF ELECTRIC SHOCK, BURN, OR EXPLOSION. Only qualified electrical workers should install and wire this equipment. Perform such work only after reading this complete set of instructions. -
Page 27: 4-4: Mounting Power Meter On 35 Mm Din Rail
Bulletin No. 3020IM9503R6/98 Power Meter December 1998 Chapter 4—Installation DIN Rail Hooks DIN Rail Clip Side View Side View After Installation DIN Rail Figure 4-4: Mounting power meter on 35 mm DIN rail © 1998 Square D All Rights Reserved... - Page 28 Power Meter Bulletin No. 3020IM9503R6/98 Chapter 4—Installation December 1998 © 1998 Square D All Rights Reserved...
-
Page 29: Chapter 5-Wiring
Bulletin No. 3020IM9503R6/98 Power Meter December 1998 Chapter 5—Wiring CHAPTER 5—WIRING DANGER HAZARD OF PERSONAL INJURY OR DEATH. Only qualified electrical workers should install and wire this equipment. Such work should be performed only after reading this complete set of instructions. -
Page 30: Control Power Transformer (Cpt) Sizing
Power Meter Bulletin No. 3020IM9503R6/98 Chapter 5—Wiring December 1998 Control Power Transformer (CPT) Sizing If you are using control power transformers (CPTs), refer to table 5-2 below. It shows CPT sizing for various quantities of power meter modules. Table 5-2 Control Power Transformer Sizing Number of Size of... -
Page 31: 5-1: Clamp-On Ferrite And Disconnect Breaker For Ce Compliance
Bulletin No. 3020IM9503R6/98 Power Meter December 1998 Chapter 5—Wiring Metering Voltage Source Note: The disconnect Disconnect breaker must be Breaker installed here If control power is derived from the metering voltage source, no additional disconnect device is necessary. Clamp-On However, if control Ferrite power is derived from a separate source ( not... -
Page 32: 5-3: 3-Phase, 3-Wire Delta Direct Voltage Connection With 2 Cts
Power Meter Bulletin No. 3020IM9503R6/98 Chapter 5—Wiring December 1998 AØ Line BØ Load CØ Fuses Voltage Control Power Comms Current Display Communications Port Note: Control power can be drawn from fused voltage inputs L-L or an external source. See page 22 for CPT and fuse recommendations. Control power range: L1-L2 90–600 Vrms 90–300 Vdc Installation Category II... -
Page 33: 5-4: 3-Phase, 3-Wire Delta With 2 Pts And 2 Cts
Bulletin No. 3020IM9503R6/98 Power Meter December 1998 Chapter 5—Wiring AØ Load BØ Line CØ Fuses Open Delta PT Connection (120 V Secondaries) Fuses Fuses (120 or 240 Vac Secondary,10 VA) Fuse Voltage Control Power Comms Current Display Communications Port Note: Control power can be drawn from fused voltage inputs L-L or an external source. -
Page 34: 5-5: 3-Phase, 3-Wire Delta With 2 Pts And 3 Cts
Power Meter Bulletin No. 3020IM9503R6/98 Chapter 5—Wiring December 1998 AØ Line BØ Load CØ Fuses Open Delta PT Connection (120 V L-N Fuses Secondaries) (120 or 240 Vac Fuses Secondary, 10 VA) Fuse Voltage Control Power Comms Current Display Communications Port Note: Control power can be drawn from fused voltage inputs L-L or an external source. -
Page 35: 5-6: 3-Phase, 4-Wire Wye, Ground And Direct Voltage Connection, With 3 Cts
Bulletin No. 3020IM9503R6/98 Power Meter December 1998 Chapter 5—Wiring AØ BØ Load Line CØ Fuses Voltage Control Power Comms Current Display Communications Port Note: Control power can be drawn from fused voltage inputs L-L, or L-N, or an external source. See page 22 for CPT and fuse recommendations. Control power range: L1-L2 90–600 Vrms 90–300 Vdc Installation Category II... -
Page 36: 5-7: 3-Phase, 4-Wire Wye, Ground Connection, With 3 Pts And 3 Cts
Power Meter Bulletin No. 3020IM9503R6/98 Chapter 5—Wiring December 1998 AØ BØ Line Load CØ Fuses Wye PT Connection (120 V L-N Fuse Secondaries) Fuses (120 or 240 Vac Secondary, 10 VA) Fuse Voltage Control Power Comms Current Display Communications Port Note: Control power can be drawn from fused voltage inputs L-L, or L-N, or an external source. -
Page 37: 5-8: Dc Control Power Wiring
Bulletin No. 3020IM9503R6/98 Power Meter December 1998 Chapter 5—Wiring Voltage DC Control Control Power 125/250 Power Vdc Nominal Comms Current Display Communications Port Note: Control power can be drawn from fused voltage inputs L-L, or L-N, or an external source. See page 22 for CPT and fuse recommendations. Control power range: L1-L2 90–600 Vrms 90–300 Vdc Installation Category II... -
Page 38: 5-9: Power Meter Wire Routing
Power Meter Bulletin No. 3020IM9503R6/98 Chapter 5—Wiring December 1998 Typical power meter module wire routing is shown in figure 5-9 below. 3-Phase Voltage Inputs Control Power Terminals KYZ Output 3-Phase Current Inputs Communications Connection to Display RS-485 Communications Terminals Figure 5-9: Power meter wire routing DANGER HAZARD OF ELECTRICAL SHOCK, BURN, OR EXPLOSION. -
Page 39: Deriving Control Power From Phase Voltage Inputs
Bulletin No. 3020IM9503R6/98 Power Meter December 1998 Chapter 5—Wiring 2. Connect the spade connectors to the 3-phase voltage input terminals ( , figure 5-9) and the 3-phase current input terminals ( , figure 5-9). Tighten the terminal block screws to 9 lb-in (1.0 N•m). 3. -
Page 40: Grounding The Power Meter
Power Meter Bulletin No. 3020IM9503R6/98 Chapter 5—Wiring December 1998 Note: Before wiring, see fuse recommendations on page 22. Follow these steps to derive control power from phase PT inputs: 1. Connect the Va terminal (terminal 9) to the L1 terminal (terminal 6). 2. -
Page 41: Solid-State Kyz Pulse Output
Bulletin No. 3020IM9503R6/98 Power Meter December 1998 Chapter 5—Wiring SOLID-STATE KYZ PULSE OUTPUT DANGER HAZARD OF ELECTRICAL SHOCK, BURN, OR EXPLOSION. • Turn off all power supplying this equipment before opening the terminal shield or making connections. • Snap terminal shield into closed position before turning power on. Failure to observe these precautions will result in death or severe personal injury! The KYZ output can be wired to a 2-wire or 3-wire pulse receiver. -
Page 42: 5-11: Typical Kyz Pulse Output Connection For Use As An Alarm Contact
Power Meter Bulletin No. 3020IM9503R6/98 Chapter 5—Wiring December 1998 For the PM-650 only, the KYZ output can also be wired as an alarm contact (figure 5-11). When wiring the KYZ output, use 14 to 18 AWG wire. Strip 0.25" (6 mm) of insulation from the end of each wire being connected to the KYZ connector. -
Page 43: Chapter 6-Communications
POWERLOGIC PROTOCOL COMMUNICATIONS WIRING POWERLOGIC devices are equipped with RS-485 communications. You can daisychain up to 32 POWERLOGIC (or Power Monitoring and Control System [PM&CS]) compatible devices to a single communications port. This document refers to a chain of PM&CS devices connected by communications cable as a communications link. -
Page 44: Connecting To A Personal Computer Via Powerlogic Communications
To do this, the PM&CS devices must be connected to an RS-232-to-RS-422/RS-485 converter, which is connected to the personal computer. POWERLOGIC offers a converter kit for this purpose (Class 3090 Type MCI-101; refer to the instruction bulletin included with the MCI-101 for connection instructions). -
Page 45: Connecting To A Powerlogic Network Interface Module (Pnim) Using Powerlogic Communications
Link in this chapter for distance limitations at different baud rates. • Connect PM&CS devices to PNIM port 0 (top RS-485 port) only. • Configure PNIM port 0 for “POWERLOGIC” mode (see side of PNIM for instructions on setting dip switches). -
Page 46: Connecting To A Sy/Max Programmable Controller Using Powerlogic Communications
POWERLOGIC device data. • Configure the baud rate of the programmable controller’s port to match the baud rate of the POWERLOGIC devices on the communications link. • Refer to the programmable controller instruction manual for detailed instructions on configuring the programmable controller. -
Page 47: Modbus Rtu Protocol
Bulletin No. 3020IM9503R6/98 Power Meter December 1998 Chapter 6—Communications MODBUS RTU PROTOCOL Alternately, power meters can communicate using the Modbus RTU protocol. Using 4-wire Modbus, you can daisychain up to 32 power meters to a single communications port. When using 2-wire Modbus communications, a maximum of 16 power meters can be daisychained to a single communication port. -
Page 48: Connecting To A Pc Using Modbus Or Jbus Communications
To do this, the power meters must be connected to an RS-232-to-RS-422/RS-485 converter, which is connected to the personal computer. POWERLOGIC offers a converter kit for this purpose (Class 3090 Type MCI-101; refer to the instruction bulletin included with the MCI-101 for connection instructions). -
Page 49: Length Of The Communications Link (Powerlogic, Modbus, Or Jbus)
Power Meter December 1998 Chapter 6—Communications LENGTH OF THE COMMUNICATIONS LINK (POWERLOGIC, MODBUS, OR JBUS) The length of the communications link cannot exceed 10,000 feet (3,048 m). This means that the total length of the communications cable from the PNIM, personal computer, or PLC, to the last device in the daisychain, cannot exceed 10,000 feet. -
Page 50: Biasing The Communications Link (Powerlogic, Modbus, Or Jbus)
PNIM, SY/LINK board, or other host device. Note: When connecting to a PNIM, connect the power meter to the top RS-422 port, labeled port 0. This port must be configured for POWERLOGIC mode. © 1998 Square D All Rights Reserved... -
Page 51: Labeling The Cab-107 Leads
Bulletin No. 3020IM9503R6/98 Power Meter December 1998 Chapter 6—Communications 3. Carefully mark the flying leads on the CAB-107 as indicated in table 6-2 below. For example, mark the green wire, labeled 20, as “IN+”; mark the white wire, labeled 21, as “IN–”; and so on. Table 6-2 Labeling the CAB-107 Leads Existing Label... -
Page 52: Terminating The Communications Link (Powerlogic, Modbus, Or Jbus)
Bulletin No. 3020IM9503R6/98 Chapter 6—Communications December 1998 Terminating the Communications Link (POWERLOGIC, Modbus, or Jbus) For proper RS-485 communications performance, terminate the last device on a PM&CS or Modbus communications link. To terminate the last device, use a POWERLOGIC Multipoint Communications Terminator. -
Page 53: Terminating Power Meter With Terminal Block And Mct-485
Bulletin No. 3020IM9503R6/98 Power Meter December 1998 Chapter 6—Communications Terminal Block Power Meter (If Last Device in Daisychain) In– Out+ Out– Shield MCT-485 In– RS-485 Out+ Terminals Out– Shield Belden 8723 To Next Device on Daisychain Figure 6-8: Terminating power meter with terminal block and MCT-485 ©... - Page 54 Power Meter Bulletin No. 3020IM9503R6/98 Chapter 6—Communications December 1998 © 1998 Square D All Rights Reserved...
-
Page 55: Chapter 7-Display Operation
CHAPTER 7—DISPLAY OPERATION INTRODUCTION This chapter tells how to set up the power meter from the display only. You can also set up the power meter using POWERLOGIC SMS-3000, SMS-1500, or PMX-1500 software. Refer to the software instruction bulletin(s) for specific instructions. -
Page 56: Accessing A Mode
Power Meter Bulletin No. 3020IM9503R6/98 Chapter 7—Display Operation December 1998 Accessing a Mode To access a mode, refer to figure 7-1 while following these steps: 1. Press the Mode button until the desired mode appears ( , figure 7-1). 2. Press Select to enter the desired mode. 3. -
Page 57: Setup Mode
Bulletin No. 3020IM9503R6/98 Power Meter December 1998 Chapter 7—Display Operation Setup Mode The Setup mode lets you configure the following parameters: • Protocol • Device Address • Baud Rate • Parity (even or none) • CT Primary • CT Secondary •... -
Page 58: Resets Mode
Power Meter Bulletin No. 3020IM9503R6/98 Chapter 7—Display Operation December 1998 Note: Because the power meter can directly meter up to 600 V line-to-line without using potential transformers, you must specify the appropriate voltage range during the setup procedure. To determine what voltage range to enter during setup, find your system voltage in table 7-1 below. -
Page 59: How The Buttons Work
Bulletin No. 3020IM9503R6/98 Power Meter December 1998 Chapter 7—Display Operation How the Buttons Work The buttons on the power meter display (figure 7-2) function differently in Setup, Resets, Diagnostics, Alarm Log , and Alarm Setup than they do in the display modes. Select Mode Figure 7-2: Power meter display buttons... -
Page 60: Setting Up The Power Meter
0 to 327.67 kWH THD (United States) THD (United States) thd (European) Password (Master and Reset) 0 to 9998 See note on voltage range selection, page 50. PM-620 and PM-650. PM-600 and PM-620. PM-650 only. © 1998 Square D All Rights Reserved... -
Page 61: Power Meter Setup Flowchart
Bulletin No. 3020IM9503R6/98 Power Meter December 1998 Chapter 7—Display Operation Start Press the Mode button until “Setup” is displayed. Press the Select button to choose Setup. Use the arrow buttons to display the password. Then press the Select button. Press the Select button to move to the parameter to be changed. -
Page 62: Performing Resets
Power Meter Bulletin No. 3020IM9503R6/98 Chapter 7—Display Operation December 1998 PERFORMING RESETS To reset energy, demand , and min/max values using the display, follow these steps: 1. Press the Mode button until “Resets” is displayed. 2. Press the Select button to enter the Resets mode. The display shows the password prompt. -
Page 63: Viewing Diagnostic Information
Bulletin No. 3020IM9503R6/98 Power Meter December 1998 Chapter 7—Display Operation VIEWING DIAGNOSTIC INFORMATION To view diagnostic information via the display, follow these steps: 1. Press the Mode button until “Diagnostics” is displayed. 2. Press the Select button to enter the Diagnostics mode. As you continue to press the Select button, you’ll scroll through these screens: Model Number, Serial Number, and four F/W (firmware operating) Version screens. -
Page 64: Viewing Active Alarms (Pm-650 Only)
Power Meter Bulletin No. 3020IM9503R6/98 Chapter 7—Display Operation December 1998 8. Use the arrow keys to increase or decrease the displayed value until the desired pickup delay is reached; press the Select button. 9. The display shows the appropriate scale factor for the dropout value. Multiply the desired dropout value by the scale factor shown on the screen;... -
Page 65: Chapter 8-Metering Capabilities
Bulletin No. 3020IM9503R6/98 Power Meter December 1998 Chapter 8—Metering Capabilities CHAPTER 8—METERING CAPABILITIES REAL-TIME READINGS The power meter measures currents and voltages and reports rms values for all three phases and a calculated neutral current . In addition, the power meter calculates true power factor, real power, reactive power, and more. -
Page 66: Power Factor Min/Max Conventions
• upload min/max values from the power meter and save them to disk • reset min/max values For instructions on viewing, saving, and resetting min/max data using POWERLOGIC software, refer to the instruction bulletin included with the software. POWER FACTOR MIN/MAX CONVENTIONS All running min/max values, with the exception of power factor, are arith- metic minimums and maximums. -
Page 67: Power Factor Min/Max Example
Bulletin No. 3020IM9503R6/98 Power Meter December 1998 Chapter 8—Metering Capabilities Maximum Minimum Power Factor Power Factor .8 (leading) -.7 (lagging) Range of Power Factor Values Unity 1.00 LEAD Figure 8-1: Power factor min/max example Quadrant Quadrant WATTS NEGATIVE (–) WATTS POSITIVE (+) VARS NEGATIVE (–) VARS NEGATIVE (–) P.F. -
Page 68: Alternate Var Sign Convention
Power Meter Bulletin No. 3020IM9503R6/98 Chapter 8—Metering Capabilities December 1998 REACTIVE POWER Quadrant Quadrant WATTS NEGATIVE (–) WATTS POSITIVE (+) VARS POSITIVE (+) VARS POSITIVE (+) P.F. LEADING (+) P.F. LAGGING (–) Reverse Power Flow Normal Power Flow REAL POWER WATTS NEGATIVE (–) WATTS POSITIVE (+) VARS NEGATIVE (–) -
Page 69: Energy Readings
(i.e., the energy value increases, even during reverse power flow as in a tie breaker application). ® Using POWERLOGIC System Manager™ Software SMS-3000, SMS-1500, or PMX-1500, the power meter can be configured to accumulate kWh and kVARh in one of three additional modes: signed, energy in, and energy out. -
Page 70: Power Analysis Values
Power Meter Bulletin No. 3020IM9503R6/98 Chapter 8—Metering Capabilities December 1998 POWER ANALYSIS VALUES The power meter provides power analysis values that can be used to detect power quality problems, diagnose wiring problems, and more. Table 8-3 summarizes the power analysis values. Table 8-3 Power Analysis Values Value... -
Page 71: Demand Readings (Pm-620 And Pm-650 Only)
Bulletin No. 3020IM9503R6/98 Power Meter December 1998 Chapter 8—Metering Capabilities DEMAND READINGS (PM-620 AND PM-650 ONLY) Power meter models PM-620 and PM-650 provides both current and power demand readings (table 8-4). Table 8-4 Demand Readings Demand Reading Reportable Range Demand Current, Per-Phase & Neutral Present 0 to 32,767 A Peak... -
Page 72: Block Interval Demand With Subinterval Option
Synch to Comms (PM-650 Only) If you set the demand to 0 using POWERLOGIC software, the synch to comms demand calculation is used. See Appendix E for more information. Predicted Demand (PM-650 Only) Predicted demand is the average rate of power use during the most recent one-minute interval. -
Page 73: Kyz Pulse Output
Bulletin No. 3020IM9503R6/98 Power Meter December 1998 Chapter 8—Metering Capabilities KYZ PULSE OUTPUT This section describes the power meter’s pulse output capability. For wiring instructions, see Chapter 5—Wiring. The KYZ output is a Form-C contact with a maximum rating of 96 mA. Calculating the Pulse Constant This section shows an example of how to calculate the pulse constant (in this case, a watthour-per-pulse value). -
Page 74: Chapter 9-Onboard Alarming (Pm-650 Only)
These alarm conditions are tools that enable the power meter to execute tasks automatically. Using POWERLOGIC application software, each alarm condition can be assigned one or more of the following tasks: • Force data log entries in the data log file •... -
Page 75: Setpoint-Controlled Relay Functions
(Max2) during the alarm period. Figure 9-1: How the power meter handles setpoint-driven alarms Figure 9-2 shows the event log entries for figure 9-1 displayed by POWERLOGIC application software. Max1 Max2 Figure 9-2: Sample event log entries... -
Page 76: Undervoltage
Power Meter Bulletin No. 3020IM9503R6/98 Chapter 9—Onboard Alarming December 1998 Undervoltage • Pickup and dropout setpoints are entered in volts. Very large values may require scale factors. Refer to Appendix I—Alarm Setup. • The per-phase overvoltage alarm occurs when the per-phase voltage is equal to or above the pickup setpoint for the specified pickup delay period (in seconds). -
Page 77: Chapter 10-Logging (Pm-650 Only)
Chapter 9 for more information.) The event log holds a user-configurable number of alarm events in FIFO (first-in-first-out) or Fill/Hold order. The event log is factory pre-configured to hold 20 events. Using POWERLOGIC application software, you can upload the event log for viewing, save it to disk, and clear the power meter’s event log memory. -
Page 78: Appendix A-Specifications
Power Meter Bulletin No. 3020IM9503R6/98 Appendix A—Specifications December 1998 APPENDIX A—SPECIFICATIONS Metering Specifications Current Inputs Current Range ..................0–10.0 A ac Nominal Current .................... 5 A ac Voltage Inputs Voltage Range (line to line) ..............35–600 Vac Voltage Range (line to neutral) ............20–347 Vac Nominal Voltage (typical) ........ - Page 79 Bulletin No. 3020IM9503R6/98 Power Meter December 1998 Appendix A—Specifications Control Power Input Specifications Input Range, ac ..................90–600 Vac Burden ................90 Vac–264 Vac, 10 VA 265 Vac–600 Vac, 30 VA Frequency Range ..................45–66 Hz Isolation ................2000 Vac/60 seconds Ride-through on Power Loss ............
-
Page 80: Appendix B-Dimensions
Power Meter Bulletin No. 3020IM9503R6/98 Appendix B—Dimensions December 1998 APPENDIX B—DIMENSIONS 3.81 6.08 96.7 4.50 4.75 Inches Millimeters 3.63 4.50 1.26 4.50 Figure B-1: Dimensions of power meter and display © 1998 Square D All Rights Reserved... -
Page 81: Appendix C-Communication Cable Pinouts
Bulletin No. 3020IM9503R6/98 Power Meter December 1998 Appendix C—Communication Cable Pinouts APPENDIX C—COMMUNICATION CABLE PINOUTS CAB-107 CAB-108 TXA—White Power Meter Male DB-9 Terminal Connector TXB—Green N- (4)—White RXA—Black IN+ (5)—Green RXB—Red OUT- (2)—Black OUT+ (3)—Red Shield—Shield SHLD (1) Shield CAB-102, CAB-104 CC-100 ©... -
Page 82: Appendix D-Additional Wiring Diagrams
Power Meter Bulletin No. 3020IM9503R6/98 Appendix D—Additional Wiring Diagrams December 1998 APPENDIX D— ADDITIONAL WIRING DIAGRAMS DANGER HAZARD OF ELECTRICAL SHOCK, BURN, OR EXPLOSION. • Turn off all power supplying this equipment before opening the terminal shield or making connections. •... -
Page 83: D-1: Power Meter System Wiring Connections
Bulletin No. 3020IM9503R6/98 Power Meter December 1998 Appendix D—Additional Wiring Diagrams Table D-1 Power Meter System Wiring Connections Power Meter Wiring for System Wiring Notes System I.D. Power Meter 3Ø, 4W wye 3Ø, 4W wye grounded figure 5-6 neutral or 5-7 3Ø, 3W wye 30 or 31 3Ø, 3W delta... -
Page 84: D-1: 240/120 V 1-Phase, 3-Wire Direct Voltage Connection With 2 Cts
Power Meter Bulletin No. 3020IM9503R6/98 Appendix D—Additional Wiring Diagrams December 1998 Line Load Fuses Voltage Control Power Comms Current Display Communications Port Note: Control power can be drawn from fused voltage inputs L-L, or L-N, or an external source. See page 22 for CPT and fuse recommendations. Control power range: L1-L2 90–600 Vrms 90–300 Vdc When configuring the power meter, set system type to 4-wire (40) and... -
Page 85: D-2: 3-Phase, 4-Wire Delta With 3 Pts And 3 Cts
Bulletin No. 3020IM9503R6/98 Power Meter December 1998 Appendix D—Additional Wiring Diagrams AØ BØ Line Load CØ Fuses Voltage Control Power Comms Current Display Communications Port Note: Control power can be drawn from fused voltage inputs L-L, or L-N, or an external source. -
Page 86: D-3: 3-Phase, 4-Wire Wye, 3-Wire Load With 3 Pts And 2 Cts
Power Meter Bulletin No. 3020IM9503R6/98 Appendix D—Additional Wiring Diagrams December 1998 AØ BØ Line Load CØ Fuses Wye PT Connection (120 V L-N Fuse Secondaries) Fuses (120 or 240 Vac Secondary, Projected 10 VA) Fuse Voltage Control Power Comms Current Display Communications Port... -
Page 87: Appendix E-Using The Command Interface
To change to the alternate sign convention, complete the following steps: 1. (SY/MAX or POWERLOGIC protocol only) Read register 7715. 2. Read register 2028, the value of the system password. 3. Write the value in register 2028 into register 7721. - Page 88 Power Meter Bulletin No. 3020IM9503R6/98 Appendix E—Using the Command Interface December 1998 3. Write the value in register 2028 into register 7721. 4. Write the decimal value 2020 into register 7720. 5. Change to binary mode and read register 7755. 6.
-
Page 89: Appendix F-Register List
A to Neutral Factor D These registers can be used with POWERLOGIC, Modbus, or Jbus protocols. Although POWERLOGIC and Jbus protocols use a zero-based register addressing convention and Modbus uses a one-based register addressing convention, the power meter, when configured for Modbus communications, automatically compensates for the Modbus offset of one. - Page 90 Phase B Factor E These registers can be used with POWERLOGIC, Modbus, or Jbus protocols. Although POWERLOGIC and Jbus protocols use a zero-based register addressing convention and Modbus uses a one-based register addressing convention, the power meter, when configured for Modbus communications, automatically compensates for the Modbus offset of one.
- Page 91 0 to 10,000 B Voltage These registers can be used with POWERLOGIC, Modbus, or Jbus protocols. Although POWERLOGIC and Jbus protocols use a zero-based register addressing convention and Modbus uses a one-based register addressing convention, the power meter, when configured for Modbus communications, automatically compensates for the Modbus offset of one.
- Page 92 Degrees Coincident Angle These registers can be used with POWERLOGIC, Modbus, or Jbus protocols. Although POWERLOGIC and Jbus protocols use a zero-based register addressing convention and Modbus uses a one-based register addressing convention, the power meter, when configured for Modbus communications, automatically compensates for the Modbus offset of one.
- Page 93 1207 Reserved These registers can be used with POWERLOGIC, Modbus, or Jbus protocols. Although POWERLOGIC and Jbus protocols use a zero-based register addressing convention and Modbus uses a one-based register addressing convention, the power meter, when configured for Modbus communications, automatically compensates for the Modbus offset of one.
- Page 94 In 1000ths -100 to +1000 to +100 These registers can be used with POWERLOGIC, Modbus, or Jbus protocols. Although POWERLOGIC and Jbus protocols use a zero-based register addressing convention and Modbus uses a one-based register addressing convention, the power meter, when configured for Modbus communications, automatically compensates for the Modbus offset of one.
- Page 95 Factor E 0 to ±32,767 These registers can be used with POWERLOGIC, Modbus, or Jbus protocols. Although POWERLOGIC and Jbus protocols use a zero-based register addressing convention and Modbus uses a one-based register addressing convention, the power meter, when configured for Modbus communications, automatically compensates for the Modbus offset of one.
- Page 96 Percent in 10ths 0 to ±1000 These registers can be used with POWERLOGIC, Modbus, or Jbus protocols. Although POWERLOGIC and Jbus protocols use a zero-based register addressing convention and Modbus uses a one-based register addressing convention, the power meter, when configured for Modbus communications, automatically compensates for the Modbus offset of one.
- Page 97 1436 Reserved These registers can be used with POWERLOGIC, Modbus, or Jbus protocols. Although POWERLOGIC and Jbus protocols use a zero-based register addressing convention and Modbus uses a one-based register addressing convention, the power meter, when configured for Modbus communications, automatically compensates for the Modbus offset of one.
- Page 98 Unused 1616 These registers can be used with POWERLOGIC, Modbus, or Jbus protocols. Although POWERLOGIC and Jbus protocols use a zero-based register addressing convention and Modbus uses a one-based register addressing convention, the power meter, when configured for Modbus communications, automatically compensates for the Modbus offset of one.
- Page 99 1730 Unused These registers can be used with POWERLOGIC, Modbus, or Jbus protocols. Although POWERLOGIC and Jbus protocols use a zero-based register addressing convention and Modbus uses a one-based register addressing convention, the power meter, when configured for Modbus communications, automatically compensates for the Modbus offset of one.
- Page 100 1745 Unused These registers can be used with POWERLOGIC, Modbus, or Jbus protocols. Although POWERLOGIC and Jbus protocols use a zero-based register addressing convention and Modbus uses a one-based register addressing convention, the power meter, when configured for Modbus communications, automatically compensates for the Modbus offset of one.
- Page 101 Real Power) 1800–1802 These registers can be used with POWERLOGIC, Modbus, or Jbus protocols. Although POWERLOGIC and Jbus protocols use a zero-based register addressing convention and Modbus uses a one-based register addressing convention, the power meter, when configured for Modbus communications, automatically compensates for the Modbus offset of one.
- Page 102 Neutral Current 1800–1802 These registers can be used with POWERLOGIC, Modbus, or Jbus protocols. Although POWERLOGIC and Jbus protocols use a zero-based register addressing convention and Modbus uses a one-based register addressing convention, the power meter, when configured for Modbus communications, automatically compensates for the Modbus offset of one.
- Page 103 1 to 255 Jbus Device Address These registers can be used with POWERLOGIC, Modbus, or Jbus protocols. Although POWERLOGIC and Jbus protocols use a zero-based register addressing convention and Modbus uses a one-based register addressing convention, the power meter, when configured for Modbus communications, automatically compensates for the Modbus offset of one.
- Page 104 Password Setup Password These registers can be used with POWERLOGIC, Modbus, or Jbus protocols. Although POWERLOGIC and Jbus protocols use a zero-based register addressing convention and Modbus uses a one-based register addressing convention, the power meter, when configured for Modbus communications, automatically compensates for the Modbus offset of one.
- Page 105 @1 min. multiples These registers can be used with POWERLOGIC, Modbus, or Jbus protocols. Although POWERLOGIC and Jbus protocols use a zero-based register addressing convention and Modbus uses a one-based register addressing convention, the power meter, when configured for Modbus communications, automatically compensates for the Modbus offset of one.
- Page 106 2094 Reserved for DL These registers can be used with POWERLOGIC, Modbus, or Jbus protocols. Although POWERLOGIC and Jbus protocols use a zero-based register addressing convention and Modbus uses a one-based register addressing convention, the power meter, when configured for Modbus communications, automatically compensates for the Modbus offset of one.
- Page 107 None 0–32,767 These registers can be used with POWERLOGIC, Modbus, or Jbus protocols. Although POWERLOGIC and Jbus protocols use a zero-based register addressing convention and Modbus uses a one-based register addressing convention, the power meter, when configured for Modbus communications, automatically compensates for the Modbus offset of one.
- Page 108 Power Meter Bulletin No. 3020IM9503R6/98 Appendix F—Register List December 1998 Reg. No. Register Name Units Range 5803 Event Counter 24 None 0–32,767 5804 Event Counter 25 None 0–32,767 5805 Event Counter 26 None 0–32,767 5806 Event Counter 27 None 0–32,767 5807 Event Counter 28 None...
-
Page 109: Appendix G-Modbus And Jbus Functions Supported
Bulletin No. 3020IM9503R6/98 Power Meter December 1998 Appendix G—Modbus and Jbus Features Supported APPENDIX G—MODBUS AND JBUS FUNCTIONS SUPPORTED Standard Modbus and Jbus functions supported by the power meter are listed below. 3 Read Registers 4 Read Registers 6 Write Single Register 8 Diagnostic Codes: 10 Clear Counters and Diagnostic Registers 11 Returns the number of messages received with correct CRC. - Page 110 Slave ID Run Indicator Status Additional Data Hi Additional Data Lo CRC Lo — CRC Hi — For the power meter, this will always be 64. See Additional Data Hi/Lo for POWERLOGIC address. © 1998 Square D All Rights Reserved...
-
Page 111: Appendix H-2-Wire Modbus Or Jbus
Bulletin No. 3020IM9503R6/98 Power Meter December 1998 Appendix H—2-Wire Modbus or Jbus APPENDIX H—2-WIRE MODBUS OR JBUS COMMUNICATIONS WIRING When wiring the communications terminals for 2-wire Modbus or Jbus, be sure to jumper IN+ to OUT+ and IN– to OUT– (figure H-1). IN–... -
Page 112: Appendix I-Alarm Setup (Pm-650 Only)
• take the scale factor into account when entering alarm pickup and dropout settings SCALING ALARM SETPOINTS If you do not have POWERLOGIC software, you must set up alarms from the power meter display. This section explains how to properly scale alarm setpoints so you can do that. - Page 113 Bulletin No. 3020IM9503R6/98 Power Meter December 1998 Appendix I—Alarm Setup As one more example, consider an Unbalance Alarm. The power meter prompts you to enter the pickup and dropout values as PERCENT x 10. Therefore, to alarm on an unbalance of 3.5%, enter 35 as the pickup value. ALARM CONDITIONS AND ALARM NUMBERS The power meter‘s predefined alarm conditions are listed below along with the information given for each alarm condition.
- Page 114 Power Meter Bulletin No. 3020IM9503R6/98 Appendix I—Alarm Setup December 1998 Alarm Alarm Test Units Scale Alarm Description Register Group Type Overcurrent Phase A 1003 Amps Overcurrent Phase B 1004 Amps Overcurrent Phase C 1005 Amps Overcurrent Neutral 1006 Amps Reserved Undercurrent Phase A 1003 Amps...
- Page 115 Bulletin No. 3020IM9503R6/98 Power Meter December 1998 Appendix I—Alarm Setup Scale Group Definitions Scale Group A—Phase and Neutral Current Amps Scale Factor 0–327.67 –2 0–3276.7 –1 0–32767 0 (default) Scale Group D—Voltage, L-L, L-N Amps Scale Factor 0–3276.7 –1 0–32767 0 (default) 0–327.67 0–3276.7...
-
Page 116: Appendix J-Calculating Log File Size (Pm-650 Only)
APPENDIX J—CALCULATING LOG FILE SIZE (PM-650 ONLY) The PM-650 has 1K of memory available for the event log and data log combined. Using POWERLOGIC software, you can configure the sizes of the event log and data log within the available memory. - Page 117 Bulletin No. 3020IM9503R6/98 Power Meter December 1998 Appendix J—Calculating Log File Size For example, suppose you want to log cumulative apparent energy every hour for 2 days and store the last 20 events: 1. Multiply the number of cumulative 1 x 4 = 4 energy readings by 4 (registers): 1.
- Page 118 14 link biasing 42 Jbus protocol 39 link, length of Jbus/2-wire Modbus 103 POWERLOGIC, Modbus, or Jbus 41 KYZ pulse output 65 resetting Demand and Energy via 79 illustration 10 terminating the communications link 44 wiring 33 wiring...
- Page 119 Power Meter as first device on PM&CS or Modbus Length of the communication link comms link 42 POWERLOGIC, Modbus, or Jbus 41 connecting to a personal computer 36 Log file size, calculating 108 connecting to a PNIM—illustration 37 connections, wiring—illustration 10 MCT-485—illustration 45...
- Page 120 Setting up onboard alarms 55 Modbus RTU 39 Setting up the power meter 52 Jbus 39 Setup 7 POWERLOGIC protocol 35 mode 49 CTs, PTs, and control power 21 parameters, factory defaults 52 dc control power 29 Sliding block interval demand 63...
- Page 122 Order No. 3020IM9503R6/98 December 1998 Printed in USA PG 5M 12/98 R 2 99 © 1998 Square D All Rights Reserved...
Need help?
Do you have a question about the PM-600 and is the answer not in the manual?
Questions and answers