
Related Manuals for 4NSYS FDS-401Hl

Summary of Contents for 4NSYS FDS-401Hl
- Page 1 DIGITAL VIDEO RECORDER USER MANUAL For safe use of system and to prevent product failure or accident, please read this manual carefully before use. Ver : HL.R1.00.ENG_1.2...
-
Page 2: Before Usage
DIGITAL VIDEO RECORDER MANUAL Before Usage This product has been designed and manufactured to assure personal safety. Improper use can result in electronic shock or fire hazard. The safeguards incorporated in this product will protect you if you observe the following procedures for installation, use, and servicing. This product does not contain any parts that can be repaired by user. -
Page 3: Table Of Contents
DIGITAL VIDEO RECORDER MANUAL CONTENTS 1. Summary ∙ Feature ……………………………………………………………………………………………….………………………..……………….5 2. Installation ∙ Contents ………………………………..…………………………………………………………………….…………………………………..6 ∙ Front panel ………………………………………………………………………………………………………………………..………….….7 ∙ Rear panel.…………………………………………………………………………………………………………………………………………7 3. System Operation ∙ How to call setup menu……………………………………………………………………………………..……………………….…….9 ∙ Icon………………………………………………………………………………………………………………………………………..…..…..…9 ∙ Remote Controller…………………………………………………………………………….………………………………………..…..11 ∙ How to setup the remote controller ID ………………………………………………………………………………..….…..12 4. - Page 4 DIGITAL VIDEO RECORDER MANUAL ∙ Free DDNS………………………..………………………………………………………………………………………….………………….25 ∙ Dual Codec Setup…………..………………………………………………………………………………………….………………….31 7. Camera Setup ∙ Camera ……………….………………………………………………………………………..…………………………………..…………..…32 ∙ Camera Title……….………………………………………………………………………..…………………………………..…………..…32 ∙ PTZ Setting………….….……………………….………………………………………………………………………………………...……33 ∙ How to use PAN/TILT….….……………………….………………………………………………………………………………...……35 8. Record ∙ Record Setup…………………………..……….……………………………………………………………………….…………………….37 ∙ Schedule Record..……………………..……….…………………………………………………………….………….………………….38 ∙ Holiday Record..…...…………………………..……….…………………………………………………………….………….………….39 9. Event Setup ∙...
-
Page 5: Feature
DIGITAL VIDEO RECORDER MANUAL 1 — Summary Feature This Stand Alone Digital Video Recorder is capable of high quality of video and audio data recording and provides various ways of data search by Calendar, Date/Time and event. Also the system allows remote user to access in order to monitor and control multiple local DVRs via TCP/IP / LAN connection. -
Page 6: Installation
DIGITAL VIDEO RECORDER MANUAL 2 — Installation Contents HDD fixing screw (8PCS) Battery for remote Program CD controller Size : AAA 1.5V X 2EA MANUAL DIGITAL VIDEO RECORD Power Adapter POWER CODE Remote controller Accessories. ㆍ Digital Video Recorder (1EA) ㆍ... -
Page 7: Front Panel
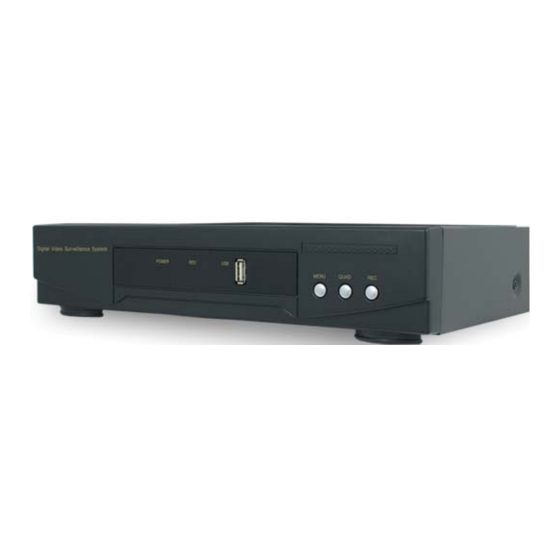
DIGITAL VIDEO RECORDER MANUAL Front panel [1] POWER LED [2] RECORD LED [3] USB Port [4] MENU Button [5] QUAD Button [6] REC Button (Emergency / Schedule) Rear panel (4Ch DVR) DIGITAL VIDEO RECODER MANUAL... - Page 8 DIGITAL VIDEO RECORDER MANUAL (8Ch DVR) [1] AUDIO OUTPUT [2] AUDIO INPUT [3] VIDEO INPUT [4] VIDEO OUTPUT (COMPOSITE) [5] VGA OUTPUT [6] ETHERNET PORT (RJ-45) [7] USB PORT (USB Drive / Mouse) [8] RS-485/ALARM/SENSOR [9] POWER (ADAPTER) DIGITAL VIDEO RECODER MANUAL...
-
Page 9: System Operation
DIGITAL VIDEO RECORDER MANUAL 3 — System Operation How to call Setup menu DVR can be operated by using remote controller and mouse. ∙ By front button Press “MENU” button. ∙ By remote controller Press “MENU” button on the controller. ∙... - Page 10 DIGITAL VIDEO RECORDER MANUAL [2] Camera title will be shown as above. [3] Recording Status Icon Recording. Video Loss. Motion Detection. Sensor. DIGITAL VIDEO RECODER MANUAL...
-
Page 11: Remote Controller
DIGITAL VIDEO RECORDER MANUAL [4] Status Bar 1. Date / Time 2. Record mode : Emergency recording - “ER”, Scheduled recording - “SR”. 3. Key Lock / Network Connectivity status. 4. Hard Disk status. Remote Controller [1] ID (Remote controller ID) : Press to select a remote controller ID in case of using one remote controller to multi DVRs. -
Page 12: How To Setup The Remote Controller Id
DIGITAL VIDEO RECORDER MANUAL [5] SEQ (Sequence) : Press to display each camera in sequence for specific duration. [6] PTZ : Call PTZ control menu. [7] SEARCH : Call search menu to playback recording image. [8] CHANNEL / NUMERIC BUTTON : Input the channel number to make full screen mode or the number in setup menu. -
Page 13: System Configuration
DIGITAL VIDEO RECORDER MANUAL [2] How to use remote controller ID must be identified between remote controller and system. Otherwise remote controller cannot recognize DVR correctly. [3] Remote controller ID menu displays as above image when you click ID button of remote controller. -
Page 14: Time/Date
DIGITAL VIDEO RECORDER MANUAL [3] Language : Select a language [4] Version : To show H/W Version and S/W Version [5] Health: Indicates storage status • HardDisk1 : Temperature of HDD. • Front USB : Temperature of external storage with front USB port. •... -
Page 15: Password
DIGITAL VIDEO RECORDER MANUAL [3] Date Format : Select a Time / Date display format. [4] Daylight Saving Time : It is commonly called as “Summer time”. During the period, user can change system time 1 hour early or late. [5] Time Server : It helps time set of DVR automatically by synchronization of time server service. -
Page 16: Hard Disk
DIGITAL VIDEO RECORDER MANUAL [3] Function : Assign user’s function on each account. ㅇ Configuration ㅇ HardDisk ㅇ Search ㅇ Backup ㅇ PTZ Setting ㅇ Record Key ㅇ Camera Hard Disk It is the HDD and ODD setup. Since it is closely related to the record, if the setup is wrong, it may cause the mal functioning. -
Page 17: Default Setup
DIGITAL VIDEO RECORDER MANUAL [NOTE] “Mirro Disk” or “RW Writer” purpose is able to setup when the external device is connected with DVR via USB port. Default Setup [1] Default Setup : Except major configuration (Network, Password), parameters are initialized. [2] Factory Setup : All parameters are initialized. -
Page 18: Button Setup
DIGITAL VIDEO RECORDER MANUAL Firmware USB Memory Stick [NOTE] Do not turn off power or remove USB stick while the upgrade is in progress. [2] Configuration Backup : Save a configuration file of DVR. [3] Configuration Load : Upload a configuration file to DVR. Button Setup •... -
Page 19: Display
DIGITAL VIDEO RECORDER MANUAL √ Baudrate /Parity /Stopbit : For using RS-485 port, refer to the manual of “Keyboard” or “PTZ camera”. 5 — DISPLAY [1] Camera Title : ON / OFF [2] Status Bar : ON / OFF. [3] Multi screen Border : ON / OFF DIGITAL VIDEO RECODER MANUAL... -
Page 20: Split Mode
DIGITAL VIDEO RECORDER MANUAL [4] Login Display : Select a login option • As Per Last Login : Display live image after system rebooting. • Cover All Camera : Do not display live image after system rebooting. [5] Log in menu : Select a log in option. •... -
Page 21: Auto Sequence
DIGITAL VIDEO RECORDER MANUAL [9 Split] There is one split mode in 9 split and channel selection is available. [Note] Various split screen switch If you press UP direction key in live mode, the split mode is changed. And if you press the RIGHT direction key, the split group is changed. -
Page 22: Tv Adjustment
DIGITAL VIDEO RECORDER MANUAL TV Adjustment [1] Monitor : Output is fixed with 4:3 ratio. [2] Icon : Change the icon position. • Small : When using small monitor. • NORMAL : When using normal monitor • VGA : When using the monitor for VGA 6 —... -
Page 23: Notification
DIGITAL VIDEO RECORDER MANUAL [1] DHCP : “ON” for dynamic IP user. “OFF” for static IP user. [2] IP Address : Input the IP address. [Example] • IP address : 61.250.152.050 • Subnet Mask : 255.255.255.000 • Gateway : 61.250.152.001 •... -
Page 24: Selecting E-Mail Notification
DIGITAL VIDEO RECORDER MANUAL [1] SMTP SERVER : Designating the mail server sending a mail. Input the mail server address a user uses. [2] Use Port : Mostly 25 is used to a mail server. Check the port when it doesn’t work after Setup. [3] Mail Address : Input the e-mail address of receipts (Available up to max 3 people) [4] Password : When sending an e-mail in case ID &... -
Page 25: Web Server
DIGITAL VIDEO RECORDER MANUAL Web Server Built-in web server make user can connect the DVR remotely on the Internet Explorer. [1] ON/OFF : Select ‘ON’ to use remote N/W connection through web. [2] USE PORT : Port for remote connection. [Example] In case of using IP 61.250.157.50 and Port 2001, type http://61.250.157.50:2001 on the address input of browser. - Page 26 DIGITAL VIDEO RECORDER MANUAL [1] For creating an account, visit the website: http://www.dyndns.com [2] After creating sub domain name(example:dvr-sample), select the main domain name using with free. A user can select any domain name convenient to oneself. Then, click the “ADD”...
- Page 27 DIGITAL VIDEO RECORDER MANUAL [4] When you see that the e-mail has been sent to you for verification, then check the e-mail. [5] After opening the verification e-mail, if you click the linked part, the verification is proceeded automatically. DIGITAL VIDEO RECODER MANUAL...
- Page 28 DIGITAL VIDEO RECORDER MANUAL [6] If the e-mail verification is completed, you are entered into following website. [7] After log-in, click “My Zones/Domains” in “My Service” menu [8] Then, click “Dynamic DNS Hosts” in the menu on the left. DIGITAL VIDEO RECODER MANUAL...
- Page 29 DIGITAL VIDEO RECORDER MANUAL [9] Click the firstly registered domain(dvr-sample.dyndns-ip.com) [10] Input the public IP of installed router for IP Address. You can find the public IP of the router when you check the router setup. When you complete the input, click “Save Changes”.
- Page 30 DIGITAL VIDEO RECORDER MANUAL [12] Then, click “Proceed to checkout” button below. [13] And click “Activate Services” below. [14] Then, selected domain IP is activated. [15] Input registered information in DVR setup. • DDNS address : Select the private DNS service name (Select DyDns ) •...
-
Page 31: Dual Codec Setup
DIGITAL VIDEO RECORDER MANUAL [16] If you input the registered domain in URL address of web browser, then the connection is made. Note : After making new account, the relevant service would be available after 10~30 minutes Dual Codec Setup It is a transmitting function through the extra network transmitting Codec. -
Page 32: Camera Setup
DIGITAL VIDEO RECORDER MANUAL 7 — Camera Setup Camera • Channel : Select the channel to set • On/Off : Select whether you use the channel or not • Brightness / Contrast / Saturation / Hue : Adjust the image of the selected (Default : 50%) Camera Title Input a camera title Multi-language keyboard is supported... -
Page 33: Ptz Setting
DIGITAL VIDEO RECORDER MANUAL PTZ Setting [1] Channel: Select a channel [2] ON/OFF : Enable or disable to use PTZ. [3] MODEL : Select the PTZ protocol or, model [4] ID : Select the PTZ ID. (For more detail, refer to the manual of PTZ device.) Advanced [1] Reverse Control (Pan) : Set the Pan works reverse direction. - Page 34 DIGITAL VIDEO RECORDER MANUAL [4] Setup Preset Touring It is operable when you select the ‘preset touring’ from the touring mode’ menu. The touring number is selectable 1~16. [1] Touring number : Select the number. [2] Preset number : Select the preset number saved before. [3] Touring interval (/SEC) : Select the touring dwell time.
-
Page 35: How To Use Pan/Tilt
DIGITAL VIDEO RECORDER MANUAL How to use PAN/TILT How to call the PTZ menu recall • Mouse menu: Click the right button of mouse and select the ‘PTZ’. • Remote controller menu: Click the “PTZ” from remote controller. (1) Select PTZ Button on the remote controller •... - Page 36 DIGITAL VIDEO RECORDER MANUAL [ PTZ control menu ] ㅇ PanTilt : Control the direction by the direction key in remote controller. ㅇ PRESET = Input the preset number to be moved or saved and select this menu. (Preset moving) (Preset saving) ㅇ...
-
Page 37: Record
DIGITAL VIDEO RECORDER MANUAL 8 — Record Record setup The record setup can be made as per the different channel such as different record frame and resolution etc. Since the file size is different from the record setup, you have to be careful when you make setup. -
Page 38: Schedule Record
DIGITAL VIDEO RECORDER MANUAL Schedule Record For schedule recording, it can be setup as per the day/date/time and channel. The record schedule can be setup by an hour. N : No record C : Continuous record M : Motion detected record S : Sensor triigered record M+S : Motion or sensor record [How to setup]... -
Page 39: Holiday Record
DIGITAL VIDEO RECORDER MANUAL Holiday Record Different record can be applied as per different holiday. [1] 7 different holiday setup can be made. After selecting the recording type from H1 ~ H7, set by mouse dragging or direction key of remote controller [2] Select the Holiday from the menu and select the holiday type from H1~H7. -
Page 40: Event Setup
DIGITAL VIDEO RECORDER MANUAL 9 — Event Setup Sensor It is for sensor setup. [1] Sensor Input : Select the sensor input channel. [2] On/Off : Select the sensor usage. [3] Input Type: Select the sensor input type. • N/Open (NORMAL OPEN) : The contact is normally opened but closed when the signal is generated. - Page 41 DIGITAL VIDEO RECORDER MANUAL ▷ Channel : Select the motion detection channel. ▷ On/Off : Select the motion detection usage. ▷ Sensitivity : Select the sensitivity of motion detection. Please apply it after the actual testing. ▷ Detection Area: Select the motion detection area. ( 1~5 ) The cursor moving by the direction key and if press “enter”, this block is designated for motion detection.
-
Page 42: Camera Temper Detection
DIGITAL VIDEO RECORDER MANUAL • If the movement is detected, the color of that area turns green. [ Apply to all ] If you use the following key, you can apply or release in one button “No1” button: Release all “No 2”... - Page 43 DIGITAL VIDEO RECORDER MANUAL [1] Motion : It is the setup for PTZ, pop-up, relay out, buzzer in motion detection • Channel : Select the channel to apply. • Preset channel : Select the preset camera being applied for the event. •...
- Page 44 DIGITAL VIDEO RECORDER MANUAL [3] Video loss : It is the setup for PTZ, pop-up, relay out, buzzer in video loss. • Channel : Select the channel to apply. • Preset channel : Select the preset camera being applied for the event. •...
-
Page 45: Search
DIGITAL VIDEO RECORDER MANUAL 10 — SEARCH Search It supports the various ways of search mode such as Calendar, Date/Time, Event, etc. [1] How to call menu : Select the “SEARCH” from remote controller and right button of mouse. [2] Search mode selection ·... - Page 46 DIGITAL VIDEO RECORDER MANUAL [2] If there is the recorded data, it shows red color so, press the enter button on selected date. (The display for channel is different per model) [3] The recorded data shows as a graph and select the minutes to search. (The display for channel is different per model) DIGITAL VIDEO RECODER MANUAL...
-
Page 47: Data / Time Search
DIGITAL VIDEO RECORDER MANUAL Date/Time search If you know the specific date/ Time, input the time to search. [1] Record begin : It shows the record began time. [2] Record end : It shows the record end time. [3] Channel : Select the channel to search. [4] Play Begin : Input the time to search. -
Page 48: Go To First / Go To Last
DIGITAL VIDEO RECORDER MANUAL [4] Event Type : Select the type of event(MD/Sensor/Video Loss / System/all). [5] Search : If you click “Search”, it shows the event list and if you click, it playback the relevant image. [6] If you select the event list from above, it shows playback. Go to first / Go to last It searches the first or last recorded image. -
Page 49: Audio
DIGITAL VIDEO RECORDER MANUAL [8] Calendar search during playback [9] Mark In-Mark Out : If you click it during playback, it recognizes as a backup start time and if you click it once again, it recognizes as a backup end time. After this, it moves to the backup menu automatically. -
Page 50: Backup
DIGITAL VIDEO RECORDER MANUAL 11 — Backup Backup Selected image can be backup to the external device(USB). Connect the USB pen drive to the DVR and select ‘BACKUP’ button from remote controller or, click the right button of mouse. [1] Select the recognized backup device. If it recognized normal, it shows the device capacity such as ”XXX MB”. - Page 51 DIGITAL VIDEO RECORDER MANUAL [3] Select the time by double click. (The display for channel could be different per model) [4] Select the minute. Once you select “--------“, the time will be automatically input. (The display for channel could be different per model) [5] Backup end time selection •...
- Page 52 DIGITAL VIDEO RECORDER MANUAL (The display for channel could be different per model) [6] Camera : Select the channel to be backup.( Selected channel will be shown as red) [7] Backup Start : If all setup is completed, click the ‘Backup start’ button then, backup starts. It shows the backup capacity/ USB pen drive capacity“...
- Page 53 DIGITAL VIDEO RECORDER MANUAL • Log Backup : The log file will be backup together. • Password : Backup data can be protected by the password. • Format Backup Disk : Select whether the viewer program will be backup together with data file.
- Page 54 DIGITAL VIDEO RECORDER MANUAL ① Scroll bar : It shows the current location from the total playback volume. ② Open : To open the other backup file. ③ Fast reverse playback ④ Reverse playback ⑤ One step reverse playback ⑥ Pause ⑦...
-
Page 55: Remote Connection-Iphone
DIGITAL VIDEO RECORDER MANUAL 12 — Remote Connection-iPhone 12-1 Program Installation Go to Apple Store website and search and download MPRMS. Then install the MPRMS. 12-2 Program Execution When the installation is completed, the following icon is created. Select the Icon and execute it. 12-3 Product Information Registration Input network information in order to access the DVR a user has. - Page 56 DIGITAL VIDEO RECORDER MANUAL [1] New Registration Execute the program on iPhone and click the new button for new registration. [2] Input Reg Name Any name is available to use for Reg Name. DIGITAL VIDEO RECODER MANUAL...
- Page 57 DIGITAL VIDEO RECORDER MANUAL [3] Model name selecting If it is DVR you would use, select DVR. [4] Log in DVR ID : Input the user ID registered in the DVR Password : Input the password registered in the DVR (Note : You can check the user ID and password in the DVR Setup Menu) DIGITAL VIDEO RECODER MANUAL...
- Page 58 DIGITAL VIDEO RECORDER MANUAL [5] DVR IP input (Only for static IP user) Dynamic IP user doesn’t make DVR IP input. (Note) As for Static IP, input the IP address registered on DVR. [6] DDNS IP Setup (Only for Dynamic IP user) Static IP user sets it with NO USE Dynamic IP user sets it with USE DDNS ID : Input the web code allocated to each DVR.
-
Page 59: Live Viewing
DIGITAL VIDEO RECORDER MANUAL [7] DDNS IP setup (Only for dynamic IP user) After completing all the inputs, push ADD button then the settings are saved. 12-4 Live Viewing [1] Click the registered DVR name. DIGITAL VIDEO RECODER MANUAL... - Page 60 DIGITAL VIDEO RECORDER MANUAL [2] Remote connection For channel selection, click CH SELECT icon and select the number. PTZ : Pan/Tilt/Zoom controlling Remove Time, Resolution, channel info and etc. and display the video only. It is a still image transmitting function. In case of video disconnection due to network load while transmitting, you’d better use this function.
- Page 61 DIGITAL VIDEO RECORDER MANUAL 12-5 Search Select “Search” icon below. [1] Select Date/Time After selecting the date, click “Search” button. [2] Search key operation DIGITAL VIDEO RECODER MANUAL...
- Page 62 DIGITAL VIDEO RECORDER MANUAL Reverse Playback Pause Playback Return to Live After clicking “CH SELECT” button, if you select a channel number, the channel is selected. 12-6 Relay out Relay can be controlled remotely.. Time selection : Alarm output time selection. OFF : Alarm off Infinity : Unlimited alarm output DIGITAL VIDEO RECODER MANUAL...
- Page 63 DIGITAL VIDEO RECORDER MANUAL 12-7 PTZ(Pan/Tilt/Zoom) Controlling PTZ controlling is available on iPhone. The way how to control is the same with on CMS and DVR. (1) Select (2) Cancel (3) Automatic camera focus (4) Pan/Tilt menu call (5) Direction movement (6) Camera focus control (7) Camera zoom control (8) Channel selection...
-
Page 64: Windows Mobile Viewer
DIGITAL VIDEO RECORDER MANUAL 13 — Windows Mobile Viewer 13-1 Program Installation Copy the program, MPRMS and save it to the mobile phone. 13-2 Run Program After save the program into the any folder, you can see the “MPRMS_Setup.cab” file as bleow picture. - Page 65 DIGITAL VIDEO RECORDER MANUAL You can see the icon of “MPRMS”. 13-3 Registration In order to see a video on mobile phone, user must register the DVR network information properly. For network setting, please refer to the user’s manual of DVR. [1] Registration Click the “Add DVR”...
- Page 66 DIGITAL VIDEO RECORDER MANUAL [2] Fill in the required information. • NAME : Input any name of user’s own accord. • ID : Input the DVR’s login ID. • PASS : Input the DVR’s login password. • MODEL : Select a DVR model among H.264, MPEG-4 and MJPEG. [3] DDNS For Dynamic IP user, it supports DDNS service for mobile program.
- Page 67 DIGITAL VIDEO RECORDER MANUAL • ADDR : Do not change the dedicated IP address. (61.250.157.14) • PORT : Input the port of DVR. • SAVE : Save the information. [4] STATIC (For Static IP User) • Use STATIC : Check on the “Use STATIC”. •...
- Page 68 DIGITAL VIDEO RECORDER MANUAL • Connect : Click the “CONNECT” tap to see the video. • Info Setup : To modify the DVR information, click the “Info Setup” tap. • I Only : In case of using low bandwidth, the “I only” helps to see the image which allows to transmit the I Frame only.
-
Page 69: Ptz Control
DIGITAL VIDEO RECORDER MANUAL 13-5 Search To playback recorded image, click the “Search” tap then click the “Rec Info Req” menu to set the date and time for searching. After setting the data and time, click the “START” to start playback. (NOTE : It might be delayed to playback that is depending on network environment.) 13-6 PTZ Control Click the “Pan Tilt”... - Page 70 DIGITAL VIDEO RECORDER MANUAL • Left : Move to the left • Right : Move to the right. • Up : Move to the upper. • Down : Move to the down. • STOP : Stop movement. • Normal/Invert : Change direction. 13-7 Zoom / Focus Click the “Zoom/Focus”...
-
Page 71: Alarm Control
DIGITAL VIDEO RECORDER MANUAL Click the “Preset” tap to set up the preset of camera. • P1~P16 : Select a number. • MOVE / SET ◎ MOVE : After selecting a number among from P1~P16, press “SEND” to move camera location. ◎... -
Page 72: Remote Connection-Android Phone
DIGITAL VIDEO RECORDER MANUAL Remote connection- Andriod phone — 14-1 Program installation To install the program on Phone, execute the ‘MARKET’ program and download the ‘MPRMS’ and install it. If the installation is completed, you will see the ‘MPRMS’ icon on main SCREEN (ORDER1) (ORDER2) (ORDER3) - Page 73 DIGITAL VIDEO RECORDER MANUAL 14-3 Product information registration Please register the device to see it remotely [1] Registration Click ‘ADD’ button to start registration. [2] Input the registration information (ORDER1) (ORDER2) (ORDER3) (ORDER1) Input the Name, ID(User), Password. Name : Input any name you want. DIGITAL VIDEO RECODER MANUAL...
- Page 74 DIGITAL VIDEO RECORDER MANUAL User : Input the USER ID. Password : Input the same password registered on DVR. (Notice : DVR ‘MENU’ “SYSTEM” PASSWORD “USER ID” + “PASSWORD”) IP : It is for Static IP user only. (ORDER2) If you check “DDNS Use”, DDNS IP input space will be activated (Notice : It is for Dynamic IP user only ) (ORDER 3) How to check the DDNS ID: DVR ‘MENU’...
- Page 75 DIGITAL VIDEO RECORDER MANUAL 14-5 Remote connection Select the registered list for connection. Once you click the registered device, it shows information and if you click ‘OK’, it will connect DVR for monitoring. (List selection) (Detailed information) 14-6 Live It shows the live image as a real-time. (1) Numeric button : To select the channel click the numeric button.
-
Page 76: Main Menu
DIGITAL VIDEO RECORDER MANUAL 14-7 Main menu On the bottom line of screen, there is the main menu. It is for the monitoring changes. Move to the previous menu or close the monitoring program. Move to live mode( channel changing, I Frame, OSD display) PTZ mode PTZ preset SEARCH mode... - Page 77 DIGITAL VIDEO RECORDER MANUAL 14-8 PTZ It is for the remote PTZ control. (PTZ mode selection) (PTZ mode screen) (1) Move to PTZ mode Select the PTZ connected channel and click the PTZ button. (2) How to control the PTZ According to the click, PTZ moves to the selected direction.
- Page 78 DIGITAL VIDEO RECORDER MANUAL PTZ menu call AUTO FOCUS It is OK button for PTZ OSD menu It is CANCEL or upper menu on PTZ OSD menu 14-9 PRESET It controls PRESET on PTZ. (PRESET MODE SELECTION) (PRESET MODE SCREEN) (1) How to move PTZ mode Select the PTZ connected channel and click the PRESET button.
- Page 79 DIGITAL VIDEO RECORDER MANUAL 14-10 Search It is for remote search. (1.SEARCH MODE SELECTION) (2.TIME SEARCH SELECTION) (3.DATE/TIME SELECTION) (1) SEARCH MODE : Select the SEARCH mode. (2) Time Search : Click the “Time Search” button to search the time to playback. (Notice : Return to LIVE, click ‘To Live”...
-
Page 80: Information Display
DIGITAL VIDEO RECORDER MANUAL 14-11 Relay out Relay can be controlled remotely.. (1) Relay : Select the usages (on / off) (2) Number : Select the relay number. (3) Time : Select the relay out duration. (4) Execute : According to the setup 1~3, relay out operates 14-12 Information display It shows the information of current connection. - Page 81 DIGITAL VIDEO RECORDER MANUAL [Information display] It is the example of information. • IP : 61.250.157.37 : 2000 Via DDNS <- Connected IP information. • MODEL : 16CH(63,ADT CAPS:0) <- 16Ch --- model • WebCode : H6F6057200001394 <- Product ID(webcode). •...
-
Page 82: Appendix
DIGITAL VIDEO RECORDER MANUAL 15 — Appendix SPECIFICATION ITEM Video NTSC/PAL format Video inputs Compressio Video H.264 Video Composite (1) , VGA (1) outputs Playback Split / Full screen Split / Full screen(1,4,6,9) Speed NTSC : 120fps, PAL : 100fps NTSC : 240fps, PAL : 200fps Recor D1 (30 fps) / Half D1 (60 fps) /... - Page 83 DIGITAL VIDEO RECORDER MANUAL MEMO DIGITAL VIDEO RECODER MANUAL...
Need help?
Do you have a question about the FDS-401Hl and is the answer not in the manual?
Questions and answers