Advertisement
Quick Links
Keys
The thermostat has the following keys see (Fig.4.1, 4.2):
Key ON/OFF (on front housing)
With this key you can turn OFF the thermostat or turn it
ON into Normal mode. When the thermostat is turned
OFF. "OFF" will show in the display and you will see the
room temperature. If the thermostat is in Normal mode,
you will see the Set temp and the Room temp in the
display.
You might want to turn off the thermostat during the
summer to avoid any heating to take place.
or keys
If you want to increase the Set temp just press .
If you want to decrease the Set temp just press .
You can see this on the display.
To change the factory set ECO temp and ECO period
℃
℃
Eco temp 5-30
for 1-99h (pre-set to 16
for 4h)
℃
℃
Eco temp 5-30
for 1-99h (pre-set to 16
for 6h)
℃
℃
Eco temp 5-30
for 1-99h (pre-set to 16
for 7h)
Operation
As soon as the batteries are installed the thermostat will
℃
keep the room temperature at 20 .
The directions given hereunder are only for use
with models # HD-310 AND # HD-410
To use set back program press
,
or
key
When you want to go to Eco temp for the Eco period you
just push the
,
or
. The Eco temp and Eco period is
shown on display.
Good tips for the user
Alternative use for
The display will show the remaining time of the Eco period.
If you leave for the wee kend you can reprogram the Eco period
The display will show the button number will show as
,
for one of the keys up to 99 h. This means that you can keep
or
.
DIGITAL TEMP THERMOSTAT
HD-210 HD-310 HD-410
USERS MANUAL
CONGRATULATIONS
You have acquired the latest micro processor controlled
thermostat to reduce your heating bill. It is made to be
very user friendly and easy to use.
General: The HD series digital thermostat is an battery
operated. For HD-310 & HD-410 are possible to save
energy by decreasing the temperature to "Eco" temp for
shorter periods. These periods can be occasional or
repeating during the day.
You just press the
,
or
button and temperature
will temporary decrease from 20 degree to an economical
℃
"Eco" temp of 16 .
Pre-set:
Set Temperature: 20℃
℃
button: 16
temporary for a period of 2 hours
℃
button: 16
temporary for a period of 4 hours
℃
button: 16
temporary for a period of 6 hours
℃
The Set (Comfort) temperature of 20
and the Eco
℃
temperature of 16
as well as Eco periods 2,4,6 hours
can easily be changed to fit your own need.
The HD series is battery operated, and it can therefore
replace any mechanical standards 2 wires thermostat.
Please however note that the maximal resistive load is 5A.
Installation:
Noted that if you connect the thermostat to a 230V system,
please make sure the power is switched off and that only
a person with good electrical knowledge does the installation.
Keys
Display shows
an Eco temp for a weekend or maximum little more than 4
~
Ambient temp, Eco temp, Eco period left in hours,
days and then it will automatically go back to the set temp.
,
,
or
depending on which key was pressed
If you want a low temperature for a longer period you can
The room temperature will go down to the Eco
simply decrease the set temp to a wished low temperature
temp for Eco period (the pre-set no. of hours) and
but it will not automatically go back so this must be done
thereafter go back to the set temp as it had before
manually with
pressing the button.
NB:
To cancel the Eco program:
If you press both and key both Eco program and Eco
If you press the
,
and
key again during the Eco period,
program 2 will run simultaneously. To cancel one press that
you will cancel the Eco program.
key once more.
Recommended use for
,
and
MODELS:
Use
when you go out for a part of the day
HD-210
Use
when you go to bed
HD-310
Use when you are away from the house for a full working day.
HD-410
Keys Display shows
℃
>2s Room tem, 16
Eco temp, flashing 4h and ,
Increases or decrease the flashing Eco period from
4h to your wished period (1-99h),
℃
Room temp, flashing 16
Eco temp, Eco period and 1,
USER OPTIONAL SELECTION:
Increases or decreases the flashing Eco temp to
On the back of the front housing. There is a DIP SWITCH
wished Eco temp.
on the PCB where the user can select following option:
Stop the flashing and sets the mew values.
DIP SWITCH 1. SWING cycle ON = 0.2
Now you have set the new Eco temp and new Eco period
for this key.
NB.
is used in the example but the procedure is identical
for
or
as well.
,
or
-
If you have a mechanical thermostat connected with 2
wires, just take away the old thermostat and replace it
with HD series. Connect the 2 wires to the terminals as
the Fig.2 shows, then put the batteries in and close the
thermostat. See below.
If you don't have a previous
thermostat that you wish to
replace you must install a 2
wires cable to the heating
1. You should place the thermostat as follows:
system. See (Fig.2.1, 2.2,
2.3)
Fig. 1
HD-210 ,310 ,410
THERMOSTAT
3
1
L 220/240VDC
5A FUSE
N 50/60Hz
2. Remove the front cover.
HEATER
Fig. 2.1
HD-210 ,310 ,410
THERMOSTAT
1
3
L 220/240VDC
5A FUSE
N 50/60Hz
1
2
3
4
5
Fig. 2.2
DIP SWITCH 2. HEAT OR COOL SYSTEM SETTING
FACTORY SETTING: 1.SWING cycle OFF = 0.5
key.
General specification and data:
Temperature range:
Differential:
Batteries:
DIGITAL THERMOSTAT only
Rated switching power:
,
,
are Eco setting and can not repeat
each day.
is Eco setting only and
,
can be
Min On time in heat mode:
repeated each day.
Min Off time in cool mode:
℃
e.g.
is set at PM 4:00 for 16
for next 4 hours.
Battery Low:
THEREFORE, the temperature will repeat the
℃
-
set at 16
from PM 4:00 PM 6:59:59 each day.
-
-
℃
OFF= 0.5℃
ON
{
Cool
0.2 ºC
Switch
0.5ºC
Heat
1
2
HD SERIES SWITCH OPTION
3. Unscrew the screw in the protective cover and remove
HD-210 ,310 ,410
the protective cover. (See Fig.3.2)
THERMOSTAT
1
3
L 220/240VDC
5A FUSE
N 50/60Hz
1
2
3
4
5
HEATER
Fig. 2.3
~ 160 cm up from the floor on a wall with constant
temperature in the house. (Fig.1)
4. Mount the base on the wall and make sure the hole on
Only on inside walls (Not on a wall towards the outdoor)
Not exposed to direct sunlight
the wall is cover by the base with the wires coming in
Not close to a heater, furnace or ventilation outlet.
through theprotective cover hole. (See Fig.3.3)
Loss tightens the screw of the terminal block and installs
Not on a wall towards a heater, cooker or furnace on
the wires into the terminals. (See Fig.2.1, 2.2, 2.3 for
backside.
Not close to a door towards the outdoor.
which type of connection you will be using.)
Unscrew the screw in the battery compartment.
Remove the front housing from the base. (See Fig.3.1)
5. Put the protective cover back to the base and lock the
cover with the screw.
6. Put the front housing back to the base and lock the
Fig. 3.1
front housing with screw.
FOR SELECTION
ON = COOL
OFF = HEAT
-
℃
1.SYSTEM OFF = HEAT
HD-210 HD-310 HD-410
5~30℃
℃
+/-0.5
from set temp
2 x AA size batteries
(Alkaline Recommended)
250V, 5A resistive load and
2A inductive load
1 min
3 min
Thermostat will turn Off and
low battery indication will
show on display
USERS MANUAL
7. Install 2 AA size batteries onto the batteries compartment.
8. Press the RESET key once and make sure it is working
on initial condition.
9. When the thermostat is installed with the batteries or
after press RESET key it works immediately.
The LCD shows set temperature 20
temperatures.
When the thermostat is connected and the batteries are
installed it works immediately. The LCD shows set temp
Fig. 3.2
℃
20
and actual room temp.
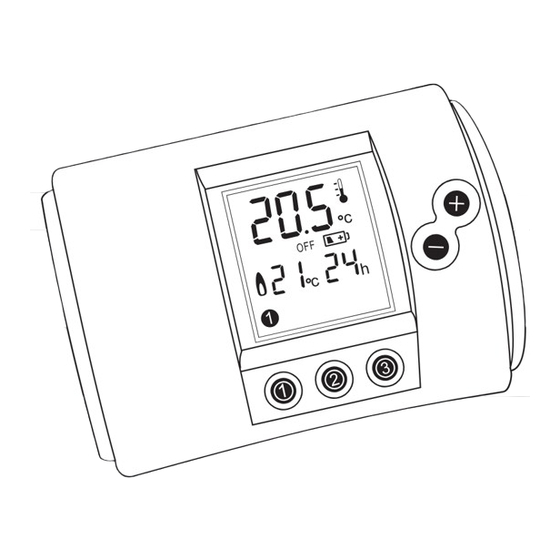
Room
Temperature
Air condition on
Fig. 3.3
Eco program
℃
and actual room
ECO
program keys
Fig. 4.1
Low battery
indicator
Fig. 4.2
Advertisement


Need help?
Do you have a question about the HD-210 and is the answer not in the manual?
Questions and answers