Remington HC4250 Use And Care Manual
Hide thumbs
Also See for HC4250:
- Manual (9 pages) ,
- Instructions manual (144 pages) ,
- Use and care manual (2 pages)
Table of Contents
Advertisement
Quick Links
IMPORTANT SAFETY
INSTRUCTIONS
HC4250
When using an electrical appliance, basic precautions should always be observed,
including the following; read all instructions before using this appliance.
Use and Care Guide
DANGER
To reduce the risk of electric shock:
■
Do not use in area that can be dropped into a sink or bath while plugged in.
Make sure the power adapter and cord do not get wet. Do not plug or unplug the
■
appliance with wet hands.
■
Do not reach for an appliance that has fallen into water. Unplug it immediately.
■
Do not use while bathing or in the shower while plugged in.
Do not place or store this appliance where it can fall or be pulled into a tub or sink
■
while charging or plugged in.
■
Except when charging, always unplug this appliance from the electrical outlet
immediately after using.
Unplug this appliance before cleaning it.
■
WARNING
To reduce the risk of burns, fire, electric shock or injury to persons:
■
This appliance is for household use only.
■
An appliance should never be left unattended when it's plugged in, except when
charging a rechargeable appliance.
■
Close supervision is necessary when this appliance is used by, on, or near
children or persons with special needs.
■
Use this appliance only for its intended use as described in this manual.
Do not use attachments not recommended by the manufacturer.
■
Register Your New Product Today!
■
Keep the cord away from heated surfaces.
■
Never operate this appliance with a damaged cord or plug, if it is not working
By registering your new Remington
®
product, you will receive these important benefits:
properly, if it has been dropped or damaged.
Proof of Ownership • Product Protection • Product Registration • Special Offers
Do not store in shower or tub.
■
Register online at: www.RemingtonProducts.com
■
Never drop or insert any object into any of the appliance's openings.
Product Features
■
Do not use outdoors or operate where aerosol (spray) products are being used, or
where oxygen is being administered.
Remington
hair clippers provide a quick and easy way to create
®
professional-looking haircuts. To help you create those styles, and to extend the life
■
Make sure the cord is disconnected from the clipper while storing. Always store
of your hair clipper, please read all instructions before using.
this appliance and cord in a moisture-free area. Do not store it in temperatures
exceeding 140°F (60°C).
6
Do not use this appliance with a damaged or broken cutter unit, as injury may
1
■
occur. Always make sure blades are aligned properly.
■
Always attach plug to appliance and then the adapter to the outlet. To disconnect,
turn all controls to OFF, then remove adapter from outlet, then detach power cord
from the dipper for storage.
■
Do not use an extension cord or a voltage converter with this appliance.
■
Do not wrap the cord around the appliance.
■
Dispose of batteries properly. Do not incinerate. Batteries may explode if
overheated. Do not wrap in metal or aluminum foil. Wrap in newspaper before
discarding. It is suggested that you contact local battery redemption site(s) in
your area.
SAVE THESE INSTRUCTIONS
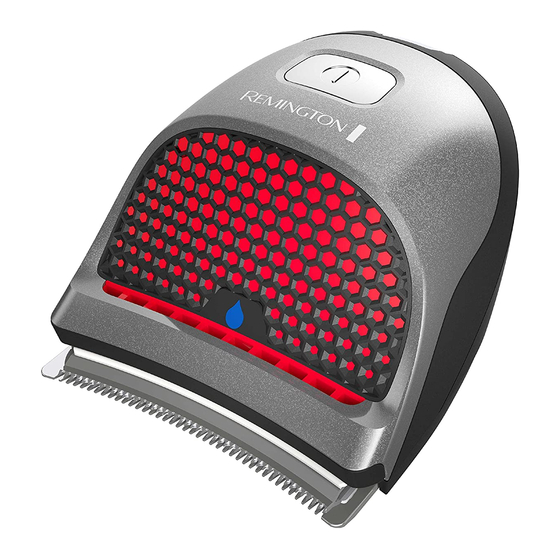
1
On/off switch
2
Removable blade set
3
9 attachment guide combs
4
Washout port
5
Travel pouch (not shown)
6
Charging indicator
7
Cleaning brush (not shown)
8
Oil bottle (not shown)
9
Adaptor (not shown)
Removable Blade
■ To remove blade, hold the clipper with front of blade teeth facing away.
■ Push the blade cartridge out, using the thumb cut out on the back of the
clipper.
■ The blade can be easily brushed or rinsed for cleaning (see Cleaning
and Maintenance section).
To Install Blade
■ To reattach blade, slide cartridge back into clipper body until it clicks.
■ When pushing blade back into position, ensure that you do not push on the
metal blades; there is a plastic portion of the blade cartridge that should be
pushed in.
4
2
Attaching Guide Comb
1. Guide combs should be installed by first hooking the blade teeth to front side of
3
guide comb. Then press the back of the guide comb down until it snaps into place.
2. Ensure comb is attached before beginning to cut hair.
3. To remove, pull the snap tab on back side of guide comb and pull the comb off.
Instructions For Cutting Hair
Hair Length Settings
■ The clipper's ergonomic design provides many different ways of holding the
clipper in use. Recommended ways of holding the clipper can be seen below.
Barber Grade Number:
Length in millimeters:
#0 (1/16")
1.5mm
-
2mm
-
2.5mm
#1 (1/8")
3mm
Fig. 1
Fig. 2
-
4.5mm
■ For clipping the top of the head (see fig. 1).
#2 (1/4")
6mm
■ For clipping the back of the head (see fig. 2).
#3 (3/8")
9mm
■ For clipping the sides of the head (see fig. 3).
■ For detailing (see fig. 4).
#4 (1/2")
12mm
■ For even cutting, allow the comb attachment/blade to cut its way through the
#5 (5/8")
15mm
hair. Do not force it through quickly. If you are cutting for the first time, start
with the maximum comb attachment.
■ For one all over cut length, attach the desired guide comb and slowly guide
How to Use
the clipper through the hair against the direction the hair normally grows.
■ Remove the guide comb. To produce a clean straight line at the sideburns and
Charging Your Hair Clipper
the base of the neck, reverse the hair clipper. Place the reversed clipper at
right angles to the head, tips of the blades lightly touching the skin and then
■ Clipper must be turned off.
work downwards.
■ Insert the adapter plug into the clipper and plug the adapter unit into a power
outlet. The indicator light will blink to indicate that it is charging. The indicator
light will stop blinking and stay lit when the clipper is fully charged.
The following instructions are for those users who want different trimming lengths
on the sides, back and top of the head
■ The clipper will be fully charged in 3–5 hours. A full charge provides 40
minutes of cordless use.
STEP 1 – Nape of the neck
■ Do not allow to charge for an extended period of time.
■ Use the 3mm or 6mm comb.
■ If the clipper has not been used for a month or longer, it is advisable to
recharge it for 3–5 hours.
■ Hold the clipper with the blade teeth pointing upwards. Begin starting at the
centre of the head at the base of the neck.
■ To preserve the life of the batteries, discharge them by running the clipper
until the blades stop. Switch off and fully recharge. Do this every
■ Slowly lift the clipper, working upwards and outwards through the hair, trim-
six months.
ming just a little at a time.
■ Charge the clipper at temperatures between 40º–90ºF.
■ Lithium Ion batteries included. See battery removal section for
proper disposal of batteries.
Fig. 3
Fig. 4
Advertisement
Table of Contents

Related Manuals for Remington HC4250


Summary of Contents for Remington HC4250
- Page 1 ■ Never operate this appliance with a damaged cord or plug, if it is not working Cleaning brush (not shown) By registering your new Remington ® product, you will receive these important benefits: properly, if it has been dropped or damaged.
- Page 2 ■ Remove the painted panel from the top of the clipper by prying at the seam STEP 5 – The finishing touches it with the original dated sales receipt directly to Remington and receive a full © 2015 Spectrum Brands, Inc. 10/15 12872-01 wiped dry.
Need help?
Do you have a question about the HC4250 and is the answer not in the manual?
Questions and answers