Advertisement
Quick Links
Performance Tech Support 1(800)727-2453
9am-6pm EST Monday-Friday
Performance, Inc.
One Performance Way
Chapel Hill, N.C. 27514
1-800-727-2453
Made in Italy
www.performancebike.com
PERFORMANCE and the Flying P Logo are registered marks of Performance, Inc.
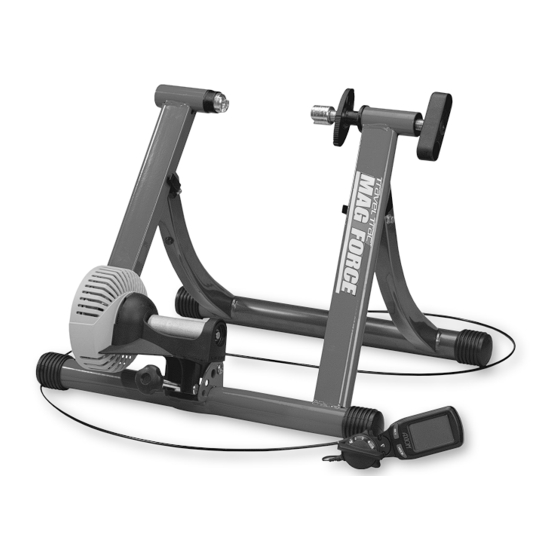
adjustable
magnetic
trainer with
computerized
display
Congratulations on your purchase of the Travel Trac
provides the same data on speed, distance and time that is available from a full-featured cycling computer,
plus information on power output (expressed in watts), elevation gain and slope (percent grade). Your
indoor training has never been as fun or effective as it will be with your new Travel Trac
NOTE: This trainer is intended for single-rider bicycles only.
• Read and follow all instructions.
• Before beginning each workout, be sure bicycle is securely attached to the trainer.
• Do not touch resistance unit during use and for some period after use because it is very hot and can cause burns.
• Keep children and pets away from the trainer during use.
• Before you start any exercise program you should consult a physician.
40-1669
0703_1
™
Mag Force bicycle training system. Your new trainer
!
SAFETY PRECAUTIONS
™
Mag Force!
Advertisement

Subscribe to Our Youtube Channel
Related Manuals for Performance Travel Trac Mag Force


Summary of Contents for Performance Travel Trac Mag Force
- Page 1 • Keep children and pets away from the trainer during use. Made in Italy • Before you start any exercise program you should consult a physician. www.performancebike.com 40-1669 0703_1 PERFORMANCE and the Flying P Logo are registered marks of Performance, Inc.
- Page 2 Table of Contents II. Parts List About Your Travel Trac ™ Mag Force System .....2 Part Part Code Quantity Parts List ..........3 Travel Trac ™...
- Page 3 10. Check that the bicycle is securely installed in the trainer by pushing or pulling on the bicycle’s top tube or seat. Adjust the resistance level (simulated slope) using the shift lever. Rotating the 11. If the bicycle is not secure, check to see that the QR skewer lever and nut are shift lever from the lowest setting (1) to the highest setting (5) will increase the properly positioned in the axle support cups, and that the right side axle support resistance.
- Page 4 B. Battery Life Indicator VIII. Changing the Batteries When battery life is low, a battery icon will flash in the display screen to indicate The computer console uses 2 “AA” batteries. When the low battery life indicator only a few hours of battery life remain. See Figure 13. When the battery icon appears in the display, or if the display is erratic, faint or disappears altogether, appears, replace the batteries as soon as possible.
Need help?
Do you have a question about the Travel Trac Mag Force and is the answer not in the manual?
Questions and answers