Table of Contents
Advertisement
Advertisement
Table of Contents

Related Manuals for yemenren R5


Summary of Contents for yemenren R5
- Page 1 R5-USER MANUAL R5-使用説明書...
- Page 2 PRECAUTIONS 1. Please read the user manual carefully before using this recorder 2. Please backup recording files to your computer often to avoid accidents. 3. Do not use the recorder where electronic products are forbidden (like on aircraft). 4. Do not wet the product or put it into water.
- Page 3 TABLE OF CONTENTS CHAPTER I PRODUCT INTRODUCTION -------P3 CHAPTER II START TO USE -------P5 CHAPTER III PRODUCT SPECIFICATION -------P19 CHAPTER IV FREQUENTLY ASKED -------P20 QUESTIONS...
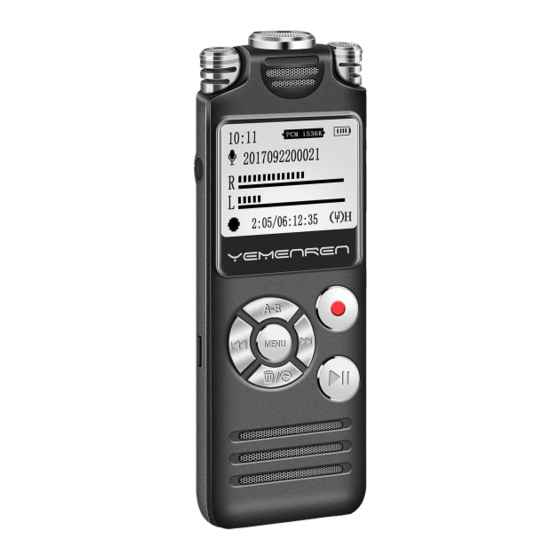
- Page 4 CHAPTER I PRODUCT INTRODUCTION PRODUCT EXTERIOR AND KEY FUNCTION DIAGRAM MENU KEY FUNCTION NAME FUNCTION REC Key Recording/Save recording Menu Enter system setting/Select setting option/Switch between play recording and play music...
- Page 5 On&Off/Pause& Play Key Restart recording/Play& Pause playing music or recording Return Return/ (press)/Delete Delete Key (press and hold) 1.Switch to Select Key last/next song 2. Select functions on the menu 3. Setting figures Set A as the repeat A-B repeat start point and B as the end point Play music on...
- Page 6 CHAPTER II START TO USE 1.POWER ON/OFF AND CHARGE POWER ON: Press and hold the Play Key to power on when it is off. POWER OFF: a) Press and hold the Play Key to power off when it is on. b) Auto power off: The device will automatically power off if there is no operation in 2 minutes for power saving.
- Page 7 Note: User could operate the device normally when it is charging with a charger. b) CHARGE THE DEVICE WITH A COMPUTER: The screen of the device will show “Select Connection Type”: “Charge And Play”, “Charge And Transfer” when it is connected to a computer with a USB cable.
- Page 8 Use the supplied USB cable to connect the device to a computer, then the device could be used as a portable disk. (Find the “RECORD” folder in the portable disk named YEMENREN). All the recording files are in the folder.
- Page 9 Select the suitable media player to play the recording files. Note: The original media player in MAC doesn’t support recording files in WAV format. It needs certain tool to convert WAV format to MP3 format. A-B REPEAT OF THE RECORDING FILES a) Press “A-B Repeat Key”...
- Page 10 4. PLAY MUSIC FILES DOWNLOAD MUSIC FILES Use the supplied USB cable to connect the device to a computer, then the device could be used as a portable disk. Save your favorite music files on the portable disk. Note: a) Please don’t save the music files in “RECORD”...
- Page 11 DELETE MUSIC FILES Press and hold the Delete Key while the play stops, and select Cancel Delete/Delete Single Song/Delete All, then press Menu Key to confirm. Note: Be careful to use the Delete Key. The files can’t be restored after deleting. 5.
- Page 12 Speed Control: Change the play speed of the music or recording files, range from 70% to 120%. Default setting is 100%, and it is the normal speed. RECORDING SETTING Press and hold to enter system setting, then press Select Key to select recording setting. There are eight options under this setting:Recording Format, Rec Subsection, Noise Reduction Mode, Recording Monitor,...
-
Page 13: Recording Monitor
The default setting of the device is 1536Kbps in WAV format .Users can choose appropriate recording format and quality according to their own needs. --Rec Subsection Press ◀◀ /▶▶ Key to select Rec Subsection while it is under recording setting. There are four time-length: Close/30 minutes/60 minutes/90 minutes/120 minutes If you choose 30 minutes, it means that every... - Page 14 After starting Recording Monitor, the recording effect can be monitored through the headphone during recording so as to judge whether the recorder has an ideal recording effect under current environment. After Recording Monitor is stopped, there is no sound during recording when the user inserts the headphone.
- Page 15 it is under recording setting, and press Menu Key to enter. There are two options: High and Low. If you choose high sensibility, you could record more remote sound, but meanwhile the noise is more. If you choose low sensibility, you may not record sound far away, but meanwhile the noise is less.
- Page 16 There are three options: Timing-Rec(On/Off), Start Time and End Time. If you choose “On” and set a start time and an end time, the device will automatically start to record at the “Start Time”, and end and save the recording at the “End Time”. Note: Please make sure the system time and date of the device has been set correctly before set the Timing Record.
- Page 17 press ◀◀ /▶▶ Key to select Set Time, and press the Menu Key to enter. Press Volume Key to select setting location (HH/MM), then press ◀◀ /▶▶to adjust the value of HH/MM. Press ◀◀ /▶▶ Key to select Date Setting while it is under Date and Time setting option, then press the Menu Key to enter: Set Date Format: DDMMYYYY/...
- Page 18 then press ◀◀ /▶▶ Key to select Information, and press the Menu Key to enter There are two options: Disk Space: You could view the storage usage. Player Information: The model and the software version of the device. FORMAT THE DEVICE Press and hold the Menu Key to enter System Setting while it is standby or playing files, then press ◀◀...
- Page 19 even if it is recording or playing the music/ recording files FACTORY RESET Press and hold the Menu Key to enter System Setting while it is standby or playing files, then press ◀◀ /▶▶ Key to select Factory Reset. If you choose “Yes”, the device will restore to factory reset, but the music and recording files won’t be deleted.
- Page 20 CHAPTER III PRODUCT SPECIFICATION PRODUCT SPECIFICATION ITEM SPECIFICATION Storage Capacity Highest 1536Kbps Recording Quality Recording WAV/MP3 Format Battery 360mAh Capacity Battery About 18H Duration Product Weight Headset Jack 3.5mm Noise Support Reduction Screen HD big screen VOR: Voice Operated Recording...
- Page 21 CHAPTER IV FREQUENTLY ASKED QUESTIONS 1.WHAT IF “NO FILE” IS DISPLAYED ON THE RECORDING PLAYING INTERFACE OR RECORDING FILE CANNOT BE FOUND AFTER RECORDING? Format the device with its own format function. Connect the recorder onto the computer through the USB cable, and format the recorder on the computer.
- Page 22 2. HOW TO ADJUST THE RECORDING SENSIBILITY TO GET THE BEST EFFECT? If the sound you want to record is high, you could choose low sensibility to avoid the noise; If the sound you want to record is low or unstable, you could choose high sensibility and put the recorder nearer.
Need help?
Do you have a question about the R5 and is the answer not in the manual?
Questions and answers