Advertisement
Quick Links
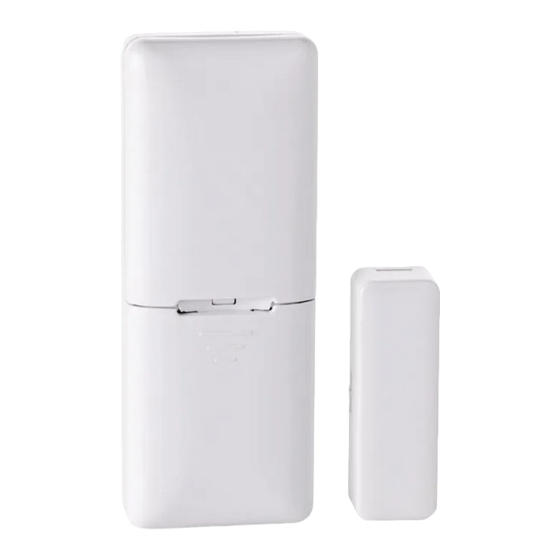
MCT-340 SMA
Door / Window Sensor
1. INTRODUCTION
The MCT-340 is a fully supervised, wireless magnetic door / window
sensor, for use with ZigBee enabled home security panels. The sensor
includes a built-in reed switch (that opens upon removal of a magnet
placed near it).
The MCT-340 tamper switch is activated when the cover is removed.
A periodic supervision message is transmitted automatically. The target
receiver is thus informed, at regular intervals, of the unit's active
participation in the system.
Operating power is obtained from an on-board 3 V Lithium battery. When the
battery voltage is low, a "low battery" message will be sent to the receiver 60
days before expiration of battery life (for operation in room temperature).
2. SPECIFICATIONS
WIRELESS
Supported Network: ZigBee H.A 1.2
Frequency: 2.4 GHz as per IEEE 802.15.4
Tamper Alert: Reported when a tamper event occurs and in any
subsequent message, until the tamper switch is restored.
ELECTRICAL
Internal Battery: 3V Lithium battery, type CR2032. Use Varta only.
Nominal Battery Capacity: 230 mAh
Battery Life Expectancy: 3 years (for typical use).
3. ACTIVATING AND PAIRING THE SENSOR
To pair the sensor to the security panel, you must set it to pairing mode.
1. First set the panel to pairing mode and then the sensor.
2. To activate, pull the activation strip (from either side) that protrudes
from the back of the sensor.
3. The LED blinks 3 times every 5 seconds (repeated for up to 20 times) to
indicate that the sensor is searching for a security panel.
Note: If sensor pairing is not successful during the searching process -
by tripping the door / window sensor or by pressing the tamper switch -
the searching process will restart.
4. Complete the pairing procedure on the security panel (see the pairing
instructions in the security panel's installation guide).
4. INSTALLATION AND SENSOR TESTING
CAUTION: This equipment shall be installed by Service Personnel in
non-hazardous indoor locations only.
4.1 Mounting
NOTE: It is highly recommended to attach the door / window sensor to the
top of the door/window on the fixed frame and the magnet to the movable
part (door or window). Make sure that the magnet is located not more than 6
mm (0.25 in.) from the sensor's marked side.
The sensor should be mounted on the fixed surface and the magnet on
the moving surface (see Figure 3b).
A
1
Fig. 3a – Attaching the Adhesive Tape
5. BATTERY REPLACEMENT
1
Fig. 4a – Opening Battery Cover
D-305291 MCT-340 SMA Installation Instructions
1. Peel away the
release liners from
the two strips of
double-sided
adhesive tape and
attach to the device
and magnet.
Tamper
Clip
switch
Fig. 4b –Replacing Battery
Note: Inability to connect with wireless network, or wireless link quality no
higher than 20% may significantly reduce the expected battery life.
Battery Power Test: Performed immediately upon battery insertion and
periodically every several hours.
Battery Supervision: Automatic transmission of battery condition data as
part of any status report.
ENVIRONMENTAL
Operating Temperature: 0°C to 55°C (32°F to 131°F).
Dimensions: 66 x 25 x 10 mm (2-9/16 x 1 x 6/16 in.)
Weight (including battery): 15g (0.5 oz)
Note: Pairing should be performed before installation.
2
Fig. 3b – Mounting on Fixed
Surface
4.2 Sensor Testing
Close the door or window, thus restoring it to the undisturbed state
1. Press down on the battery cover and slide in the direction shown in
2
Figure 4a to open.
2.
Pull back on the clip and remove the battery as shown in Figure 4b.
3. Insert the new battery into the sensor while observing battery polarity
(see Figure 4b).
4. Close the battery cover.
Note: The required battery is CR2032 Lithium 3V, manufactured by
VARTA.
Installation Instructions
Activation
strip
Figure 2 – Activation Strip
2. Align the device with the magnet
according to the location marks
and fasten the device and magnet
to the mounting surface. The
sensor should be mounted on the
fixed surface and magnet on the
B
moving surface.
A. Double-sided adhesive tape
B. Magnetic location marks
Note: Silicone can also be used to
securely mount the device and
magnet.
Figure 1 –
External
View
1
Advertisement

Related Manuals for Visonic MCT-340 SMA


Summary of Contents for Visonic MCT-340 SMA
- Page 1 MCT-340 SMA Door / Window Sensor Installation Instructions 1. INTRODUCTION The MCT-340 is a fully supervised, wireless magnetic door / window sensor, for use with ZigBee enabled home security panels. The sensor includes ...
- Page 2 9. PRODUCT LIMITATIONS Visonic Ltd. wireless systems are very reliable and are tested to high B. A receiver responds only to one transmitted signal at a time. ...
- Page 3 ©VISONIC LTD. 2014 MCT-340 SMA D-305291 (Rev, 10/14) Please refer to the separate Warranty statement D-301998 3 ...
Need help?
Do you have a question about the MCT-340 SMA and is the answer not in the manual?
Questions and answers