Table of Contents
Advertisement
Quick Links
Advertisement
Table of Contents

Related Manuals for Axon DS4 series

Summary of Contents for Axon DS4 series
- Page 1 APT4 User Manual ISO 9001 Certified Quality Management System...
-
Page 2: Table Of Contents
Contents Safety Instruction ....................................7 Chapter 1: Introduction ..................................9 Overview of terminal features ............................10 Front View ..................................10 Back View ..................................11 Hand Strap Removal and Replacement ....................... 12 Battery ......................................12 Battery power source ..............................12 Power Adapter ..................................13 Chapter 2: Getting Started ................................ - Page 3 Icons in the Status Bar ..............................26 Icon Bar ....................................28 Icons in the Task Tray ..............................29 Programs in Start Screen ............................29 Setting Applications ..............................30 LEDs ....................................... 32 LED Appearance upon terminal feature ......................32 Keypad ......................................33 Enter characters using SIP (Soft Input Panel) ....................
- Page 4 WEH6.5 ....................................78 GPRS Connection ..................................79 Setting APN (Access Point Name) ......................... 79 Using Connection Manager Sample ........................81 Barcode Tray ....................................82 1D Barcode ..................................82 2D Imager Barcode ............................... 84 2D Barcode Scanner Center Aiming (N560X SR/ HD) .................. 89 Barcode API ....................................
-
Page 5: Safety Instruction
Safety Instruction Read this instruction carefully to keep yourself safe and to avoid loss of property. Make sure that battery terminals (metal part) should not contact with any conductive materials like a necklace or coin. Also make sure that batteries should not be damaged by teeth or a nail. - Page 6 Do not use this Product in a hot or humid place. Using the product under a hot/humid temperature such as rain or sauna may cause a trouble. Keep this Product away from magnetic products such as credit card, telephone card, bank ...
-
Page 7: Chapter 1: Introduction
Chapter 1: Introduction series is rugged mobile computer for use data capture and automation in retail, warehouse and other field applications. The 4 series puts convenient features and capabilities at your hand, including barcode scanning, RFID tag reading and writing, image capturing with built-in camera, and real-time mobile communications through WWAN and WLAN network. -
Page 8: Overview Of Terminal Features
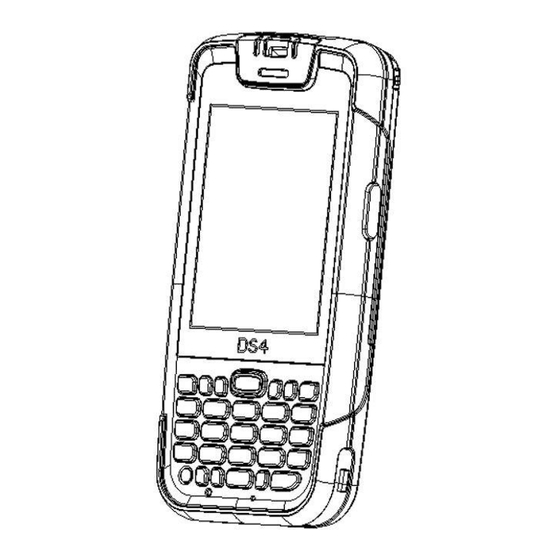
Chapter 1: Introduction Overview of terminal features Front View Scanner Window Scan LED Indicator Network LED Indicator Charging LED Indicator (Phone only) Receiver Scan Triggers 3.5” Display Modifier LED Indicator Micro phone Power Button Reset button... -
Page 9: Back View
Chapter 1: Introduction Back View Stylus Pen Camera Flash Camera Lens Speaker Hand belt Micro USB Port... -
Page 10: Hand Strap Removal And Replacement
Chapter 1: Introduction Hand Strap Removal and Replacement To remove hand strap: 1. Rip the Velcro strap off 2. Remove the battery cover from the terminal 3. Take out the Velcro strap from upper/bottom hooks. 4. Put one side of hand strap into the bottom hook and fix it. 5. -
Page 11: Power Adapter
Chapter 1: Introduction You may need to fully charge the battery before using your terminal for the first time. Battery can be charged using below listed accessories Charging Accessory Charging Time micro USB cable About 4hours 30minutes Desktop cradle and AC adapter About 4hours 30minutes Snap on About 4hours 30minutes... -
Page 12: Chapter 2: Getting Started
Chapter 2: Getting Started This chapter will describe how to install and charge battery, mount micro SD card and start up the terminal To start up the terminal: Install Micro SD card Mount Battery Connect power source Operate power of the terminal ... - Page 13 Chapter 2: Getting Started Installation micro SD card Insert the micro SD card carefully as shown in the following illustrations. Make sure the micro SD card terminal position before insert the micro SD card. Push the back end of the micro SD card to fix it at the last step.
-
Page 14: Battery Mounting And Operation
Chapter 2: Getting Started Battery Mounting and Operation Mount the battery to the bottom side of terminal and push the battery. Note Battery Maintenance Lithium-ion batteries have a limited life, which is affected by several factors; environment, storage, the number of charge/ discharge cycles, and level of discharge/ charge To extend battery lifespan and battery life, we recommend following these simple guideline;... -
Page 15: Connecting Power Source
Chapter 2: Getting Started Connecting Power Source Connect power, using one of the methods listed below. Caution Verity that the terminal battery is installed prior to connection. If the battery is not properly installed and the wall charger is connected, the terminal may power off and on continuously, preventing proper operation. Note Failure to unplug the wall charger before you remove the battery, can cause damage to the terminal To use micro USB Travel Charger... -
Page 16: Operating Power Of The Terminal
Chapter 2: Getting Started Operating Power of the Terminal Power On and Off Make long press Power button to turn on, or off the terminal. Select OK confirmation message, when you make long press to turn off the terminal Suspend and Resume Press power button shortly to enter Suspend, or Resume the terminal Reset If the terminal stops responding, try reset to kill running applications. -
Page 17: Chapter 3: Getting Understanding Details
Chapter 3: Getting Understanding Details Battery Status Below battery title bar is indicating your battery status. Battery Icon Status Battery is fully charged Battery capacity is high Battery capacity is in medium to continue work for several hours Battery is weak and a few minutes of operation remain Battery power is critical low. -
Page 18: Clean Boot
Chapter 3: Getting Understanding Details Clean Boot Cold boot also enables to kill all running applications. However, it deletes all stored data and entries in RAM. It makes the terminal to factory default status. Try Reset first if the terminal is not responding. -
Page 19: Backup Manager
Chapter 3: Getting Understanding Details Backup Manager Windows CE 6.0 Your data, such as registry at Windows CE 6.0 can be deleted after Clean boot. To keep your data, use Backup manager. (Two methods) 1) Start ▶ Programs ▶ Backup Manager 2) My Device ▶... -
Page 20: Icons In The Task Bar
Chapter 3: Getting Understanding Details Icons in the task bar At the bottom of Desktop screen, the task bar displays active programs Open program & Status Icons Start Desktop Display Window Title Icons are provided in the terminal display to indicate the state of feature choices. The icons that appear in the terminal display are described in following table. -
Page 21: Start Button
Chapter 3: Getting Understanding Details Start Button Press Start icon to launch - Programs: access to available programs - Favorites: lists files in favorites directory - Documents: displays files in Documents directory - Settings: access to Control Panel, Network and Dial-up Connections, and Taskbar and Start Menu - Help: access Windows CE Help, Summit Utility Client Manual has included - Run: Open to specific program, folder or document... -
Page 22: Icons In Control Panel
Bluetooth Device Properties: Brightness controlling Battery Power and Activate Bluetooth manager AC Power Certificates: Certificate information of CPU Settings: Select Power DS4 series management mode of CPU Date/Time: Set Date/Time and Time Dialing: Set dial properties in modem Zone communication... -
Page 23: Windows Embedded Handheld 6.5 Home Screen
Chapter 3: Getting Understanding Details Windows Embedded Handheld 6.5 Home Screen Status Bar Today Screen Task Tray Title Bar Icons in the Status Bar It displays current status of system of the terminal. ○ ○ ○ ○ ○ ○ ○ Input mode ○... - Page 24 Chapter 3: Getting Understanding Details Input mode icon Description Numeric key input Lower character input (double press Orange modifier key board) Upper character input (double press Orange modifier and double press SHIFT key board) Connectivity (WLAN, and Active Sync) Connection is active (In case SCU activated) Connection is inactive (In case SCU activated) WLAN on, but not connected.
-
Page 25: Icon Bar
Chapter 3: Getting Understanding Details Battery Battery has a full charge Battery has a high charge Battery has a medium charge Battery has a low charge Battery has a very low charge Battery is charging No battery Icon Bar Tab Status Bar to display Icon Bar. Slide Icon Bar to see more information Icon Description Enlarge screen display... -
Page 26: Icons In The Task Tray
Chapter 3: Getting Understanding Details Icons in the Task Tray It displays current applications status which is running on top of terminal system Icon Description Wireless Manager: power on/off Phone, WiFi and Bluetooth Barcode Tray: barcode application tool. To display this icon, refer Barcode Scanner Programs in Start Screen Icon... -
Page 27: Setting Applications
Chapter 3: Getting Understanding Details Messenger: Activate Messenger MSN Weather: Set your regional program weather information Windows Live: Access Windows Live MSN Money: Set Stock market information Calculator: Calculator feature Games: Microsoft’s mobile game application Notes: Note pad program. Add, edit, Notes: Note pad program. - Page 28 Chapter 3: Getting Understanding Details Connections Beam: Connections: Set up your network connection (modem, ISP, VPN, dial up) Domain Enroll: Register your terminal Network Cards: Set up network cards in a domain such as WLAN, Bluetooth, USB Ethernet and others USB to PC: enable, or disable Wireless Manager: Power control to advanced network functionality...
-
Page 29: Leds
Chapter 3: Getting Understanding Details LEDs LED indicates status of the terminal in power sourcing, data capture, network connection Modem LED Charging LED Data Capture Status LED LED Appearance upon terminal feature Feature Color Description Data capture status LED Blue Good read barcode, or RFID The terminal is in charging status Charging LED... -
Page 30: Keypad
Chapter 3: Getting Understanding Details Keypad DS4 series comes with large numeric keypad including function 1~10. You need to use orange modifier key and blue modifier key to access all characters and functions on Numeric Keypad Upon repetition of key press, input method varied... -
Page 31: Barcode Scanner
Chapter 3: Getting Understanding Details Barcode Scanner APT4 series provides industry leading barcode scanner options for the best data capture performances in most of labels and field conditions. Launch Barcode Tray Aim scanner window exit to barcode Press scan button 1. -
Page 32: Aim 2D Imager Scanner Window Exit To Barcode
Chapter 3: Getting Understanding Details Aim 2D Imager Scanner window exit to barcode [4500/4750] Good Wrong 3. Press scan button, or trigger and see scanner beam is generating. When scanner read barcode in success, scan indicator notify you with sound, vibration and LED Scan Indicators Followings are indication scan status Type... -
Page 33: Camera
Chapter 3: Getting Understanding Details Camera This section explains how to use the camera on your terminal. You can take photographs and shoot video by using the built-in camera functionality. Your 5 megapixel camera products photos in JPG and BMP format, and videos in ASF format. Note APT4 series may vary upon your order configuration. -
Page 34: Camera Options
Chapter 3: Getting Understanding Details Camera Options Options are represented as below Icon Feature Description Allow you to take a photo in various modes. Tap the icon to switch Camera mode feature Camcorder mode Allows you to take video. Tap to switch Camcorder mode Allows you to set the flash options to Off, On, or Auto flash Flash... -
Page 35: Wireless Manager
Chapter 3: Getting Understanding Details Wireless Manager Before setting up wireless configuration, you need to access Wireless Manager to switch on the radio power. This application is to set up wireless functionality. To access wireless manager, Windows CE 6.0: Start ▶Setting ▶ Control Panel ▶ Wireless Manager Windows Embedded Handheld 6.5: Start ▶... -
Page 36: Wi-Fi Setting
Chapter 3: Getting Understanding Details Wi-Fi Setting DS4 Wi-Fi is divided into two type of UI – Summit Client Utility (“SCU”) and Laird Connection Manager (“LCM”). Power on WiFi power at Wireless Manager Open SCU or LCM Configure your WLAN When you power on WiFi, following WiFi signal will be displayed at your task tray and task bar. -
Page 37: Configuration Wlan - Summit Client Utility ("Scu")
Chapter 3: Getting Understanding Details Configuration WLAN – Summit Client Utility (“SCU”) This section describes the steps required to set up Summit Client Utility. It shows review about the options within the SCU tabs – Main, Profile, Status, Diags and Global Settings. After turn on WiFi Power Switch from Wireless Manager, tab Windows CE6.0: Start ▶... - Page 38 Chapter 3: Getting Understanding Details Status: Indicates if the radio is associated to an AP and, if not, indicates the radio’s current status. Potential values include: Down (not recognized), Disabled, Not Associated, Associated, or EAP type authenticated. Radio Type: Indicates the terminal’s radio type including: ...
- Page 39 Chapter 3: Getting Understanding Details 2) Profile The profile settings are radio and security settings that are stored in the registry as part of configuration profile. When a profile is selected as the Active Profile on the Main tab, the setting for that profile become active.
- Page 40 Chapter 3: Getting Understanding Details Radio – Select a radio attribute from the list on the left to view its value or setting in the box on the right. Only an administrator can edit these values or settings. [Radio Settings] SSID: Service set identifier for the WLAN to which the radio connects ...
- Page 41 Chapter 3: Getting Understanding Details Security – Values for the two primary security attributes, EAP type and encryption type, are displayed in separate drop-down lists with the current the current values highlighted. Only an administrator can edit these security settings. [Security Settings] EAP type –...
- Page 42 Chapter 3: Getting Understanding Details Third Party Config ThirdPartyConfig If you choose to configure in Edit Profile tab, the will work with the Windows Zero Config operating system’s (WZC) to configure radio and security settings for the radio installed in the unit. profile Choosing this means that...
- Page 43 Chapter 3: Getting Understanding Details 4) Diags The following functions are available from the Diags window: (Re)connect: Disable and enable the radio, apply or reapply the current profile, and attempt to associate and authenticate to the wireless LAN, logging all activity in the output area at the bottom.
- Page 44 Chapter 3: Getting Understanding Details 5) Global Global settings tab allows you to define radio and security settings that apply to all profiles , along with settings that apply specifically to the Global Setting Description Value Default Roaming Trigger If RSSI from AP is less than roam trigger -50, -55, -60, -65, -70, -75, -70 dBm value, radio performs roam scan or...
- Page 45 Chapter 3: Getting Understanding Details BG Channel Set Defines the 2.4GHz channels to be Full; 1,6,11 (the most Full scanned when the radio is commonly used 2.4 GHz contemplating a roam and needs to channels); determine what APs are available. 1,7,13 (for ETSI and TELEC radios only);...
- Page 46 Chapter 3: Getting Understanding Details CCX features Use of Cisco information element (IE) Full: Use Cisco IE and CCX Optimized and CCX version number; support for version number which is CCX features. supporting all CCX features Optimized: Use Cisco IE and CCX version number which is supporting all CCX features except AP-...
- Page 47 Chapter 3: Getting Understanding Details PMK Caching When WPA2 is in use, type of Pairwise Standard or OPMK Standard Master Key (PMK) caching to use When switching from Standard to OPMK, you must initiate a suspend resume of the device. Only tapping Commit does not cause the change to take effect.
- Page 48 Chapter 3: Getting Understanding Details Hide Password If this is On, then SCU as well as EAP On, Off authentication dialog boxes mask passwords and other sensitive information, such as WEP keys. Admin Password Password that must be specified when A sting of up to 64 SUMMIT Admin Login button pressed.
-
Page 49: Configuration Wlan - Laird Connection Manager ("Lcm")
Chapter 3: Getting Understanding Details Configuration WLAN – Laird Connection Manager (“LCM”) This section describes the steps required to set up Laird Connection Manager. It shows review about the options within the LCM tabs – Status, Configuration, and Diagnostics. After turn on Wi-Fi Power Switch from Wireless Manager, Windows CE6.0: Start ▶... - Page 50 Chapter 3: Getting Understanding Details 2) Configuration Tab The configuration tab allows Wi-Fi to be enabled and disabled. It also allows users to manage Wi-Fi profiles to scan. Windows CE6.0 Main Tab Windows Embedded Handheld 6.5 Main Tab Check on/off box: Check to enable or disable Wi-Fi ...
- Page 51 Chapter 3: Getting Understanding Details · Wifi – Profile Profile settings are radio and security settings that are stored for each configuration profile. Other than viewing the settings for each profile, the functions and settings located on the Profile window are only available to administrator. Windows CE6.0 Main Tab Windows Embedded Handheld 6.5 Main Tab - Property and Value table: Display the properties of each profile and its respective...
- Page 52 Chapter 3: Getting Understanding Details · Wifi – Globals The Globals tab displays the source device’s Wi-Fi global values that apply to all profiles and settings that apply to LCM itself. The following subsections allow these values to be modified. Windows CE6.0 Main Tab Windows Embedded Handheld 6.5 Main Tab - Property and Value table: Display various properties and their respective values...
- Page 53 Chapter 3: Getting Understanding Details 3) Diagnostics Tab The Diagnostics tab enables you to troubleshoot connection issues within LCM. Windows CE6.0 Main Tab Windows Embedded Handheld 6.5 Main Tab Wi-Fi: Status enabled/disabled About: Tap to display LCM information including driver and the LCM version. ...
- Page 54 Chapter 3: Getting Understanding Details · Advanced – Ping Tools Profile: The name of the active profile Destination: The destination of the ping in use Ping Payload: The amount of date (in bytes) that is transmitted on a ping. Use the drop down menu to choose 32, 64, 128, 256, or 1024 bytes Ping Delay text box: The amount of time (in milliseconds or ms) between successive ping requests.
- Page 55 Chapter 3: Getting Understanding Details Wi-Fi Roaming (Summit Base) APT4 Wifi provides two complementary sets of roaming algorithms to provide for more reliable connectivity. Those sets of algorithms are; Standard: which manages roaming behavior under typical conditions. Users can adjust Standard Roaming parameters to customize roaming behavior for a particular environment.
- Page 56 Chapter 3: Getting Understanding Details How a given customer will configure these settings will depend on their RF environment, but also on the types of devices they use (laptop vs. data terminal for example), how those devices are used (truck- mounted going 25 MPH (40 KPH) or carried on a belt and being walked around), and what types of data they handle (voice/video vs.
-
Page 57: Bluetooth Setting
Chapter 3: Getting Understanding Details Bluetooth Setting Caution The open COM port at APT4 is COM6, COM9 At Windows CE6.0, it assigns COM6 first. If COM6 is pre-assigned, then it try to assign to COM9. At WEH 6.5, it is selectable one of COM port between COM6 and COM9 Windows CE6.0 1. - Page 58 Chapter 3: Getting Understanding Details 4. Select Trusted to open PIN input window 5. Enter your PIN number 6. After your PIN number validation, double click the Bluetooth name. then select Active Your COM information will be displayed after success...
- Page 59 Chapter 3: Getting Understanding Details WEH6.5 1. Power on Bluetooth module. (Go to Wireless Manager to turn on Bluetooth) 2. Click Menu at bottom of display and select Bluetooth Settings 3. Select Add new device to scan Bluetooth around the terminal 4.
- Page 60 Chapter 3: Getting Understanding Details 6. Assign a COMPORT. Click your Bluetooth device name 7. Select Serial Port as picture, and select Save at bottom of display menu Caution In case you don’t select Serial Port at this stage, you will have error when you delete the Bluetooth profile 8.
-
Page 61: Bluetooth Setting Trouble
Chapter 3: Getting Understanding Details Select appropriate COM Port, which is not assigned. Then select Finish and OK Bluetooth setting trouble In any case you delete the assigned Bluetooth device and have to reassign SAME, or different Bluetooth device, please follow below delete and reassign comport process. Windows Mobile 6.5 is keeping the last registry record, and it interferes reassigning the Bluetooth device to the same port. - Page 62 Chapter 3: Getting Understanding Details 3. Set COMPORT again 4. When you delete the assigned COMPORT, then it shall be deleted all information including recorded registry.
-
Page 63: Sdk
Chapter 4: Admin Manual Windows CE6.0: Please download from below link. https://www.dropbox.com/s/0mdz2s9upula5d9/DS5_SDK.msi WEH6.5: DS4 uses Microsoft providing SDK. To use DTK (Developer Tool Kit), please install SDK (Software Development Kits) first. WEH 6.5 SDK & DTK Windows Mobile 6 Professional and Standard Software Development Kits Refresh http://www.microsoft.com/download/en/details.aspx?id=6135 Windows Mobile 6 Localized Emulator Images http://www.microsoft.com/download/en/details.aspx?id=7974... -
Page 64: Reset Type
[DELETEFILE] [SHORTCUT] [EXECUTE] Chapter 4: Admin Manual Reset Type Below is type of reset and the device behaviors Reset Type Behavior Remarks ResetType=0 Applicable when all booting ResetType=1 Applicable when factory reset, Clean boot ResetType=2 Applicable when Warm boot ResetType=3 Applicable when Cold boot Only Windows CE6.0 ResetType=4... - Page 65 Setting File copy [FILECOPY] ResetType=1 SrcFile=\SetupApp.ini DesFile=\Nand\SetupApp.ini Chapter 4: Admin Manual Setting File delete [DELETEFILE] DeleteFile=\Nand\aaa.txt Setting Short cut [SHORTCUT] ResetType=0 FileName=\NAND\MBApp\MB_BarcodeTray.exe DestPath=\Windows\Desktop\Shortcut to MB_BarcodeTray Setting exe file [EXECUTE] ResetType=2 FileName=\Nand\MBApp\MB_BarcodeTray.exe Argment=\ Installing Cab file [EXECUTE] ResetType=4 FileName=\Windows\wceload.exe Argment=/noaskdest /noui /delete 0 \Nand\Install.CAB Wi-Fi power control (on) [REGISTRY] ResetType=1...
- Page 66 Chapter 4: Admin Manual Wi-Fi profile setting [WLAN] ResetType=1 Profile_name ; ConfigName= profile name SSID_name SSID= SSID name TxPower=0 AuthType=0 EapType=0 PowerSave=2 WepType= 0: none, 1: WEP, 3: WPA_PSK, 5: WPA2_PSK BitRate=0 RadioMode=6 ********** PSKKey= ; Input password in case your WepType is WPA_PSK, or WPA2_PSK ********** WEPKEY= ;...
-
Page 67: Os Update
Chapter 4: Admin Manual OS Update OS Update with SD Card Caution When you use OS update with micro SD card, please make sure the card is formatted, and battery is fully charged. 1. Copy the firmware image to root folder of the SD card 2. - Page 68 Chapter 4: Admin Manual 1. When image.bin file is copied and installed in complete, below image will be displayed at your screen. 2. After DONE message like in above, press RESET button to enter Clean Boot 3. Your device will be restarted.
-
Page 69: Wi-Fi Connection Through Scu (Summit Client Utility)
Chapter 4: Admin Manual Wi-Fi connection through SCU (Summit Client Utility) 1. Power on Wi-Fi module. (Go to Wireless Manager to turn on Wi-Fi module) 2. Click Wi-Fi signal icon as below image 3. Click Profile tab to set your Wi-Fi 4. - Page 70 Chapter 4: Admin Manual 5. Select your SSID, and click Configure 6. Select Yes to save your SSID. This process to save your SSID to the device not to re-input the SSID on your device. 7. Input your network password. Then OK.
- Page 71 Chapter 4: Admin Manual 8. Press Commit. Go to Main tab to select your saved profile. 9. Select your profile at Active Profile...
- Page 72 Chapter 4: Admin Manual Table: SCU Tray Icons The radio is not associated/authenticated to an AP. The signal strength (RSSI) for the current AP (to which the radio is associated) is -90 dBm or weaker, which means that a Summit 802.11b/g radio will operate at 802.11b data rates only.
-
Page 73: Remote Desktop Connection
Chapter 4: Admin Manual Remote Desktop Connection Caution: Make sure your device has been connected to your network Windows CE6.0 1. Click Remote Desktop Connection on idle screen 2. Input your IP address of your server computer, then click Options>> 3. - Page 74 Chapter 4: Admin Manual 1. Input your credentials to connect the local computer, then click OK 2. Your device will be connected to the local computer...
-
Page 75: Weh6.5
Chapter 4: Admin Manual WEH6.5 1. Click Start , scroll down screen and click Remote Desktop Mobile 2. Input your local computer information Caution: In case you don’t input necessary information, you will see below log in screen to require information. 3. -
Page 76: Gprs Connection
Chapter 4: Admin Manual GPRS Connection Before you programming GPRS, you may need following 2 files. cmsample.zip : Reference project to make sample ConnectionManager_Sample_CSharp.zip: A sample referred from above file Download files at below link https://www.dropbox.com/sh/hdxre34npe6zraj/AABvfEB-AzDK6Vg89_MCO3Yqa Caution Before use the program, Beside the phone modem, turn off all your wireless radios ... - Page 77 Chapter 4: Admin Manual 3. Click “Add a new modem connection” 4. Set your name at Enter name for the connection. Select Cellular Line(GPRS). Then press Next 5. Check APN address with your Telecom 6. Click Finish operator to fill in Access point name. Click Next...
-
Page 78: Using Connection Manager Sample
Chapter 4: Admin Manual Using Connection Manager Sample 1. Select MY ISP at combo box 2. Select Connect 3. If GPRS is connecting properly, you 4. If you want to disconnect GPRS, will see the screen as below press Disconnect button... -
Page 79: Barcode Tray
Chapter 4: Admin Manual Barcode Tray APT4 wide uses same Barcode tray regardless operation system in Windows CE 6.0 and WEH 6.5. 1D Barcode Image Menu lists Details Scan Detail View to detailed barcodes Barcode Setup Setting by barcode types Scan Option Scanning setting INFO... - Page 80 Chapter 4: Admin Manual Barcode Setup (Detailed tab) Setting option by barcode types such as length, change, or check sum Scan Option (Option tab) Setting Time out, Transfer Method, Prefix/ Suffix Timeout : Setting barcode beam lighting interval per pressing a scanning button TransMethod : Barcode value transfer method.
-
Page 81: 2D Imager Barcode
Chapter 4: Admin Manual Scan Option (Key tab) Scan Stop: When scan button getting up after pressing the button, barcode beam is out. Un-checking Scan Stop: Scanner beam out after user set time out Scan Option (Sound tab) Setting notification when scan success or fail. FileFind: setting user proprietary scanning sound 2D Imager Barcode Image... - Page 82 Chapter 4: Admin Manual Scan Detail It is test function barcode scanning is operating properly. It shows; - Type: Type of barcode - Info: Contents in barcode - Time(Sec): Time to scanning Barcode Setup (Enabling tab) Setting to able, or disable bar type to read barcode, or factory default barcode tray Special: Setting for non barcode types such as OCR Factory Default Barcode Types 1D : ChinaPost, Codabar, Code39, CODE93, Code128, CouponCode, EAN13, IATA25, INT25, Mx25,...
- Page 83 Chapter 4: Admin Manual Barcode Setup (Detail tab) Setting option by barcode types such as length, change, or check sum Caution: Barcode option change may change result value, or barcode type in some case Scan Option (Option tab) Setting Time out, Prefix/ Suffix, Transfer Method APT4 Barcode Tray Default Value Time out: 3.0S, TransMethod: Keyboard, Prefix 1: Null (0X00), Prefix 2: Null (0X00), Suffix 1: LF (0X0A), Suffix 2: Null (0X00)
- Page 84 Chapter 4: Admin Manual Caution Transmethod “Clipboard” is not supporting Prefix, or suffix option. Required Prefix/ Suffix enabling application version from Windows CE Windows Mobile Scanner Type Tray Version 1.0.0.11 3.0.2.5 DLL version 2.0.1.9 2.0.0.19 3.0.2.5 3.0.0.14 Example) Applying “Ctrl+F” in prefix 1.
- Page 85 Chapter 4: Admin Manual Scan Option (Key tab) Scan Stop: When scan button getting up after pressing the button, barcode beam is out. Un-checking Scan Stop: Scanner beam out after user set time out Multi Scan : This is special feature at 2D barcode function. It is enabling to read continuous barcode scanning.
-
Page 86: Barcode Scanner Center Aiming (N560X Sr/ Hd)
Chapter 4: Admin Manual 2D Barcode Scanner Center Aiming (N560X SR/ HD) This feature is to modify aiming area of 2D barcode scanner to improve aiming accuracy. When barcode labels are located very closely, and it is required to capture user’s aimed barcode only, this tool provide option to scale aiming area of 2D barcode scanner. -
Page 87: Barcode Api
Chapter 4: Admin Manual Barcode API DS4 and DS4W use same Barcode tray regardless operation system in Windows CE 6.0 and WEH 6.5. However barcode API is different between 1D, and 2D, and Windows CE 6.0 and WEH6.5 1D Barcode API 2D Barcode API https://www.dropbox.com/sh/pir1vr2kxkkh80 https://www.dropbox.com/sh/dj1w0fbt67ts... -
Page 88: Appcenter - Device Lock Down Or App Locker
Chapter 4: Admin Manual AppCenter – Device Lock Down or App Locker Review an overview of AppCenter AppCenter refers to providing a controlled and specialized experience for the end user of a device, mainly by limiting the ways in which an end user can interact with the device. There are many reasons for locking down a device, such as protecting the system from malicious users, providing a custom defined user experience, and increasing system reliability. - Page 89 Chapter 4: Admin Manual Admin Mode Select Menu at left bottom of your screen to enter ADMIN Enter password. Initial password is 0000 Admin Mode Menu · ADD PROGRAMS : add user accessible program add, or delete · CHANGE PW : To change password ·...
-
Page 90: Telnet Emulator - 3 Rd Party Solution
Chapter 4: Admin Manual Telnet Emulator – 3 Party Solution TTWin CE TTWin CE is Turbosoft’s terminal emulation solution for handhelds, Windows CE 5.0 and above, and WEH6.5 devices. Features Host Connectivity: Allows for a direct connection from the CE device or Windows based terminal to the host system Proven Technology: The Terminal Emulations that are available in TTWinCE are the most reliable and accurate on the market. -
Page 91: Gps Connection Tool
Chapter 4: Admin Manual Colour configuration: Full colour configuration. Select from preconfigured colour sets or define your own for better readability Configuration password: Administrators can prevent users from accessing or changing device configuration. Minimizes support by eliminating unauthorized changes Device application lockdown: TTWinCE can be configured to run in full screen mode, utilising the entire display screen area and preventing the user from accessing other applications. -
Page 92: Related Files And Link
Chapter 4: Admin Manual Related Files and Link Program Files Windows CE6.0 Windows CE 6.0 SDK https://www.dropbox.com/s/0mdz2s9upula5d9/DS5_SDK.msi Barcode API (1D) https://www.dropbox.com/sh/pir1vr2kxkkh80c/AAAwBHsS7U4MozZ4CRdGJzSza Barcode API (2D https://www.dropbox.com/sh/dj1w0fbt67tsg40/AADuZHY82pR-yrnmtVhQYlBDa Camera API https://www.dropbox.com/sh/11z3cymhz01662r/AABmMj2PSi9SFICs7R2ksChNa Telnet Emulator Trial https://www.dropbox.com/sh/tfu445lit86vmn7/AADI14j-MvCPZ1ibDgAKaxpqa?dl=0 UHF API https://www.dropbox.com/sh/uiplxz4esrparcy/AAAFB4Ro43pqj0tui7DzJBvda?dl=0 OS Update by PC Program (UDM) https://www.dropbox.com/s/ndbxya2kj8ee3mf/UDM_v1001_20140411.zip?dl=0 WEH 6.5 GPRS Connection...
Need help?
Do you have a question about the DS4 series and is the answer not in the manual?
Questions and answers