Table of Contents
Advertisement
MODEL NUMBER
RD200
Product Manual
Getting Started with Roadie 2.
This manual is a quick start guide for Roadie 2. Please read the
following instructions and conditions before using Roadie 2.
For a more comprehensive overview on how to operate Roadie
2 check our online helpdesk.
www.roadietuner.com/support
Join the Roadie community at:
facebook.com/RoadieTuner
twitter.com/RoadieTuner
Advertisement
Table of Contents

Related Manuals for Roadie RD200


Summary of Contents for Roadie RD200
- Page 1 RD200 Product Manual Getting Started with Roadie 2. This manual is a quick start guide for Roadie 2. Please read the following instructions and conditions before using Roadie 2. For a more comprehensive overview on how to operate Roadie 2 check our online helpdesk.
- Page 2 Disclaimer: This manual describes the version of Roadie 2 as of August 2017. Although Band Industries has made every effort to ensure that the information contained in it was correct at publish time, it does not assume and hereby disclaim any liability to any party for any loss,...
-
Page 3: Table Of Contents
Contents A. Warranty B. Inside This Box C. Getting Started: Basics Creating A New Instrument Tuning With Roadie 2 Installing The Optional Mobile App Re-stringing Using Roadie 2 Power And Recharging Beyond The Basics D. Troubleshooting Hard Reset E. Compliance... -
Page 4: Warranty
Band Industries does not warrant against normal wear and tear, nor damage caused by accident or abuse. To obtain service, please email us at support@bandindustries.com B. Inside This Box B. USB C A. Roadie 2 charging Cable... -
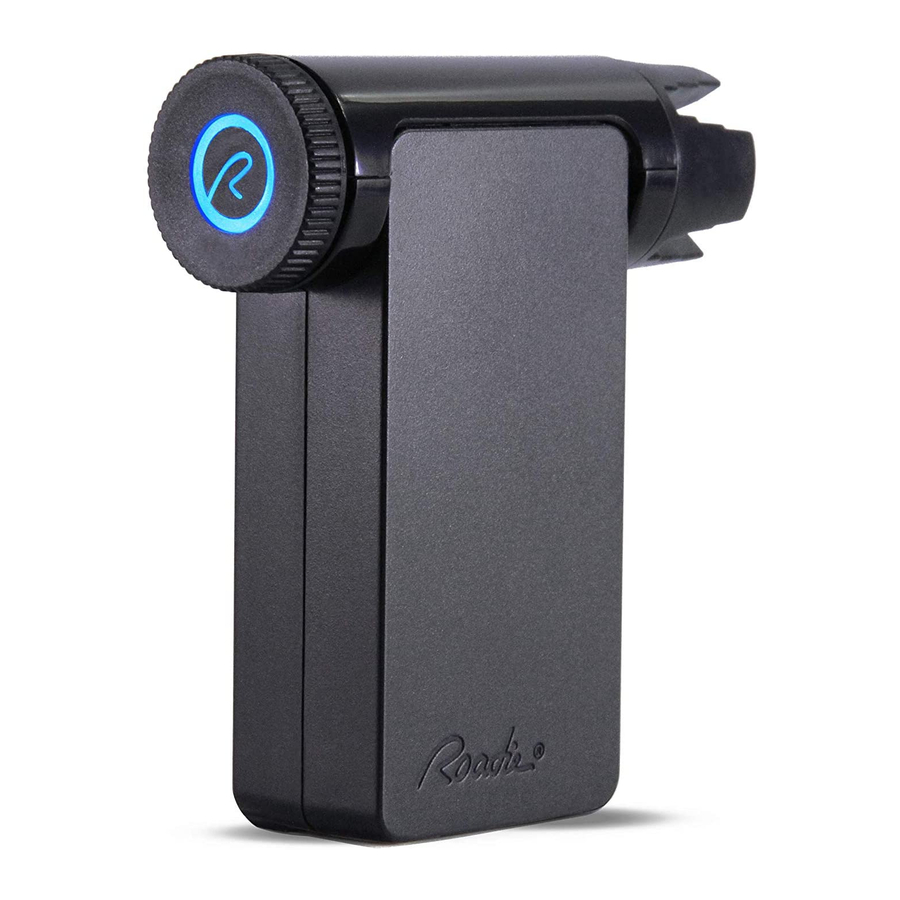
Page 5: Getting Started: Basics Es
C. Getting Started: Basics Screen Status LED R Button Nav Wheel Connector Front LED... -
Page 6: Creating A New Instrument
Creating a new instrument 1. Turn Roadie 2 on by pressing the R button (1) 2. The OLED screen (2) will power on and display the Roadie logo, the status LED (3) will light up blue and the main menu will be shown. - Page 7 pressing the R button. Add Instrument Return Acoustic Guitar Electric Guitar Ukelele 4. You will now select the type of instrument you would like to create from the list of options.
- Page 8 5. Select the number of strings your new instrument has and select “OK”. Number of Strings 6 Strings 7 Strings 6. Name the instrument and select “OK”. This will end the new instrument creation step and go back to the main menu. Give it a Name My Device_ <...
- Page 9 1. Select an instrument from the list. My Instrument #1 My Instrument #2 My Instrument #3 2. You are now ready to tune. Place Roadie 2’s peg connector (5) on your instrument’s tuning peg starting with the lowest note first.
- Page 10 You know the string is in tune when Roadie 2 beeps, flashes the status LED (3) green and vibrates. 4. Turn off Roadie 2 by long pressing on the R button (1) for 3 seconds.
-
Page 11: Installing The Optional Mobile App
Installing the optional mobile app The Roadie Tuner app allows you to set up custom tunings and customize Roadie 2 to your personal needs. The app is compatible with the following devices: iPhone (4S & above), iPad (3rd gen. & above), iPad Mini, iPod touch (5th gen. - Page 12 Wind / Unwind Settings Wind / Unwind To use Roadie 2 as a string winder/unwinder, just select Wind / Unwind in the main menu. Once in this mode, turn the nav wheel (4) in the direction you would like to rotate the peg connector (5).
-
Page 13: Power And Recharging 12 Jp
Wind / Unwind Power and recharging Charging Reset Micro USB Charging Port... -
Page 14: Beyond The Basics
• Roadie 2 operates on a 3.7V 600mAh Lithium Polymer battery. • When the battery is low you should charge it through the USB C charging port (8). • When charging, the charging LED (7) turns red. • When the charging LED indicator (7) turns green, it means that the battery is fully charged. -
Page 15: Troubleshooting
If Roadie 2 becomes unresponsive, a hard reset is required. Simply insert a pin into the reset pin (9) hole and press the button within to reset Roadie 2. E. Compliance This device complies with Part 15 of the FCC Rules. - Page 16 Note: This equipment has been tested and found to comply with the limits for a Class B digital device, pursuant to part 15 of the FCC Rules. These limits are designed to provide reasonable protection against harmful interference in a residential installation. This equipment generates, uses and can radiate radio frequency energy and, if not installed and used in accordance with the instructions, may...
-
Page 17: Fcc Radiation Exposure Statement
• Consult the dealer or an experienced radio/TV technician for help. Caution: Any changes or modifications not expressly approved by the party responsible for compliance could void the user's authority to operate this equipment. FCC Radiation Exposure Statement This equipment complies with FCC radiation exposure limits set forth for an uncontrolled environment. - Page 18 and/or human health if handled and disposed of improperly. • Do not expose your tuner to extremely high or low temperatures. • Do not leave your tuner in direct sunlight for an extended period of time. • Do not leave your tuner near open flames. •...
- Page 19 Correct Disposal of this product. This marking indicates that this product should not be disposed with other household wastes throughout the EU. To prevent possible harm to the environment or human health from uncontrolled waste disposal, recycle it responsibly to promote the sustainable reuse of material resources.
Need help?
Do you have a question about the RD200 and is the answer not in the manual?
Questions and answers