
Related Manuals for Schrack Seconet VISOCALL IP

Summary of Contents for Schrack Seconet VISOCALL IP
-
Page 1: User Manual
VISOCALL IP. Ward Terminal DZT-IP. User Manual. HEALTH CARE www.schrack-seconet.com... -
Page 2: Table Of Contents
Ward Terminal DZT-IP - Table of Contents Table of Contents Foreword ......................4 Ward terminal ....................5 General ......................6 Idle State ..............................6 Announcements .....................8 General Announcement ........................9 Nurse Announcement ......................... 9 Doctor Announcement ........................10 Staff Announcement ......................... 10 Call indication and call processing ...............11 Overview ....................14 List of all rooms .......................... -
Page 3: Foreword
The VISOCALL-IP ward terminal operating instructions are intended to serve as a reference volume to support you and assume basic knowledge that has been obtained from the VISOCALL-IP communications terminal operating instructions. Schrack Seconet wishes you every success with the system! DZT-IP V3.1 - User manual K-HB-010EN... -
Page 4: Ward Terminal
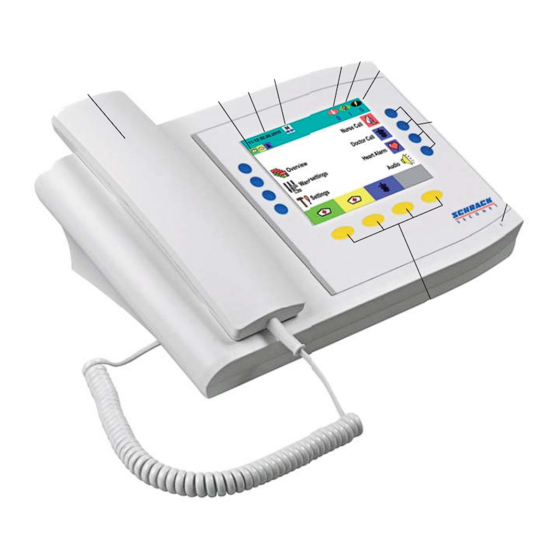
Ward Terminal DZT-IP - Ward terminal 2. Ward terminal ward interconncetion manual numbers of calls in the ward numbers of presence date and time presence in dutyroom numbers of faults handdevice handdevice function buttons blue function bu microphone microp function buttons yellow function buttons yellow K-HB-010EN DZT-IP V3.1 - User manual... -
Page 5: General
Ward Terminal DZT-IP - General 3. General By pressing the relevant function key, you enter into various submenus dependent on which icon and description is next to the key. This applies not only for the vertical banks of blue keys to the left and right of the display, but also for the yellow keys below the display. You can always return to the previous menu by pressing the yellow key underneath the „Back“... - Page 6 Ward Terminal DZT-IP - General Caution: The displaying of the three types of presence can be disabled by means of confi guration - i.e. in certain circumstances the presence symbols above the yellow keys are not visible. You will fi nd the following state information in the status line: •...
-
Page 7: Announcements
Ward Terminal DZT-IP - Announcements 4. Announcements Press the blue key on the right hand side next to the „Audio“ (Fig. 1) symbol to enter the announcement menu (Fig. 2). Using the blue keys on the right hand side, you can now choose between general, nurse, doctor or staff announcements. -
Page 8: General Announcement
Ward Terminal DZT-IP - Announcements General Announcement Status line Announcement general Function line Fig. 3 Nurse Announcement Status line Announcement Function line Fig. 4 K-HB-010EN DZT-IP V3.1 - User manual... -
Page 9: Doctor Announcement
Ward Terminal DZT-IP - Announcements Doctor Announcement Status line Announcement doctor Function line Fig. 5 Staff Announcement Status line Announcement staff Function line Fig. 6 DZT-IP V3.1 - User manual K-HB-010EN... -
Page 10: Call Indication And Call Processing
Ward Terminal DZT-IP - Call indication and call processing 5. Call indication and call processing As soon as a call is triggered in the ward, the display changes automatically and the call is dis- played in detail - with information about the room and/or bed number and the type of call. If there are several calls outstanding at the same time, the call with the highest priority is always displayed most prominently. - Page 11 Ward Terminal DZT-IP - Call indication and call processing The following fi gure shows the selected query of the bed emergency call displayed in the fi rst line of the screen Status line Function line Fig. 8 By pressing the blue keys on the right hand side next to the „+“ or „-“ symbol, you can change the Speech Volume during the conversation if required (Fig.
- Page 12 Ward Terminal DZT-IP - Call indication and call processing If due to the peripheral devices (e.g. WC call) a speech connection is not possible, then you can not query the call in question (Fig. 9). Neither the blue key next to the call symbol, nor the yellow key below the „auto query“ key react to being pressed.
-
Page 13: Overview
Ward Terminal DZT-IP - Overview 6. Overview Using Fig. 1 as a starting point, you enter the room list for the ward in question (Fig. 11) by pressing the blue key on the left hand side next to the „overview“ symbol. -
Page 14: List Of Rooms With Set Presence
Ward Terminal DZT-IP - Overview List of rooms with set presence Status line Function line Fig. 12 6.3 List of rooms with reminder Status line Function line Fig. 13 K-HB-010EN DZT-IP V3.1 - User manual... -
Page 15: List Of Rooms With Care Group Assignment
Ward Terminal DZT-IP - Overview 6.4 List of rooms with care group assignment Status line Function line Fig. 14 DZT-IP V3.1 - User manual K-HB-010EN... -
Page 16: Establishing A Direct Speech Connection
Ward Terminal DZT-IP - Establishing a direct speech connection 7. Establishing a direct speech connection (calling a room or bed) In order to establish a direct speech connection from the ward terminal with a room or a bed (Fig. 1), select the relevant room in the overview by pressing the blue key next to it (Figs. 11-14). - Page 17 Ward Terminal DZT-IP - Establishing a direct speech connection You are now connected to a specifi c person (Fig. 16). Because of the Monitor Lock the patent is able tohear you, but you can‘t hear the patient. Therefor the patient need to press the red nurse call button on the patientsterminal to deacitvate the Monitor Lock.
-
Page 18: Patient Upgrade
Ward Terminal DZT-IP - Patient upgrade 8. Patient upgrade In order to upgrade the call, for example, of a seriously ill patient, and to therefore assign it a call priority that is one level higher, enter the room list view by pressing the blue key on the left hand side next to the „Overview“... - Page 19 Ward Terminal DZT-IP - Patient upgrade Status line Function line Fig. 20 Now press the yellow button underneath the „Upgrade bed“ symbol (Fig. 20). Then you can select the beds you wish to upgrade using the blue keys next to the bed symbols. After you have selected a bed, as a marker for successfully having upgraded the bed, a „+“...
-
Page 20: Ward Interconnection
Ward Terminal DZT-IP - Ward interconnection 9. Ward interconnection By pressing the blue key on the left hand side next to the „Ward settings“ symbol (Fig. 22) you enter the ward interconnection submenu (Fig. 23). Status line Heart alarm Function line Fig. - Page 21 Ward Terminal DZT-IP - Ward interconnection Status line Function line Fig. 24 Now press the blue key to the left next to the relevant ward with which you wish to intercon- nect your ward. (Fig. 24). Then a list of wards with which your ward is interconnected appears (Fig.
-
Page 22: Settings
Ward Terminal DZT-IP - Settings 10. Settings You have the possibility to change various settings on your ward terminal. This includes set- ting the date and time, brightness and contrast of the display as well as volume settings. To do so, press the blue key to the left hand side next to the „Settings“... -
Page 23: Date And Time
Ward Terminal DZT-IP - Settings 10.1 Date and time Status line Time and date Volume Function line Fig. 28 Now press the blue key to the left hand side next to the „Time and Date“ symbol in order to set the time and date (Fig. 28). Using the yellow keys underneath the blue arrow sym- bols, you can change between hours, minutes, seconds, date, month and year. -
Page 24: Volume
Ward Terminal DZT-IP - Settings 10.2 Volume Now press the blue key on the left hand side next to the „volume“ symbol (see Fig. 28) in order to set the basic volume setting for conversations and for announcements. Press the blue keys on the left hand side next to the „+“ and „-“ symbols in order to set the volume for conversations and announcements (Fig. -
Page 25: Fault Indication
Ward Terminal DZT-IP - Fault indication 11. Fault indication If there is a fault in your ward, or in the case of a ward interconnection in another ward, then this is shown on the display of your ward terminal (Fig. 33) Status line Nurse Call Heart Alarm... -
Page 26: Failure
- and under no circumstances a disinfection by submersion process. 14. Operation and Maintenance Operation of the VISOCALL IP call system is subject to the conditions of article 9 of the standard DIN VDE0834 part 1. We would therefore take this opportunity to point our that this article requires among things that periodical inspections and maintenance are carried out, which we will gladly carry out on your behalf. - Page 27 SCHRACK SECONET AG Eibesbrunnergasse 18 A-1122 Vienna Tel.: +43-1-81157-0 office@schrack-seconet.com www.schrack-seconet.com Czech Rep. • CZ-100 00 Prague 10, V Úz ˇ labine ˇ 1490/70 • Tel.: +420-2-74782284 Hungary • HU-1119 Budapest, Fehérvári út 89-95 • Tel.: +36-1-4644300 India • IN-122002 Gurgaon, Technopolis, DLF Golf Course Road, Sector-54 • Tel.: +91-124-4626248 Poland •...
Need help?
Do you have a question about the VISOCALL IP and is the answer not in the manual?
Questions and answers