
Related Manuals for HEALTH ONE HERA-8000(I)


Summary of Contents for HEALTH ONE HERA-8000(I)
- Page 1 www.ehealth-one.com USER MANUAL HERA-8000(I) For customer service, call +82-(0)-31-949-8010...
-
Page 2: Table Of Contents
E-mail: ceo@eheatlh-one.com B. MANAGEMENT INSTRUCTIONS Oversea Business Partners HEALTH ONE ASIA PTE., LTD B-1. SYSTEM PARAMETER ...........26 391B Orchard Road, #23-01 Ngee Ann City Tower B, Singapore 238-874 Tel : +65 9337 8030 / Fax : +65 6736 7389 www.healthone.asia / E-mail : info@healthone.asia... -
Page 3: General
A-1. SPECIFICATIONS A. GENERAL Specifications Items HERA 8000(I( HERA 8000(B( Motor AC 3HP (Continuous) AC 3HP (Continuous) Speed 1.0 ~ 20.0 km/h 1.0 ~ 20.0 km/h Incline 0-16% INCLINE 3 Cardio Programs 3 Cardio Programs Programs 6 Profile Programs 6 Profile Programs 3 Target Programs 3 Target Programs Speed, Distance, Calories, Incline,... -
Page 4: A-2.Safety Instructions
A. GENERAL A-2. SAFETY INSTRUCTIONS SAFETY INSTRUCTIONS The following safety instructions are for correct and safe use of the Treadmill and should be followed for your safety and to prevent accident. There are 3types of safety marks PROHIBITION, WARNING, and CAUTION, according to the safety level. This mark calls for your attention to a possible danger. - Page 5 A. GENERAL A-2. SAFETY INSTRUCTIONS Means possible light damage on injury. CAUTION Power must be turned off and plugged removed To avoid possible impact injury from falling of the after use or when not in use for a long period of machine, ensure that solid objects are distance 2 time.
-
Page 6: Component Parts
A. GENERAL A-3. COMPONENT PARTS Components of MainBody This produt is packed and delivered as semi-assembled. Console Post Body R o H p l i a c o m / 9 5/ 20 02 RoHS compliant 2002/95/EC HERA-8000(I) -
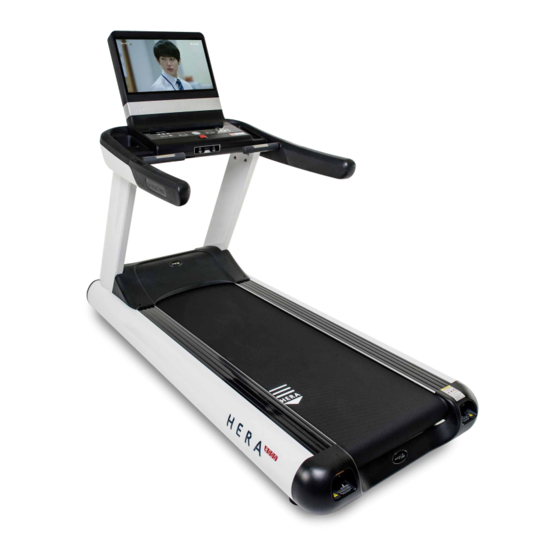
Page 7: A-4. Description
A. GENERAL A-4. DESCRIPTION DESCRIPTION HERA-9000I treadmill is designed for use in Gyms or fitness centers with a 23" LED Built-in TV Monitor. Using Powerful 3HP(Continuous) AC motor with the latest inverter control technology, it runs quietly, softly and safely. Its streamline design will add elegance to your workout place. -
Page 8: A-6. Installation
A. GENERAL A-6. INSTALLATION A S S E M B L Y A N D I N S T A L L A T I O N After unpacking all the components, assemble and install the machine as per the following procedure. Power connection should be at standard voltage Treadmill should be mounted on level floor. - Page 9 A. GENERAL A-6. INSTALLATION POST Use bolts and tool Attaching the Posts Assembly 1 : Insert posts (left & right) into the post guides at the front of the main frame body 2 : Loosely tighten 12 bolt washers fasteningthe bottom of the posts (6 each left &...
-
Page 10: Console Assembly
A. GENERAL A-6. INSTALLATION Console Assembly Use bolts and tool Attaching the Console Assembly 1. Insert the legs of Console Assembly into the left and right post 2. pushing 4 cords through the post. 3. Loosely tighten 8 bolts with nuts fastening the bottom of the Console Assembly to the top of the posts (4 bolts each left &... - Page 11 A. GENERAL A-6. INSTALLATION CABLE 1. Left Post 2. Right Post Wiring of Console The Actuator, Motor and Input Cables on the Inverter are assembled to the Socket in the factory in advance 1. Pull A : Audio Cable, B: HDMI, C : TV Antenna Cable from the hole at the lower side of the left post 2.
- Page 12 A. GENERAL A-6. INSTALLATION AC Power connection and TV Antenna Cable 1. Insert the Antenna Cable to the Antenna Socket on the Front Cover -For Video or DVD watching, insert Audio cable or DVD cable. 2. HERA -7000HD should use grounded socket and power cord. Insert ANTENA the power cord provided to the power inlet at the front of main body and connect the power plug to the grounded socket.
- Page 13 A. GENERAL A-6. INSTALLATION Belt tension and side-drift adjustment. Belt tension must be adjusted whenever the machine was first installed or moved. Otherwise, it may cause slipping or damage of belt or worn-down and breakage of other parts. Belt adjustment consists of belt tension adjustment and level adjustment. Note Turn the belt adjustment screw-heads in end-cover using 8 mm hexagon wrench to adjust the belt as shown in the above Adjustment with T-Wrench and movement change of belt and roller...
-
Page 14: A-7. Instructions
A. GENERAL A-7. INSTRUCTIONS PART NAMES Designation Consol Console Cabinet(Front) Display Control Board HR / Body Fat Grip HR / Body Fat Grip Urethane Handgrip(L) Urethane Handgrip(R) Emergency Stop Button Jack Housing(Earphone Connecter) Console Cabinet(Rear) Cover for after-sales service 11a / 11b (11a : Under Console / 11b : Rear monitor) Body Motor Cover... -
Page 15: Name Plate
A. GENERAL A-7. INSTRUCTIONS Front-cover End-cover Wheel Oil Inlet Level Foot In side motor cover Motor Inverter Converter Actuator TV Adapter Dust Block Plate POLY V-Belt Roller Front Name plate A : Indicates model name Product. TREADMILL. Model. Indicates serial number T 0 9 1 2 1 0 0 K CAUTION! Serial number. -
Page 16: Console - Features And Functions
A. GENERAL A-7. INSTRUCTIONS MAIN CONTROL Press this button to start or gradually stop HERA-7000HD. This START / STOP button button toggles between start and stop operations. Its initial starting speed is 0.8km/h. This button regulates speed of belt. It increases or decreases the SPEED button speed by 0.1km/h per touch. - Page 17 A. GENERAL A-7. INSTRUCTIONS Profile Program Select one of 6 different profile programs +, - button Press +, - button to set any numbers Enter Button Jump up to next part Press 2~3 seconds to start pairing between wearable device and Bluetooth Button treadmill MESSAGE window...
- Page 18 A. GENERAL A-7. INSTRUCTIONS OTHER CONTROL COMPONENTS EMERGENCY STOP The emergency stop key stops the treadmill immediately in the event of an emergency. All buttons and functions will not operate while emergency stopkey is engaged. For normal operation, release the locking of the emergency stop key by turning it toward clockwise.
-
Page 19: Heart Rate Monitoring System
A. GENERAL A-7. INSTRUCTIONS HEART RATE MONITORING SYSTEM Health-One treadmill is equipped with POLAR Hear Rate System using Dual Contact and Wireless heart rate monitoring board to check the heart rate during workout. Contact Heart Rate monitoring system There are two heart rate sensors located on each of the side handgrips. -
Page 20: A-8. Operation Instructions
A. GENERAL A-8. OPERATION INSTRUCTIONS O P E R AT I O N I N S T R U C T I O N S MANUAL WORKOUT 1. Turn the POWER on. Press POWER switch located on the front cover. 2. -
Page 21: Target Workout
A. GENERAL A-8. OPERATION INSTRUCTIONS TARGET WORKOUT 1. Select one of the workout targets. Workout targets Press one of the WORKOUT TARGET buttons (TIME, DISTANCE, CALORIES) on the main control. TARGET TIME (10 ~ 99) TARGET DISTANCE (1 ~ 99) TARGET CALORIES (10 ~ 999) Input target value by pressing + / - button. -
Page 22: Program Workout
A. GENERAL A-8. OPERATION INSTRUCTIONS PROGRAM WORKOUT CARDIO workout program CARDIO workout The CARDIO workout is designed to maintain an user’s heart rate at 75 percent of the theoretical maximum for optimal results promoting cardiovascular improvement. This workout makes the treadmill speed and incline automatically adjusted to take the heart rate to the pre- selected level and keep it constantly throughout the workout. - Page 23 A. GENERAL A-8. OPERATION INSTRUCTIONS FAT BURN workout CARDIO workout program The Fat Burn workout is designed to maintain an user’s heart rate at 65 percent of the theoretical maximum for optimal results. This workout is ideal for maximizing the aerobic benefits of exercise by using the body’s fat stores for fuel.
- Page 24 A. GENERAL A-8. OPERATION INSTRUCTIONS HR GOAL workout HR GOAL workout program In this workout program, the user can preset target heart rate up to 90percent of the user’s theoretical maximum. This workout makes the treadmill belt speed and incline automatically adjusted to take the heart rate to the pre-selected level and keep it constantly throughout the workout.
- Page 25 A. GENERAL A-8. OPERATION INSTRUCTIONS PROFILE workout profile button In this workout program, the user can choose one of 6 preset profiles and workout with thefollowing profile pattern. The heart rate monitor is not necessary for this workout. 1. Select PROFILE 2.
-
Page 26: Management Instructions
B. MANAGEMENT INSTRUCTIONS B-1. SYSTEM PARAMETER SYSTEM PARAMETER The system parameter adjustment is for changing certain default setting or program. Only authorized personnel can adjust the system parameters. 1. Push 'Enter' and ▼ buttons simultaneously for 5 sec. 2. Select parameter by +/- buttons. 3. - Page 27 B. MANAGEMENT INSTRUCTIONS B-1. SYSTEM PARAMETER Classification Description Defaults Function 1 Trip distance Work-out distance (km) Cumulative Function 2 Total distance Total work-out distance (LSD is 10km) Cumulative Function 3 Operation day Total work- out time (days) Cumulative Function 4 Max frequency (Hz) Inverter output frequency at the max.
-
Page 28: B-2. Tv Setting
B. MANAGEMENT INSTRUCTIONS B-2. TV Setting TV Setting Channel Setting 1. Connect TV Cable 2. Turn on the power on Control Board Panel. 3. Press Source Button to check if it is TV mode or not. 4. Press EXIT button for 3 sec on Control Board Panel. 5. -
Page 29: B-3. External Input, Usb Play
B. MANAGEMENT INSTRUCTIONS B-3. External input External input Run USB file or Video Connection Connect DVD output to Composite Port or Connect HDMI cable to HDMI port. ANTENA ETHERNET HDMI IN VIDEO AC IN 200~240V AUDIO IN / 50~60Hz POWER 2. -
Page 30: B-4. Replacement Of Parts
B. MANAGEMENT INSTRUCTIONS B-4. REPLACEMENT OF PARTS R E P L A C E M E N T P A R T S Replacement of Deck, Roller and Running Belt Running belt can be worn out and damaged from friction. In order to prevent it, check the oil condition frequently and ensure the oil is not dried. -
Page 31: B-5. Lubrication
B. MANAGEMENT INSTRUCTIONS B-4. REPLACEMENT OF PARTS STEP 7 : Unscrew the bolt of the rear roller completely. STEP 8 : Detach the rear roller. STEP 9 : Detach the Motor Belt-pulley and front roller. STEP 10 : Detach the belt and the deck by pushing toward back. Assembling is in reverse order. -
Page 32: B-6. Maintenance
B. MANAGEMENT INSTRUCTIONS B-5. MAINTENANCE maintenance list Your careful and routine maintenance of equipment including lubrication and cleaning is essential for long and problem-free operation. Check point Check method Measure daily weekly monthly Inspection with unaided eye (window, Sweat, dust and oil on 1.Cleaning with dried cloth control board, handgrip, foot rail, motor surface... -
Page 33: B-8. Self-Check
B. MANAGEMENT INSTRUCTIONS B-6. SELF-CHECK SELF-CHECK Most Treadmill problems can be solved by following the steps below. Before calling the Service Center or our agent, please check first if your problem is one of those listed below. If further assistance is still needed, then please call our Customer Service Department. Symptom Probable Cause Corrective Action... - Page 34 B. MANAGEMENT INSTRUCTIONS B-7. CUSTOMER SUPPORT SERVICE Customer’s right 2 year Customer is entitled to free warranty services for from the date of purchase. However, if service is required due to force majeure or customer’s misusage, service shall be charged even if it is within the warranty period.
- Page 35 C U S T O M E R C A R D ITEM COMMERCIAL TREADMILL M O D E L HERA-8000I SALES DATE ·Name : ·Tel : ·e-mail : ·Address : Distributor This card is for use by the distributor for customer management. ※ The above information shall be used for better customer service. Remarks C U T WARRANTY CERTIFICATE...
- Page 36 www.ehealth-one.com ⓒ 2016 HEALTH-ONE CO.,LTD. 132, Sannam-ro, Ilsanseo-gu, Goyang-si, Gyeonggi-do, Korea (10201) Tel : +82-31-949-8010 / Fax : +82-31-949-8012 www.eheatlh-one.com / E-mail: ceo@eheatlh-one.com...
Need help?
Do you have a question about the HERA-8000(I) and is the answer not in the manual?
Questions and answers
Hera-8000 model What is the year of manufacture?
The manual includes a copyright date of 2016 for HEALTH-ONE CO., LTD., which suggests that the Hera-8000 model was manufactured around that time. However, the exact year of manufacture is not explicitly stated.
This answer is automatically generated
Error 09 Plz help me on this error 09 on inverter drive box