Table of Contents
Advertisement
Quick Links
Advertisement
Table of Contents

Related Manuals for Atid AT870N

Summary of Contents for Atid AT870N
- Page 1 AT870N Guide for Customer...
- Page 2 ATID web site (www.atid1.com) or provided on appropriate media. If you visit our web site and would like to make comments or suggestions about this or other ATID publications, please let us know via the “Contact ATID ” page.
-
Page 3: Table Of Contents
Contents Page Contents Before using manual for AT870N Chapter 1. Caution when using AT870N 1. How to use battery correctly 2. Caution when using AT870N Chapter 2. Product composition 1. Product composition 2. Name of each part 3. Function of each part Chapter 3. - Page 4 Page Contents Chapter 3. Basic function(continues) 17. Memory 18. Task Manager 19. Remove the program 20. GPS 21. Set screen brightness 22. Backlight ON/OFF set up 23. Screen adjustment 24. Volume and sounds setting 25. Sounds and noti cation 26. Set up the Clock and Alarms 27.
- Page 5 Page Contents Chapter 4. Optional module(continues) 8. Bluetooth connection and termination 9. Bluetooth Pairing 10. Bixolon SPP-R200 Printer Demo 11. How to use Phone 12. Dialing 13. Receiving Phone Call 14. Hang o Phone Call 15. Contact List 16. How to search a contact information 17.
-
Page 6: Before Using Manual For At870N
Before using manual for AT870N User guide inclusive of text, images, logos, product names is either the property of, or used with permission by ATID CO.LTD. The information may not be distributed, modi ed, displayed, reproduced (in whole or in part) without the prior written permission of ATID CO.LTD. -
Page 7: Chapter 1. Caution When Using At870N
Caution when using AT870N Please aware of the manual contents in advance before you handle and operate your AT870N and other ATID Products. How to use battery correctly In case that you dropped the main body or battery in water, please do not put into the stove or heater for drying. Just keep it in natural drying or contact purchase •... -
Page 8: Chapter 2. Product Composition
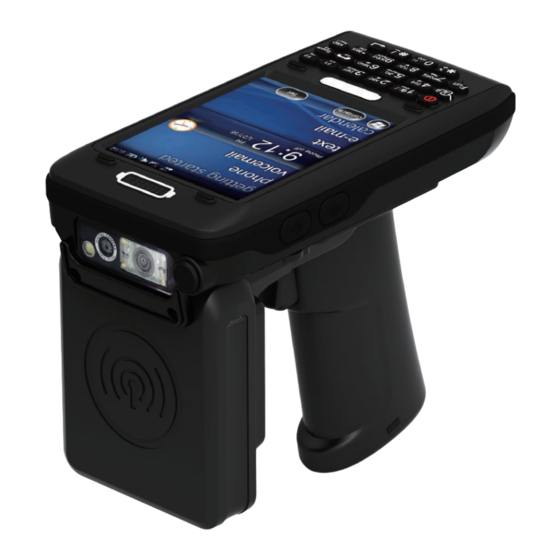
Product Composition AT870N is based upon Microsoft window Mobile 6.5. As the state of the art product, it is equipped with barcode scanner, RFID Tag reader, MSR card reader, printer, smart card reader, MODEM, Camera and so on and it can be applied to Industry, Enterprise, Logistics and so on, can be used Product composition 4. -
Page 9: Name Of Each Part
Name of each part 1D/2D Scanner Camera (option) Cradle connector (option) Camera ash Earphone jack Charger jack (option) Sync Cable Connector WLAN LED Hand strap hole Phone receiver Internal HF (option) Charge LED UHF Connecting port Scan button (F7,F8) Volume button Touch Screen Battery Keypad... -
Page 10: Function Of Each Part
Function of each part NAME FUNCTION Camera (option) It is possible to image capture and save. 1D/2D Scanner (option) Laser beam emitted through this window. Please be careful the foreign substances and preventing from the damage. Warning! Do not look at the laser beam directly. Earphone jack Enable you to connect to earphone. -
Page 11: Chapter 3. Basic Function
Basic Function Battery for AT870N is composed of main battery and backup battery. A main battery supplies the power to the system and RAM which could keep the data. A backup battery could keep the data of RAM when the main battery discharged completely. -
Page 12: Attaching And Detaching The Battery
Attaching and Detaching the battery ▶ Battery detachment Below images are shown the bottom of device Please slide the battery latch to the right (Direction to UNLOCK), and then lift the main battery to detach the main battery after grapping the laver at the bottom. Battery Latch Both Side of the Gap ▶... -
Page 13: Charging Battery
Charging battery You have to charge it through dedicated adapter which is provided when you bought Red light is lit on LED when it starts charging. It will be changed with green light in case of full ▶ Connecting Adapter 1. - Page 14 ▶ 1. When the system is in booting status, press <Power> button for 2~3 seconds, then the screen Power On: on and start the system. 2. System will automatically be turned on if it is connected with USB cable for ActiveSync Power Button ◆...
-
Page 15: Checking Battery Gauge
▶ Battery Discharging If the main battery discharge completely, the system will not turned on, the device will get into low-power mode (sleep mode) automatically, and even press the <Power> button, the system will not be turned on. In this case, you should charge the main battery or connect the adaptor to the adaptor connecting jack of main body, then press the <Power>... -
Page 16: Backup Battery
▶ Low Power Warning If the system is unavailable for low-battery, caution screen for lack of battery will be came out. Backup Battery A backup battery could safely keep the RAM data, even the main battery discharged completely. ◆ Caution: If the main battery and the backup battery are both discharged, the RAM date will disappear. -
Page 17: Soft Reset
Please do restart the system when the application doesn`t work properly or system receives no response Soft Reset When do you need to perform Soft Reset? There is a Hang-up, which means that the system receives no response in case of running the program. When user encounters Hang-up, please do reset the system for recovering the device. -
Page 18: Initializing System
Initializing System Please use [Boot Menu] when user encounters below situation 1. When user wants to recover the adjusted registry information back again. 2. When user wants to initialize the storage space inside the “My Computer” 3. When user wants to initialize the storage space inside the “Flash Disk” 4. -
Page 19: Attaching Micro Sd Card
Below image shows the back side of device when separating the main battery from device There are 1EA SIM Card Slot, 3EA SAM Card Slot and 1EA Micro SD Card Slot. Micro SD card slot SIM card slot Attaching Micro SD card Do unlock the Micro SD Lift the slot cover up Put the SD memory on the... -
Page 20: Attaching Sim Card
[Start] -> [File explorer] Attaching SIM Card Below image shows the state of equipping the SIM CARD with device. Please do insert it in accordance with card shape and edge shape Chapter 3. Basic Function... -
Page 21: Shortcuts Setting
Shortcuts setting You want to quickly run frequently used programs You can set the shortcuts function [Start button] -> [setting] -> [Personal] -> [Button] Select the button you want to assign as the shortcut, And select the desired program from the program assigned Set up phone password If the SIM card is lost or stolen, USIM card in order to prevent the use of others by setting as password [Start button] ->... -
Page 22: Owner Information
Owner information It can set up the owner information (Name, company, address, Telephone, E-mail and Notes [Start button] -> [setting] -> [personal] -> [owner information] LOCK User can set up the device as lock status for protecting data from device Device is converted with lock status for a predetermined time and user has to input the password for unlocking the device. -
Page 23: Memory
Memory You can check the capacity of the memory [Start button] -> [setting] -> [System] -> [Memory] Main memory : Usage and remaining capacity can check Storage card : it can check Flash area or SD care capacity Task Manager You can see a list of programs currently being used and the Amount of memory you have [Start button] ->... -
Page 24: Remove The Program
Remove the program This will display a list of programs installed in addition to the Preinstalled programs [Start button] -> [setting] -> [system] -> [Remove program] It can be removed from the list, select the program you want to Remove You can set the GPS port within the terminal [Start button] ->... -
Page 25: Set Screen Brightness
Set screen brightness Screen brightness is set to the factory in approximately 70% [Start button] -> [setting] -> [system] -> [Contrast] Brightness: you can adjust the brightness of the screen Backlight ON/OFF set up Because it can be set up suit the user’s needs. [Start button] ->... -
Page 26: Screen Adjustment
Screen adjustment he place where you touched with stylus, you need to reset the coordinate calibration values. [Start button] -> [setting] -> [system] -> [Screen] -> [align screen] Volume and sounds setting You can set up the Volume and sounds. Set up the volume’s ICON ... -
Page 27: Set Up The Clock And Alarms
Vibration : Set the vibration amplitude set Set up the Clock and Alarms Set up the date, time and Alarms [Start button]-> [setting] -> [Clock and Alarms] Time : Set the Date and Time Alarms : Set the Alarms Chapter 3. Basic Function... -
Page 28: Wireless Manager
Wireless Manager [Start button] -> [Setting] -> [connect] -> [Wireless manage] All : It can control the all ON/OFF of WIFI, Bluetooth, and PHONE Separately : when you click the Buttons (Wi-Fi, Bluetooth, and Phone) It is possible to ON/OFF ... -
Page 29: Using
Using <Fun> Button Device can implement the programmed function in case that you push the number button with <Fun> button simultaneously. Fun + button Function description <Esc> It is able to cancel the selected command and movement & state of program. Left side of <↑>, <↓>...Button -
Page 30: Connecting Pda To Pc
User can work in concert with computer and device by using ActiveSync through the synchronization of data one another such as installation, copy, Delete, Movement and so on. Connecting PDA to PC ActiveSync : Windows XP Windows Mobile Device Center 6.1 ( 64bit ) : Windows XP or later version Link for Download : http://www.microsoft.com/downloads/. - Page 31 Click the Installation button ActiveSync are installing Press End button for termination of installation Chapter 3. Basic Function...
- Page 32 Setting PC [Start button] -> [Programs] -> [Microsoft ActiveSync] < Windows Xp > < Win7 / Vista > Click on the install button File connection settings, Click the button. Chapter 3. Basic Function...
- Page 33 < Windows Xp > < Win7 / Vista > USB sync cable connection, select Allow, and then click the OK button. [Start buttons] -> [setting] -> [connect] -> [USB-PC] Even connect to PC, synchronization is not good Please select the Enable advanced network functionality To use a VPN you can connect your computer to your device Using the RNDIS.
- Page 34 Time-zone setting Please click the time and If you select the exact time- then, adjust by using rudder zone, user easily can adjust the time setting by selecting the time-zone on regional movement from the next time. AT870N User Guide...
-
Page 35: Data Transfer
< Windows XP > File/ directory device’s screen Data transfer screen Chapter 3. Basic Function... -
Page 36: Chapter 4. Optional Module
Optional module This chapter shows various option module which can be equipped in AT870N. Please refer to the explanation of optional module. Various optional modules for AT870N 1) Barcode reader -. 1D Laser Barcode Scanner -. 2D Imager Barcode Scanner 2) Wireless LAN –... -
Page 37: Using 1D Or 2D Barcode Scanner
Enable to equip with a compact image engine, which could recognize all the 1D and 2D barcodes. Using 1D or 2D barcode scanner Running application [Start Button] -> [DEMO_BarcodeScan] performing Chapter 4. Optional module... - Page 38 Windows Mobile Device Center 6.1 ( 64bit ) : Windows Xp or above Link for Download: http://www.microsoft.com/downloads/. CAUTION: User has to use Microsoft ActiveSync 3.77 or above if you want to synchronize by using ActiveSync Click the Next Button Select the license agreement and then, click the Next Button AT870N User Guide...
- Page 39 Option window Beep : Success the Barcode scanner, beep sound output. Vibrator : Success the Barcode scanner, working vibrator. Enable “SCAN” key : Enable “SCAN” key Enable F7 key on right side : Enable F7 key Enable F8 key on right side : Enable F9 key Enable trigger : Enable Gun Trigger key RAW Data : To set the scan results in the form of raw data 2D scanners only support.
- Page 40 Press End button for termination of installation AT870N User Guide...
- Page 41 Application run complete. Once the run is complete, the barcode icon on the bottom right of the screen is registered and can be scan When user clidk the barcode icon , pop up the main menu and Can change the settings Emulator Main Menu Exit : Exit the application Vibrator : Upon successful barcode scanning vibrator action...
- Page 42 Key Setup Below keys can set multiple F1 : Set up for starting when the F1 key is pressed F2 : Set up for starting when the F2 key is pressed F7 : Set up for starting when the F7 key is pressed F8 : Set up for starting when the F8 key is pressed SCAN : Set up for starting when the SCAN key is pressed Gun Trigger : Set up for starting when the Gun Trigger is Pressed...
- Page 43 Result Type Set output barcode form Select the type of the one of the following types Keyboard Event : Output barcode value on the screen by using Keyboard Event. Copy and Paste : Copy to clipboard and then copy to screen . ◆...
-
Page 44: Barcode Scanning
Barcode scanning 2. Executing the BarcodeDemo program. 3. Emit laser beam to the barcode. • Adjust the distance according to the size of barcode. • [Correct barcode reading] to scan barcode, please try to adjust scan angle and distance. The laser beam is a red thick line, when scanning a barcode. [Incorrect barcode reading] The laser beam must across the barcode. -
Page 45: Chapter 4. Optional Module(Continues)
[Start button] -> [Setting] -> [System] -> [WiFi POWER] ON: WiFi ON OFF: WiFi OFF First, WiFi power needs to be on. [Start button] -> [Setting] Wi-Fi On, turns on WiFi function -> [System] -> [WiFi POWER] Chapter 4. Optional module... - Page 46 How to connect AP (1) When you turn on Wi-Fi, AP list up automatically. . Choose the AP what you Click for connecting want to use and click Input the network key. If it connect well you will be able to see mark as screen Chapter 4.
- Page 47 How to connect AP (2) You can connect using the wireless AP management program [Start button] -> [Setting] -> [Connections] -> [Network cards] AP or Router captured Click as picture automatically, Click on the appropriate device form the list Input the Network key You will be able to see connect Wireless Chapter 4.
-
Page 48: Bluetooth Connection And Termination
AT870N of Windows Mobile is designed to be able to use Bluetooth Stack Service. The following part of the guide describes about Paring and Disconnection of Bluetooth. In addition, Mobile Printer SPR-R203 of Bixolon is used for test demonstration. ** Pairing is possible with total of 6 devices, but COM port allocation of COM2 and COM7 is maximum limit. -
Page 49: Bluetooth Pairing
Bluetooth Pairing After connecting each other through pairing way, Bluetooth devices could do its function properly. [Start button] -> [Setting] -> [Bluetooth] -> [Devices] Press the ‘Add new device’ Choose the devices on searching Input the PIN code and click Click the SPP-R200 on the list for searching devices which could list for paring and click the next... - Page 50 Choose the serial port. “choose the”COM port” tap and Click the SPP-R200 on the list. Choose the communications click the new serial port Port (COM2), and then click After that it is possible to transmission and reception of data by COM2 port *when you add a new device, the equipment information is not normally displayed Please try again * Password that should be used to Pairing (authentication code), the unit can be set by mutual...
-
Page 51: Bixolon Spp-R200 Printer Demo
Bixolon SPP-R200 Printer Demo SPP-R200 is typical Mobile Printer of the Bixolon, you can using its App which get from Bixolon website to perform print through Bluetooth. erent from homepage contents according to the Bixolon policy. 1. Download “SPP-R200 Windows SDK” from the Bixolon homepage (www.bixolon.com 2. -
Page 52: How To Use Phone
How to use Phone 1. [Home] -> [Phone] 2. [Start Button]->[Phone] 3. Press Keyboard button. Dialing Function Key Descriptions Delete number one by one. Enable add/edit/delete/ speed dial number and make phone call. (Save maximum 98ea speed dial numbers.) Enable to looking for recent Call History. After input phone number, press “Talk”... -
Page 53: Receiving Phone Call
Receiving Phone Call Function Key Descriptions Press this button to receive incoming phone call. Press this button to reject a phone call. Function Key Descriptions Communicate via Speaking Key. Mute microphone during a phone call. Switch active phone call on holding status. Switch on holding phone call to active status. -
Page 54: Contact List
Contact List 1. [Home] -> [Contacts] How to search a contact information Enter the contacts number or name into the searching box. Chapter 4. Optional module... -
Page 55: Add To Contact List
Add to contact list Press this button to add Select new contact information Select items which will add Enable to add name and company a new contact information type. new contact information. information. Enable to add mobile phone Enable to add new Email Except for mobile number, Except for basic e-mail address, number. -
Page 56: How To Use Text Message
How to use Text Message 1. [Home] -> [Text Message] 2. [Start Button]->[Text Message] Sending Message Press this button Press this button to make a new message. to send a message. Chapter 4. Optional module... -
Page 57: Receiving Message
Receiving Message Press this button Check message in detail. to check new message. Replying Message Click the relevant Press “Reply/Forward(R)” button Press this button message in received and then choose Reply(R) item. to send replly message, message box. after done text. Chapter 4. - Page 58 2. WiFi Connection AT870N enable to explain wireless communication including APN since it can communicate through 802.11 b/g radio. AT870N supports the TCP/IP network protocol and AT870N directly uses the TCP/IP and host computer at this protocol Device will be started as OFF state at the beginning 2.1 WiFi Connection and Termination...
-
Page 59: Use Of Camera
ure, and record video and so on functions. Use of camera [Start Button] -> [Pictures&Videos] -> [Camera] Execute Camera Application. Main Window button description : Thumb… : end the main window and switch to Pictures&Videos screen. Menu : main Manu list press “Enter”... -
Page 60: Hf13.56 Demo Application Execution
This product comes out with internal type of HF13.56Mhz reader as optional item, and card reading distance around 3~8.5cm compliant with ISO Standards, and in the case of Mifare tag, the reading distance around between 1~3.5cm. HF13.56 demo application execution [Start Button] ->... -
Page 61: Iso15693 Tag Recognition
ISO15693 tag recognition ISO15693: < MF : switch to Mifare command window. Block : start number of block which will be accessed. Read Count : number of block which be accessed. This product enable to communicate with IC Card which compliant with ISO-7816. SmartCard demo application execution [Start Button] ->... -
Page 62: Uhf 900Mhz Demo Application Execution
This product enable to install UHF module as optional item, and read&write RFID tag based on GEN2, ISO/IEC 18000-6C Protocol, performance frequency CE 865~868MHz, FCC 902~928MHz UHF Reader UHF 900Mhz demo application execution [Start Button] -> [DEMO_UHF] Demo Main window button description : Select a tag that will perform “Access”... - Page 63 Demo Application optional Manu : Read/Write : Read/Write tag. Lock/Kill : Lock/Kill tag. Option : Application option. Version : Version infroamtion. Read/Write window button description : Mask : if selected a tag value on main window, then the tag value also showed on Read/Write window, and used as masking pattern while performing Read/Write tag.
- Page 64 Lock/Kill window button description : Mask : if selected a tag value on main window, then the tag value also showed on Read/Write window and used as masking pattern while performing Lock/Kill tag. It means even there are a great many of tags around the reader, Lock/Kill tag command only apply those tag that set as masking pattern.
- Page 65 Version Window button description : Demo app Ver : Demo application Version. Protocol Ver : UHF module library Version. Hopping Mode : UHF module country Version. Max Tx Pwr : UHF module maximum output. Chapter 4. Optional module...
-
Page 66: Chapter 5. Appendix
Appendix PHYSICAL CHARACTERISTICS Dimensions(L x W x H) 148mm(L) X 76mm(W) X 26 (30.5)mm(H) Weight 250g (PDA only, without battery) Operating Temp. -20℃ ~ 60℃ Storage Temp. -30℃ ~ 70℃ Humidity 95% non-condensing Drop Spec. 1.5M Drop to concrete Dust & Water Proof IP65 PERFORMANCE CHARACTERISTICS Processor... - Page 67 NETWORK CHARACTERISTICS wWAN GSM / GPRS / EDGE / WCDMA / HSPA+ wLAN IEEE 802.11 a/b/g/n* Compliant Bluetooth 2.0 + SPP Only GPS + Glonass with internal Antenna DATA CAPTURE & DATA PROCESSING DEVICE Barcode Engine 1D Laser or 2D Imager Barcode Scanner Camera 3.0 Mega Pixel Auto Focus with Flash UHF 900MHZ RFID READER/WRITER...
Need help?
Do you have a question about the AT870N and is the answer not in the manual?
Questions and answers