Table of Contents
Advertisement
Quick Links
Advertisement
Table of Contents

Subscribe to Our Youtube Channel
Related Manuals for InkMachines Dragonfly

Summary of Contents for InkMachines Dragonfly
- Page 1 Dragonfly Manual for the tattoo machine rev.2...
- Page 2 We are proud to present the Dragonfly tattoo machine. Designed with the tattoo artist in focus and manufactured with the highest quality materials and components available. The Dragonfly is a state of the art rotary based tattoo machine with features that gives it several advantages compared to other tattoo machines. The adjustable suspension system...
-
Page 3: Maintenance Instructions
5. Run the machine between 9-12 volts for about a minute and clean it when done. Service Tools and spare parts are available on www.inkmachines.com in the spare parts section if you want to do service work yourself. You can also send machines to our service technicians for a full service. -
Page 4: Getting Started
Getting started 1. Disconnect the machine from the power supply. . 2. Attach a new quality rubber nipple or grommet to the needlebar pin The nipple or grommet should have a tight fit with the needlebar loop. 3. Open the retainer to make clearance for the needlebar and tube by adjusting the ... -
Page 5: Troubleshooting Guide
Troubleshooting guide If you experience problems with the machine you can consult the troubleshooting guide or contact us for service at Inkmachines.com Symptom Possible cause Possible Solution The motor does not start None or to low input Increase voltage (max 14 volts). - Page 6 The excenter is slipping Tighten the allen screw in the excenter . The machine won´t run but the motor appears to be on the motor shaft. Use the assemble instructions no. 1. struggling when power is The excenter bearing is Replace the Excenter assembly .
- Page 7 The needle suspension (give) is The machine or pistons are Lubricate and run the machine for a few jammed or hangs up. new. The suspension needs minutes while holding the needlebar pin with your fingers and let the inner break in.
- Page 8 Ink is creeping up the The pigment is thick. Dilute the pigment. needlebar. Thicker pigments tend to climb easier than thin pigments. The needle has a long Bend the needle at the solder so that only resting area (distance) in the the tip of the needle rests against the tip or tip.
-
Page 9: Disassemble Instructions
Disassemble instructions 1. Remove the Cap by pulling it off. Unscrew the adjustment screw and take out the inner piston spring 2. Use the matching Allen key to loosen the piston screw in the inner piston ... -
Page 10: Assemble Instructions
Assemble instructions 1. Mount the excenter assembly on the motor shaft and lock the Allen screw in the excenter to the motor shaft. Make sure that the screw that engages with the motor shaft ends on the flat part of the motor shaft. ... - Page 11 Instruction for the Spring stop screw The older version of the spring stop screw in some cases cause the stay up spring to tilt and break. If you have this problem you need to replace the spring stop screw .
-
Page 12: Specifications
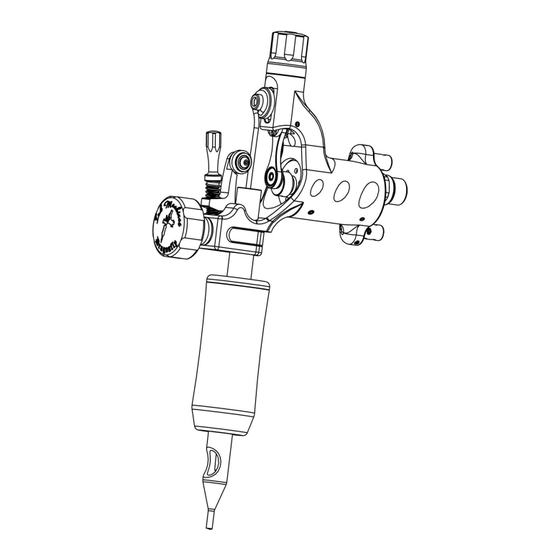
Specifications Input voltage 0 - 14 volt DC (max. 14 volt DC) Power connections RCA or clipcord (max. clipcord end diam Ø1,6 mm) Rpm range 0 - 8 000 rpm / min Stitches / sec 0 - 130 / sec Stroke length 3,7 mm standard ( 2,6mm short stroke ) Suspension stroke... - Page 13 Part names Note: Parts without numbers are not included in the purchase.
Need help?
Do you have a question about the Dragonfly and is the answer not in the manual?
Questions and answers