Table of Contents

Related Manuals for K-TEK MT5100


Summary of Contents for K-TEK MT5100
- Page 1 Installation & Operation Manual MT5100 Guided Wave Radar Level and Interface Transmitter MT5100 Guided Wave Radar Level and Interface Transmitter For the latest version of this manual, visit ktekcorp.com. MT5100-0200-1 Rev b (2-2013) DCN0365...
-
Page 2: Table Of Contents
4. Commissioning ............................... 16 4.1 Display Operation ............................16 4.1.1 Jumper Settings ..........................17 4.1.2 Push Buttons ............................17 4.2 MT5100 Menu Flow Chart ..........................18 4.3 Basic Setup ..............................19 4.3.1 Units ..............................19 4.3.2 Probe Type ............................19 4.3.3 Probe Length ............................ - Page 3 6. Installation Drawings for Intrinsic Safety & Standard Wiring ................. 39 7. Loop Powered TX Hookup / RI Dual Compartment Housing ................42 8. CE Certificate of Compliance ..........................43 9. Customer Support ..............................44 9.1 RMA Form ..............................45 10. Warranty Statement .............................. 46 MT5100-0200-1 Rev b (2-2013) DCN0365...
-
Page 4: Introduction
Beyond the Basic Setup parameters, the software will allow the user to view the return signal of the MT5100 on the computer screen. As a trouble shooting tool, a screen shot of the waveform may be taken and sent to the factory for analysis. -
Page 5: Overview
Installation of rigid probes and flange mounted transmitters may require the use of lifting equipment. Avoid sharp bending of cable probes which can result in poor instrument operation. The lids on the MT5100 housing are sealed with o-rings. To avoid damage to the electronics, both lids should be closed tightly before and after installation. -
Page 6: Description And Principle Of Operation
MT5100 Guided Wave Radar Level and Interface Transmitter 2.3 Description & Principle of Operation The MT5100 is a 4-20mA loop powered Smart Level Transmitter, which is microprocessor based and is available ® with HART communication. It uses very low power microwave energy to determine the level or interface of the products being measured. -
Page 7: Total Level And Interface Level Measurement
MT5100 is utilized with a RI100 Repeat Indicator. 2. The MT5100 provides a 4-20 mA output representing the interface level while the RI100 provides a 4-20 mA signal representing the overall level. -
Page 8: Installation
Guided Wave Radar Level and Interface Transmitter 3. Installation 3.1 Special Requirements In order to properly detect the level of interface between two liquids using the MT5100, the following rules must be adhered to: 1. One of the following probe and mounting configurations must be used: a. -
Page 9: Mechanical Installation
3.2.1 All Installations 1. Do not mount the MT5100 in the product fill stream. 2. To obtain the best return signal from the product level mount the MT5100 coupler directly into the top of the ves- sel. 3. Do not mount MT5100 single probes using bushings. (Figure 3.1) 4. -
Page 10: Single Probes In Stilling Wells
3.2.3 Single Probes in Stilling Wells An MT5100 with a single probe directly inserted in the vessel can be used to measure interface level if a metal still- ing well is also utilized. This stilling well may already exist, as part of the tank structure, or may be purchased with the MT5100. - Page 11 An ideal installation involves the use of multiple holes along the length of the stilling well. This will allow both products to flow freely over the entire length of the probe. A typical stilling well purchased from K-TEK will have 1”...
-
Page 12: Single Probes In External Chambers
This can be accomplished by keeping the dimension between the top process connection and the access flange greater than the unmeasureable zone (Section 3.2.7). If the External Chamber for the MT5100 is being supplied by K-TEK Corporation, all of the above factors will be taken into account during the manufacture. -
Page 13: Dual Rod/Cable Probes
BLK parameter. Refer to Section 4.5 to adjust this parameter. Extending the BLK may result in a loss of measurable range. 7. If the MT5100 is set up for a non-flooded condition, the upper product should not be allowed to enter the upper unmeasureable zone Refer to Section 3.2.7. -
Page 14: Unmeasurable Zones
In a flooded configuration, the unmeasureable zones will only cause errors in the interface measurement. The upper unmeasureable zone will typically be situated within a nozzle if the MT5100 is mounted directly into a process vessel. Single probe MT5100s mounted in existing displacers may be subject to having the unmeasureable zone within the measuring range. -
Page 15: Shortening Of Probes
Guided Wave Radar Level and Interface Transmitter 3.3 Shortening of Probe The MT5100 single rod and cable probe can be cut to length prior to installation. If shortening of the probe is neces- sary, cut the rod or cable to the desired length using a hacksaw. -
Page 16: Commissioning
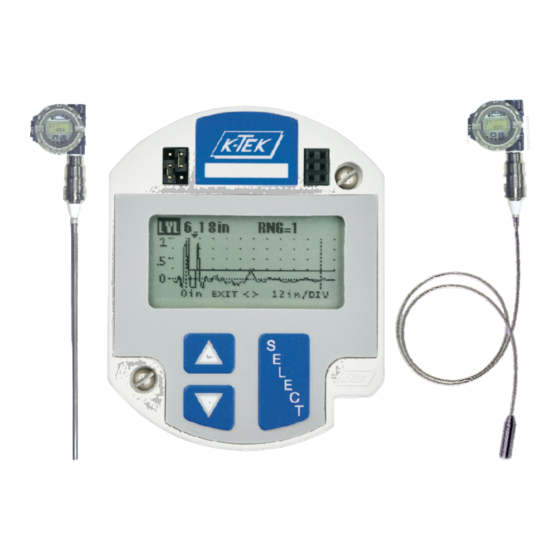
4.1 Display Operation When power is applied to an MT5100 series transmitter, the display will light up with a title screen which shows the model type and the software revision. (Figure 4.1) This initial power up cycle will last for 3 seconds and the current output of the transmitter will hold at 4.00 mA. -
Page 17: Jumper Settings
Three pushbuttons are located on the lower portion of the module faceplate (Figure 4.5). These buttons will be used to navigate through the setup and configuration menu of the MT5100. Some operations will require the pushbuttons to be used together or held for a period of time to affect a change. -
Page 18: Mt5100 Menu Flow Chart
MT5100 Guided Wave Radar Level and Interface Transmitter 4.2 MT5100 Menu Flow Chart NAVIGATION LVL XXX.X% LNI XXXX.XX gal LVL: XXXX.XX” XX.XX mA XX.XX mA UP or DOWN INT XXXX.XX KTEK MT INT XXX.XX% KTEK MT LN2 XXX.XX gal KTEK MT... -
Page 19: Basic Setup
Introduction BASIC SETUP BASIC SETUP is a menu of items that are used to adapt the internal settings of the MT5100 to a particular application. Certain fields are required entry items and will be needed for proper operation of the device. Other entry items are not used for the setup of the transmit- LVL XXX.XX in... -
Page 20: Probe Length
4. After the last digit is set, press the SELECT button to set the new PROBE LENGTH. 5. Scroll UP or DOWN to END MENU. 6. Pressing the SELECT button now will return you to the main screen. Figure 4.7 Probe Length MT5100-0200-1 Rev b (2-2013) DCN0365... -
Page 21: Offsets
Level or Interface XXX.XX in on the MT5100 with another device. The value entered in the LVL Offset will be added to or LVL XXX.XX in XX.XX mA subtracted from the LVL indication on the main display. -
Page 22: Upper Dielectric
UPPER DIELECTRIC The UPPER DIELECTRIC is the dielectric constant value of the upper fluid. This setting is an entry that will be used to calculate the level of the interface on the MT5100. If the exact XX.XX upper fluid dielectric constant is not known, the ACTUAL INTERFACE setting may be used LVL XXX.XX in... -
Page 23: Language
The MT5100 will now be fully operational. If a further detailed setup is required you may proceed to the mA OUT- PUT menu, or the Extended Setup menu. If the output of the MT5100 is required to match that of another device, the following alternate procedure may be used. -
Page 24: Ma Output Setup
Introduction mA OUTPUT SETUP mA OUTPUT SETUP is a menu of items used to control the output signal from the MT5100. In this menu you will find entries for the 4mA point, 20mA point and Damping along with other output related items. -
Page 25: Urv 20Ma
URV 20mA URV 20mA is a value in engineering UNITS which determines at which measured value the MT5100 will generate a mA OUTPUT of 20.00mA. Traditionally this is known as the span 0000.00 in point. From the factory the URV 20mA will be set to the PROBE LENGTH. -
Page 26: Alarm Delay
The MT5100 is designed as a 2 wire loop powered device. It will generate a mA OUTPUT over a range of 3.61 to 21.00 mA. When an MT5100 is calibrated at the factory, the output of the unit will be set to correspond to a calibrated multi-meter. The exact output is set using LVL XXX.XX in... -
Page 27: Hart Address
XX.XX mA to 15. As a default value, the MT5100 is set with an address of 0. This allows the MT5100 to operate normally. If an address other than 0 is set in the MT5100, the mA output of the transmitter will hold at 4.00mA and the measured level will continue to operate as normal. -
Page 28: Waveform Display
The first five menu options in the EXTENDED SETUP, will allow access to a graphic display of the return signal from the sensor of the MT5100. Each of these WAVEFORM screens has the same configuration and will allow access to the same functions. - Page 29 Division giving access to the full WAVEFORM. Shifting the Reference will not affect the operation of the MT5100. Pressing the SELECT button with < highlighted will shift the reference 5 divisions to the left. Press- ing the SELECT button with > highlighted will shift the reference 5 divisions to the right. The displayed reference may not be shifted to a value less than 0 measurement.
-
Page 30: Functions
These are not user accessible. 2. BLK = Blanking (in terms of UNITS) Blanking is a measured area which the MT5100 will be set to ignore. This will be set based on the NOZZLE LENGTH from the BASIC SETUP menu. It may be necessary to extend the Blanking further past the nozzle to ignore reflections from the top portion of the probe. -
Page 31: Temperature
LVL XXX.XX in XX.XX mA gas layer. If the MT5100 is setup for a flooded condition it must remain flooded. Likewise, if the MT5100 is setup for a non-flooded condition it must remain non-flooded. To turn the FLOODED CHAMBER on or off: 1. -
Page 32: Linearization Menu
The LINEARIZATION function of the MT5100 is a multi-purpose tool designed to enhance the operating capabilities of the MT5100 transmitter. The format of the LINEARIZATION TABLE allows a set of values to be assigned to measured level points along the PROBE LENGTH. The points in the table can be assigned exact measured values to linearize the measured level for increased accuracy at the top and bottom of the probe, assigned volume points for tank strapping, or assigned flow rates for measurement of flow in an open channel. -
Page 33: Linearization For Measurement
4.6.6.1 LINEARIZATION for MEASUREMENT Due to the nature of the microwave energy and the physics involved in the measurement of the MT5100, measure- ments return signals on the top and bottom end of the probe may be non-linear. The degree of non-linearity will de- pend upon the dielectric of the material being measured, the configuration of the probe, and the proximity of the ma- terial to the ends of the probe. -
Page 34: Linearization For Volume
4.6.6.2 LINEARIZATION for VOLUME The MT5100 is designed to measure level in a linear fashion over the length of the probe. If the transmitter is in- stalled in a straight sided tank, the volume of the tank may be calculated by knowing the amount of product per unit of measurement. -
Page 35: Linearization For Flow
1. A rigid probe must be used and it must be secured to the bottom of the flow channel. 2. A single rod probe design will require the use of a metal launch plate mounted to the MT5100 coupler. 3. The MT5100 probe and transmitter must be mounted 3 times the head height upstream from the end of the channel or from the flow change. -
Page 36: User Functions
4.7 Secondary Output - RI100 Option Introduction While the MT5100 is billed as an Interface Level Transmitter, a secondary output may be obtained by utilizing the RI100 option when the transmitter is operated in the “Non Flooded Chamber” (FLOODED CHAMBER OFF) mode selected under the EXTENDED SETUP menu. -
Page 37: Troubleshooting
These levels can have different engineering units from the units selected in Basic Setup for the direct measured primary and secondary variables. If either of the Linearized levels are selected for the MT5100’s output, the mA output will be displayed on this screen. ... -
Page 38: Symptoms And Solutions
9. If a minor error in measured level is detected, the error may be compensated for using the LVL OFFSET function in the BASIC SETUP menu. (Section 4.3.6) The MT5100 is now ready for use without further calibration. MT5100-0200-1 Rev b (2-2013) DCN0365... -
Page 39: Installation Drawings For Intrinsic Safety & Standard Wiring
MT5100 Guided Wave Radar Level and Interface Transmitter 6. Installation Drawings for Intrinsic Safety & Standard Wiring MT5100-0200-1 Rev b (2-2013) DCN0365... - Page 40 MT5100 Guided Wave Radar Level and Interface Transmitter 6. Installation Drawings for Intrinsic Safety & Standard Wiring (continued) MT5100-0200-1 Rev b (2-2013) DCN0365...
- Page 41 MT5100 Guided Wave Radar Level and Interface Transmitter 6. Installation Drawings for Intrinsic Safety & Standard Wiring (continued) MT5100-0200-1 Rev b (2-2013) DCN0365...
-
Page 42: Loop Powered Tx Hookup / Ri Dual Compartment Housing
MT5100 Guided Wave Radar Level and Interface Transmitter 7. Loop Powered TX Hookup / RI Dual Compartment Housing MT5100-0200-1 Rev b (2-2013) DCN0365... -
Page 43: Ce Certificate Of Compliance
MT5100 Guided Wave Radar Level and Interface Transmitter 8. CE Certificate of Conformity MT5100-0200-1 Rev b (2-2013) DCN0365... -
Page 44: Customer Support
MT5100 Guided Wave Radar Level and Interface Transmitter CUSTOMER SUPPORT K-TEK Corp. (USA, Canada, International) 18321 Swamp Road Prairieville, LA 70769 USA Tel: (1) 225.673.6100 Fax: (1) 225.673.2525 Email: service@ktekcorp.com Website: ktekcorp.com MT5100-0200-1 Rev b (2-2013) DCN0365... -
Page 45: Rma Form
Be sure to include the Return Authorization (RA) number on the shipping label or package to the attention: Customer Service. A copy of this document should also be included with the packing list. K-TEK wants to maintain a safe work environment for its em- ployees. -
Page 46: Warranty Statement
K-TEK will repair or replace, at K-TEK’s election, defective items which are returned to K-TEK by the original purchaser within the period specified above from the shipment date of the item and which is found, upon examination by K-TEK, to its satisfaction, to contain defects in materials or workmanship which arose only under normal use and service and which were not the result of ei- ther alterations, misuse, abuse, improper or inadequate adjustments, applications or servicing of the product. - Page 47 MT5100 Guided Wave Radar Level and Interface Transmitter MT5100-0200-1 Rev b (2-2013) DCN0365...
- Page 48 Guided Wave Radar Level and Interface Transmitter For the latest version of this manual, visit ktekcorp.com . K-TEK 18321 Swamp Road Prairieville, LA 70769 USA Tel: (1) 225.673.6100 Fax: (1) 225.673.2525 Email: service@ktekcorp.com MT5100-0200-1 Rev b (2-2013) DCN0365 Website: ktekcorp.com...
Need help?
Do you have a question about the MT5100 and is the answer not in the manual?
Questions and answers