Table of Contents
Advertisement
Quick Links
Questions or concerns about your
cooker?
Before returning to the store...
Aroma's customer service experts are happy
to help. Call us toll-free at 1-800-276-6286
Answers to many common questions and
even replacement parts can be found online.
Visit www.AromaCo.com/Support
Instruction Manual
Pasta Cooker | Rice Cooker | Slow Cooker
AMC-300SG
Advertisement
Table of Contents

Subscribe to Our Youtube Channel
Related Manuals for Aroma Professional AMC-300SG


Summary of Contents for Aroma Professional AMC-300SG
- Page 1 AMC-300SG Instruction Manual Pasta Cooker | Rice Cooker | Slow Cooker Questions or concerns about your cooker? Before returning to the store... Aroma’s customer service experts are happy to help. Call us toll-free at 1-800-276-6286 Answers to many common questions and even replacement parts can be found online.
- Page 2 Congratulations on your purchase of the Aroma Professional all-in-one Pasta, Rice and Slow Cooker. In almost no time at all, you’ll be making tantalizingly delicious ® ™ rice and pasta at the touch of a button! Whether penne, fettucini or angel-hair pasta, this cooker is specially calibrated to prepare all varieties of pasta and rice, including tough-to-cook whole grain brown rice, to fluffy perfection.
-
Page 3: Important Safeguards
IMPORTANT SAFEGUARDS Basic safety precautions should always be followed when using electrical appliances, including the following: 13. Extreme caution must be used when moving the appliance containing rice, 1. Important: Read all instructions carefully before first use. hot oil or other liquids. 2. Do not touch hot surfaces. Use the handles or knobs. 14. -
Page 4: Grounding Instructions
IMPORTANT SAFEGUARDS (CONT.) 24. This appliance is not intended for deep frying foods. 27. Intended for countertop use only. 28. WARNING: Spilled food can cause serious burns. Keep appliance and cord 25. To avoid spills and burns, do not carry rice cooker by the lid handle. away from children. -
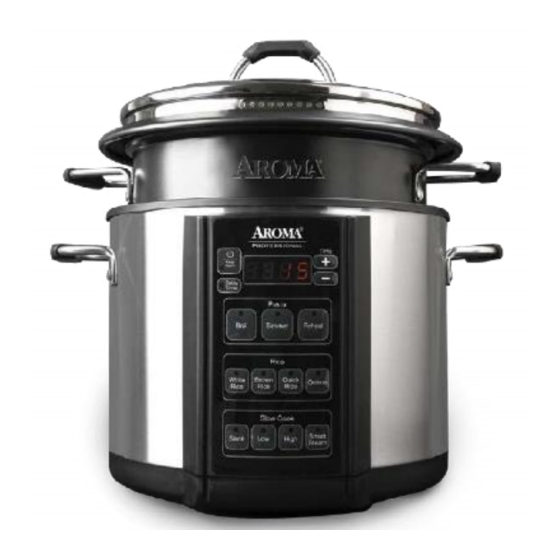
Page 5: Parts Identification
Digital Controls KEEP WARM PARTS IDENTIFICATION /KEEP WARM turns the cooker on and off and is perfect for Keep Warm keeping food warm and ready to serve. The rice/pasta cooker automatically switches over to KEEP WARM once rice is finished cooking. Delay Timer Delay Allows for rice to be ready when it’s needed. -
Page 6: Before First Use
BEFORE FIRST USE 1. Read all instructions and important safeguards. 2. Remove all packaging materials and check that all items have been received in good condition. 3. Tear up all plastic bags and dispose of properly as they can pose a risk to children. 4. - Page 7 TO COOK PASTA Fill inner pot with water to desired Plug the cooker in an available 120V Place water filled inner pot inside of Turn the cooker on by pressing the water line. AC wall outlet. cooker. Be sure that the exterior of /KEEP WARM and then press boil the inner pot is dry when inserting button to activate boil function.
- Page 8 TO COOK PASTA (CONT.) Once the water has reached a boil, When pasta has reach desired Once water has been completely Press KEEP WARM to activate add your pasta of choice to boiling softness use inner pot lid to drain drained, additional ingredients and function.
- Page 9 TO SIMMER Place water or desired sauce in Place inner pot in cooker. Plug the power cord into an available Press to turn on the cooker. inner pot. 120V AC wall outlet. • Ensure exterior of inner pot is dry when inserting as if it is wet it may damage the NOTE cooker.
- Page 10 TO COOK RICE Using the provided measuring cup, Rinse rice to remove excess starch After cleaning and rinsing rice, fill Place the inner pot into the cooker. add rice to the inner pot. and drain well. with water to the line which matches Exterior of inner pot should be the number of cups of rice being dry, as if it is not, it could possibly cooked.
- Page 11 TO COOK RICE (CONT.) Close the lid securely. Plug the power cord into an available Press to turn on the cooker. Press WHITE RICE or BROWN RICE, 120V AC wall outlet. depending upon the type of rice being cooked. • Brown rice requires a much longer cooking cycle than other rice •...
- Page 12 TO COOK RICE (CONT.) The cooker will now begin cooking. The cooker will countdown the final Once rice is finished, the cooker will For best results, stir the rice with The COOKING INDICATOR LIGHT will 12 minutes of cook time. beep and automatically switch to the serving spatula to distribute any illuminate and the digital display will KEEP WARM.
- Page 13 RICE/WATER MEASUREMENT TABLE UNCOOKED RICE RICE WATER LINE INSIDE POT APPROX. COOKED RICE YIELD COOKING TIMES WHITE RICE: 27-32 Min. 2 Cups Line 2 4 Cups BROWN RICE: 69-74 Min. QUINOA: 22-27 Min. WHITE RICE: 28-33 Min. 3 Cups Line 3 6 Cups BROWN RICE: 70-75 Min.
- Page 14 TO USE QUICK RICE The rice produced by QUICK RICE will not be to the same quality as rice made using the WHITE RICE or BROWN RICE, but it’s an excellent option for cooked rice in a pinch. To use QUICK RICE, follow the steps for “To Cook Rice” beginning on page 8. Rather than pressing one of the standard rice function buttons, press QUICK RICE.
- Page 15 TO USE THE DELAY TIMER Follow steps 1 to 7 of “To Cook Rice” beginning on page 8. Press DELAY TIMER. Each press Once the needed time is selected, The digital display will countdown Once rice begins cooking, the increases in one hour increments. It press WHITE RICE or BROWN RICE, from the time selected.
- Page 16 TO USE THE DELAY TIMER (CONT.) The cooker will countdown the final Once rice is finished, the cooker will For best results, stir the rice with When finished serving, turn the 12 minutes of cook time. beep and automatically switch to the serving spatula to distribute any cooker off by pressing /KEEP KEEP WARM. remaining moisture. WARM twice and unplug the power cord.
- Page 17 TO SAUTÉ Place the inner pot into the cooker. Plug the power cord into an available Press to turn on the cooker. Press SAUTÉ to begin sautéing. 120V AC wall outlet. Add ingredients to be sautéd/ Using a long-handled wooden Press KEEP WARM to switch the When finished sautéing, turn the browned to the inner pot.
- Page 18 TO STEAM Using the provided measuring cup, Place the inner pot into the cooker. Place food to be steamed onto the Place the stainless steel steam tray add 3 cups water to the inner pot. stainless steel steam tray. into the cooker. •...
- Page 19 TO STEAM (CONT.) Close the lid securely. Plug the cord into an available 120V Press to turn on the cooker. Press SMART STEAM. The digital AC wall outlet. display will show a flashing 5 to represent five minutes of steam time. Press + or - to adjust time. Each Once the needed time is selected, The COOKING INDICATOR LIGHT Once the water reaches a boil, the press will increase or decrease by...
- Page 20 TO STEAM (CONT.) Once the selected time has passed, Check steamed food for doneness. When finished serving, turn the the cooker will beep and switch to If finished steaming, remove food cooker off by pressing /KEEP KEEP WARM. immediately to avoid overcooking. WARM twice and unplug the power Use protective, heat-resistant glove cord.
- Page 21 TO STEAM FOOD & SIMULTANEOUSLY COOK RICE To steam while cooking rice, begin cooking rice by following steps 1 to 9 of “To Cook Rice” on page 8. Place food to be steamed onto the Using caution to avoid escaping Place stainless steel steam tray into Close the lid securely and let rice stainless steel steam tray.
- Page 22 TO STEAM FOOD & SIMULTANEOUSLY COOK RICE (CONT.) Using caution, open the lid to If food is finished steaming, remove Allow the cooker to continue Once rice is finished, the cooker will check steamed food for doneness stainless steel steam tray. Use cooking rice. beep and automatically switch to periodically. protective, heat-resistant glove to KEEP WARM.
-
Page 23: Steaming Tables
STEAMING TABLES When steaming, Aroma recommends using 3 cups of water with the provided measuring cup. ® Meat Steaming Table Vegetable Steaming Table SAFE INTERNAL MEAT STEAMING TIME VEGETABLE STEAMING TIME TEMPERATURE Asparagus 9-11 Minutes Fish 25 Min. 140°F Broccoli 6-8 Minutes Chicken 30 Min. - Page 24 TO COOK SOUPS, STEWS OR CHILIS Add ingredients to the inner pot. Place the inner pot into the cooker. Close the lid securely. Plug the cord into an available 120V AC wall outlet. • Before placing the inner pot into the cooker, ensure outer surface •...
- Page 25 TO COOK SOUPS, STEWS AND CHILIS (CONT.) Press to turn on the cooker. Select LOW or HIGH SLOW COOK. Using caution to avoid escaping to adjust cooking time steam, open the lid and stir in 30 minute increments. Once occasionally with a long-handled indicator lights stop flashing cooking will begin.
- Page 26 TO CLEAN Handwash the inner pot and all Wipe cooker body clean with a damp Thoroughly dry cooker body and all Reassemble for next use. cloth. accessories or wash them in the top accessories. rack of the dishwasher. • Do not use harsh abrasive cleaners, scouring pads or products that are not considered safe to use on nonstick coatings. •...
-
Page 27: Troubleshooting
TROUBLESHOOTING Because pasta/rice varieties may vary in their make-up, results may differ. Below are some troubleshooting tips to help you achieve the desired consistency. If your pasta/rice is dry or hard/chewy when the cooker switches to KEEP WARM mode, additional water and Pasta/Rice is too dry/hard after cooking time will soften the food. -
Page 28: Limited Warranty
LIMITED WARRANTY SERVICE & SUPPORT Aroma Housewares Company warrants this product free from defects in In the event of a warranty claim, or if service is required for this material and workmanship for 5 years from provable date of purchase in the product, please contact Aroma customer service toll-free at: ®...
Need help?
Do you have a question about the AMC-300SG and is the answer not in the manual?
Questions and answers