Table of Contents
Advertisement
Advertisement
Table of Contents

Related Manuals for DigiTech DC-1122

Summary of Contents for DigiTech DC-1122
-
Page 1: Instruction Manual
DC-1122 Compact 5W UHF CB Radio Instruction Manual... - Page 3 Introduction Use of the citizen band radio service is licensed in Australia by ACMA Radio communications (Citizen Band Radio Stations) Class Licence and in New Zealand by MED General User Radio Licence for Citizens Band Radio. Operation is subject to NOTE conditions contained in those licences.
-
Page 4: Control And Indicators
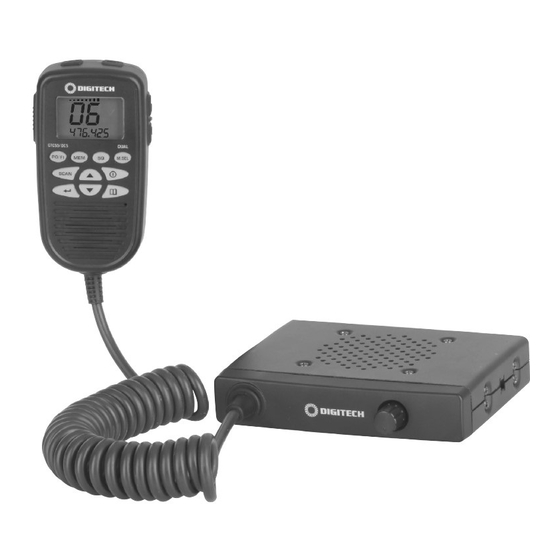
Control and Indicators Base (front & Rear view) EXT.SP. DC 13.8V DC 27.6V 1. MIC Jack 2. Volume knob 3. Main speaker 4. Power Input Connection ( 13.8VDC or 27.6VDC ) 5. EXT SP - External Speaker Jack 6. UHF Antenna Connection... - Page 5 Microphone CTCSS DCS DUAL PO FI M.SEL SCAN 6. CALL/SELCALL Button 16.LCD display 7. Push To Talk Button 17.Volume Up 8. Memory Button 18.Volume Down 9. PO/FI and CTCSS/DCS button 19.Memory channel Select and 10.Channel Up Dual Watch Button 11. Scan Button 20.Squelch Button 12.Confirm Button 21.Power Button...
-
Page 6: Lcd Display
LCD display LCD display 19 20 21 22 CALL INST SCAN DUAL CTC DCS FIRE 1.TX - transmit 12.PRI- Priority channel watch 2. RX- Receiving 13.DUAL-Dual Watch 3. REP-Repeater function 14.DCS selected 4. MEM-Memory 15.CTC- CTCSS selected 5. POL- Police bank 16.CTCSS/DCS code number 6. - Page 7 Included with Radio DC-1122 CTCSS DCS DUAL PO FI M.SEL SCAN Compact 5W UHF CB Radio Instruction Manual Standard Microphone Instruction manual Microphone Hanger, Mounting cradle, Screws & Washers Screws & Washers DC Power Cord...
-
Page 8: Installation
Installation Connecting the Microphone The microphone uses a miniature 6 pin style plug and socket. To connect the microphone: 1. Push the MIC plug at the end of the microphone cord into the MIC jack until the connection locks into place. Gently tug the MIC cord to test that the connection is locked. - Page 9 Mounting the MIC Hanger The Microphone Hanger comes in two parts. How and where you mount the MIC hanger will determine which parts to use. Conventional Mounting with Screws Use the front part of the MIC hanger only. Locate a suitable mounting position, mark and drill two 3mm holes.
-
Page 10: Operation
Operation Turning on/off the Power Press and hold the Power to turn on or off. CTCSS DCS DUAL PO FI M.SEL SCAN Low-Vo tage/High-Voltage Alert This unit can operate on 12V DC (13.8V) or 24V DC (27.6V) power supply , with the range between 10.2V DC to 28.8V DC. If the power supply voltage exceeds 28.8V DC, an alert tone sounds and HI DC flashes for 5 seconds. -
Page 11: About Channels
About channels The unit has 80 channels, but not all of these are available; several are prohibited for voice transmission and other are restricted, as explained below. The selected channel is displayed on the LCD. Channels 5 and 35 are for emergency calling. Do not use these channels in Ÿ... -
Page 12: Selecting A Channel
Selecting a channel Before selecting a channel for transmitting, always listen on it and ensure it is not already being used. Always avoid selecting a busy channel when the unit keeps on receiving signal from unknown party. The RX icon will be displayed. The factory default start up channel is channel 1 and sub-channel 00. -
Page 13: Receiving A Signal
Receiving a signal The unit is continuously in RECEIVE mode when it is on and not transmitting. When you receive a signal on the current channel, the RX icon will appear. Transmitting The unit transmits only on UHF-CB CALL INST channels. - Page 14 CTCSS (Continuous Tone Coded Squelch System) The unit has 38 CTCSS private codes available. Different CTCSS tones may be associated to different channels. To choose the desired CTCSS code: Press and hold CTCSS/DCS button until the Ÿ CTCSS code number blinks; Press 5 or 6 button to select the desired CTCSS...
-
Page 15: Squelch Level Setting
Squelch level setting Press the SQ button to set the squelch level. Ÿ Press the 5 or 6 button to select the desired Ÿ squelch level from the following options: 0, 1,2,3,4,5. Press and hold the 5 or 6 button to move faster Ÿ... -
Page 16: Repeater Function
Repeater function The repeater facility is a third party facility that is only available in some local area. When the repeater function is on, the REP icon will be appeared. Only use this function for extending your communication range when you know the channel of the repeater facility in your area. -
Page 17: Add/Remove Channels From Scan Memory
Scanning Channel scan performs searches for active signals in and endless loop of channels. Scan only checks channels or frequencies that are in the SCAN Memory, which are indicated by the MEM icon. The unit has tow Scan Memory modes: Open Scan (OS) mode and Group Scan (GS) mode, to give you flexibility and allow you to use the radio more effectively. - Page 18 Group Scan (GS) Mode GS Mode has no channels in the SCAN Memory by default. Channels must be added to the GS SCAN Memory before group scan can start. To add/remove channels from GS SCAN Memory. Includes the accessory feature priority Watch which allows you to monitor the Instant Priority Channel while scanning.
- Page 19 Key Beep Press MENU seven times, the key beep setting flashes. Ÿ Press 5 to change the setting between ON and OFF. Ÿ Backlight Colour Press MENU eight times, the backlight colour setting flashes. Ÿ Press 5 to select colour (3 colours: orange /red /green). Ÿ...
-
Page 20: Channel Table
Channel Table Frequency Frequency Frequency Channel Channel Channel (MHZ) (MHZ) (MHZ) Number Number Number 476.4250 477.1000 476.7875 476.4500 477.1250 476.8125 476.4750 477.1500 476.8375 476.5000 477.1750 476.8625 476.5250 477.2000 476.8875 476.5500 477.2250 476.9125 476.5750 477.2500 – 476.6000 477.2750 62 + – 476.6250 477.3000 –... - Page 21 * Channel 5 and 35 are for emergency calling. Please do not use these sub-channels in non-emergency cases. + Speech telephony is inhibited on Channel 22 and 23. * Channel 1-8 and 31-38, 41-48 and 71-78 are used as repeater channels with 750kHz offset.
-
Page 22: Dcs Codes Table
DCS Codes Table Channel Octal Channel Octal Channel Octal Number Code Number Code Number Code -20-...
Need help?
Do you have a question about the DC-1122 and is the answer not in the manual?
Questions and answers
Hi Guys. I have a DIGITECH 1120 & it is not very old. It will not receive or transmit calls. The Aerial connection seems fine.
Possible issues with the DigiTech DC-1122 not receiving or transmitting calls include:
1. Wrong Channel Selection – Ensure the unit is set to the correct channel, as only UHF-CB CALL INST channels can transmit.
2. Signal Reception – The unit must be in RECEIVE mode, and the RX icon should appear when a signal is received.
3. Transmission Issues – When transmitting, the PTT button must be held, and the TX icon should appear. Ensure the microphone is positioned correctly (5-7 cm from the mouth).
4. Frequency Band Limitation – The unit operates within the 400-520MHz band in 12.5kHz steps; ensure compatible frequencies are used.
5. Encrypted Signals – The unit only supports unencrypted analogue police, fire, and ambulance channels. Encrypted signals cannot be received.
6. Emergency Channels Restriction – In Australia, channels 05 and 35 are reserved for emergency calls and may have restrictions.
7. Scan Mode Activation – If SCAN mode is on, the unit may be scanning and not locked onto a channel. Deactivate SCAN if necessary.
8. Priority Watch Interference – If Priority Watch is enabled, the unit may switch to the Instant Priority Channel instead of staying on the expected channel.
Checking these settings and conditions should help resolve the issue.
This answer is automatically generated