
Subscribe to Our Youtube Channel
Related Manuals for Engineering Solutions OMNIGUARD 4

Summary of Contents for Engineering Solutions OMNIGUARD 4
- Page 1 ® Advanced Test Equipment Rentals www.atecorp.com 800-404-ATEC (2832) OMNIGUARD 4 DIFFERENTIAL PRESSURE RECORDER Owner's Manual...
- Page 2 Advanced Test Equipm www.atecorp.com 800-4 OMNIGUARD 4 Differential Pressure Recorder Serial #: The serial number is located inside the case lid. Dealer Name and Address: Name Address City, State, Zip Phone Date of Purchase: Registered to: Name Address City, State, Zip...
-
Page 3: Table Of Contents
Section 2: Navigating The LCD Display ........5 Section 3: Quick Setup & Usage ..........6 Sample Session: Viewing/Changing Settings ....6 Hanging the Omniguard 4 ............. 7 Display Modes ..............7 Loading the Thermal Printer Paper ........8 Section 4: Detailed Operation ............9 Work Area Setup .............. -
Page 4: Introduction
Please remember to fill out and return the Registration Card. Owner’s Manual Overview This manual covers the setup and operation of the Omniguard 4 . It uses several different fonts and other special characters to make various unit functions and types of reporting easy to identify. Below is an example of each: •... - Page 5 Advanced Test Equipm • Multiple display modes, allows easy viewing of pressure reading from a distance, modes toggled by DISPLAY key www.atecorp.com 800-4 • 30+ days internal memory stores pressure readings and alarm occurrences with a date/time-stamp, complete record of operation available for printing and transfer to computer •...
-
Page 6: Section 1: Basic Care
• Protect the unit from strong shocks or vibrations. Be sure the lid is securely closed whenever transporting the unit. • Be sure to plug your Omniguard 4 into a power supply that complies with the National Electrical Code. Keep all connections dry. -
Page 7: Section 2: Navigating The Lcd Display
Advanced Test Equipm Section 2: Navigating The LCD Display www.atecorp.com 800-4 The Omniguard 4 display features four screen types, shown below. Press the indicated key to move from screen to screen. Monitor Screen "WC -0.058 Pressure in “WC Alarm 1 & 2... -
Page 8: Section 3: Quick Setup & Usage
1. Insert one end of pressure tubing inside the containment area. Connect the other end of tubing to INLET #1. 2. Locate a convenient place for Omniguard 4 outside the containment. Plug power cord into a power outlet. 3. Turn the unit on. If the message Set Time &... -
Page 9: Hanging The Omniguard 4
Hanging the Omniguard 4 The Omniguard 4 can be hung on a wall for easy viewing and to keep it off of the floor, away from possible damage. Hanging the Omniguard 4 by the clip allows the cover to close, protecting the unit from water damage while allowing the LCD display and STATUS LED to be viewed through the window on the cover. -
Page 10: Loading The Thermal Printer Paper
Advanced Test Equipm Loading the Thermal Printer Paper www.atecorp.com 800-4 Caution: Only use Omniguard thermal printer paper! Thermal paper prints on only one side, the side away from the paper roll. If the roll is installed incorrectly the printer will be able to advance the paper but be unable to print on it. -
Page 11: Section 4: Detailed Operation
Power-Up To begin operating the Omniguard 4 , plug the power cord into a standard wall outlet supplying 115VAC, 60Hz and press the POWER ON/OFF key. The first time a new unit is turned on the settings will be at default values. -
Page 12: Contractor Name
0.005”WC of the Alarm setpoints. Contractor Name The Omniguard 4 can store the name of the Contractor that is using the unit. The Contractor name will appear in all Job logs and printed Reports. Only one name can be stored. -
Page 13: Alarm Setpoint Selection
Alarm 2 setpoints. These setpoints can be set anywhere within the operating range of the unit; +/- 0.250” WC in increments of 0.005”WC. The Omniguard 4 can also operate in units of mmWC or Pascals. (See Pressure Units .) Alarm 1: (default is -0.025”WC) •... -
Page 14: Starting/Ending A Job
Advanced Test Equipm 4. Use to set Alarm 1 to -0.020”WC. The value will change in 0.005” increments. The bar graph at the right of the screen www.atecorp.com 800-4 indicates the relative operating window size within the operating pressure range of the unit. 5. -
Page 15: Alarm Condition
Advanced Test Equipm The memory has a capacity to store 128,000 characters of printed data. This represents 30+ days of normal operation and approximately www.atecorp.com 800-4 200 alarm messages. When the memory is full, the new data will begin to overwrite the oldest data. Note: Overwritten data cannot be retrieved. -
Page 16: Turning Printer On/Off
Printer Symbols Viewing/Printing Jobs & the Print Job Key The Omniguard 4 provides a printout of all recorded data, alarm messages and changes in operational settings. The current Job or any previous Job (or portions of those jobs) and the Omniguard ’ s Configuration Report can be printed at anytime. -
Page 17: Configuration Report
1 6 m i n s 2 8 s e c s Configuration Report The Omniguard 4 provides a report of all of the unit’s current settings (Alarm Setpoints, Log Rates, etc.) and the current system information (memory status, unit serial number, etc.). This report can be viewed and printed at any time. -
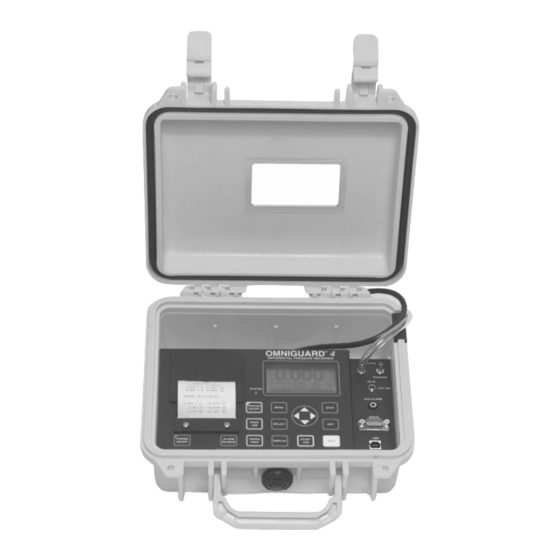
Page 18: Description Of Controls
DISPLAY SILENCE FEED ON/OFF ENGINEERING SOLUTIONS INC SEATTLE, WA USA Printer Keys PRINTER ON/OFF - turns the printer on and off. Printer status is indicated by the printer symbol at the Monitor Screen. PRINT JOB - press to print a current Job Report. Actual report type is assigned to key in the Print Job Key Setup menu item. - Page 19 Advanced Test Equipm #1 - inlet connector for pressure tubing from www.atecorp.com 800-4 containment. Ports #2 - inlet connector for sensing ambient pressure from outside containment. DC IN - connects to optional external battery. AUX ALARM - SPDT relay output supports optional remote alarm or telephone autodialer.
-
Page 20: Print/Log Rates
Advanced Test Equipm Print/Log Rates www.atecorp.com 800-4 The printing and logging of pressure readings begins once the unit reaches normal operation (status bar indicates NORMAL). There are two user-definable rates at which printing/logging occurs. Normal Rate: (default is 15 min.) •... -
Page 21: Display Contrast & Backlight
Pressing the EXIT key will return you to the Main Menu without saving the updated settings. Pressure Units The pressure units used by the Omniguard 4 to display and record pressure readings are selectable. Pressure Units: (default is Inches WC) •... -
Page 22: Passcode Protect
Advanced Test Equipm 4. Press SAVE to save the updated settings and return to the Main Menu. www.atecorp.com 800-4 Pressing the EXIT key will return you to the Main Menu without saving the updated settings. Passcode Protect The passcode protect feature allows the site manager to assign a passcode that prevents unauthorized changes to the unit’s settings. -
Page 23: Zero Calibration
Zero Calibration The Omniguard 4 does not require calibration between jobs. Internal temperature compensation and other circuity provides unsurpassed accuracy over a 30°- 130° Fahrenheit range. -
Page 24: Using Help
3. Press SELECT to view the information available for that topic. Communication The Omniguard 4 has built-in USB and Serial ports to connect to a PC or to an optional External Modem. The Windows® compatible Omniguard 4 Communication software must be installed in the PC and is available as a free download @ www.engsolinc.com. -
Page 25: Remote Monitoring & Modem Setup
Remote Monitoring & Modem Setup Office personel using their modem equipped PC can call the phone number of the site and connect to the Omniguard 4 through its optional External Modem.The modem plugs into the SERIAL port and requires a standard RJ11 phone plug and a working telephone line. -
Page 26: Communication Remote Monitoring Screen
Omniguard 4 Communication Remote Monitoring Screen www.atecorp.com 800-4 Each section of the window can be opened or closed independently. Remote monitoring occurs in real-time and does not affect the normal operation of the Omniguard 4 . Remote Monitoring Job Log Status &... -
Page 27: Appendix A: Troubleshooting
Appendix A: Troubleshooting www.atecorp.com 800-4 If you experience problems with your Omniguard 4, use this section to try to solve the problem. If you are unable to solve the problem, consult with your dealer or call Engineering Solutions at (206) 241- 9395 (8:00 a.m.-12:00 noon, 12:30-4:30 p.m. -
Page 28: Shipping & Repair
The unit should not be able to be shift after packing. Engineering Solutions will not be responsible for any damage which may occur. -
Page 29: Appendix B: Specifications
Advanced Test Equipm Appendix B: Specifications www.atecorp.com 800-4 Differential Pressure Range: +/-0.250” WC (+/-6.35mmWC, +/-62.5 Pascals) Accuracy: +/- .003” WC or +/-1% of reading whichever is greater Resolution: 0.001” WC, (+/-0.05mm WC, +/-0.5 Pascals) Burst Pressure: 3 psi (20 kPa) on either inlet port Pressure Units Displayed: “WC (Inches Water Column), mmWC (millimeters Water Column), or Pa (Pascals) Data Storage: 128,000 characters, 30+ days of readings (over 4,000... -
Page 30: Containment Site
Engineering Solutions Inc specifically advises all users to obtain the advice of qualified professionals for each use and application of the Omniguard 4 . Engineering Solutions Inc makes no claims as to the proper usage or interpretation of the data provided by the Omniguard 4 . - Page 31 Advanced Test Equipm 4. Calculating site airflow requirements: A typical heavy duty HEPA fan/filter unit has a 1000 CFM (cubic www.atecorp.com 800-4 feet per minute) capacity with a new filter. Units are typically derated by 25%, so a 1000 CFM unit is derated to 750 CFM by the hyiegenist when calculating actual site airflow requirements.
-
Page 32: Appendix D: Limited Warranty
SOUTHCENTER BLVD, SUITE 70, TUKWILA, WA 98188. To keep this warranty valid, the purchaser must (a) return signed Registration card to Engineering Solutions within fifteen (15) days of purchase, (b) have promptly informed Engineering Solutions’ customer service department of any defects in writing, (c) properly used, maintained and repaired the Product, and (d) have proof of purchase. - Page 33 Advanced Test Equipm www.atecorp.com 800-4 © 1995-2004 Engineering Solutions Inc. Omniguard™ is a trademark of Engineering Solutions Inc. Product specifications subject to change without notice. First Printing 1/04. Printed in the U.S.A. $10.00 P/N OG4-MAN.100...
- Page 34 Omniguard 4 Quick Reference Advanced Test Equipm Starting A New Job 1. PRINT JOB for printout of current job. www.atecorp.com 800-4 2. START JOB to name new job & end previous job. 3. Check Date & Time, set if needed.
Need help?
Do you have a question about the OMNIGUARD 4 and is the answer not in the manual?
Questions and answers