Table of Contents
Advertisement
Quick Links
TX-NR646
AV RECEIVER
Basic Manual
This manual includes information needed when
starting up and also instructions for frequently
used operations. The Advanced Manual is
published on the web for ecological reasons and
has more detailed information and advanced
settings.
Advanced Manual
found here
En
http://www.onkyo.com/manual/txnr646/adv/en.html
Advertisement
Table of Contents

Related Manuals for Onkyo TX-NR646


Summary of Contents for Onkyo TX-NR646
- Page 1 TX-NR646 AV RECEIVER Basic Manual This manual includes information needed when starting up and also instructions for frequently used operations. The Advanced Manual is published on the web for ecological reasons and has more detailed information and advanced settings. Advanced Manual found here http://www.onkyo.com/manual/txnr646/adv/en.html...
-
Page 2: Table Of Contents
6 Multi-zone ...............18 ● Advanced speaker connections calculation performance ・ Making Multi-zone Connection ........18 ● Connecting and Operating Onkyo RI Components ● Music Optimizer™ for compressed digital music files ・ Performing Multi-zone Playback .........19 ● Firmware Update ● Phase Matching Bass System 7 Quick Setup Menu ............19... -
Page 3: Front Panel
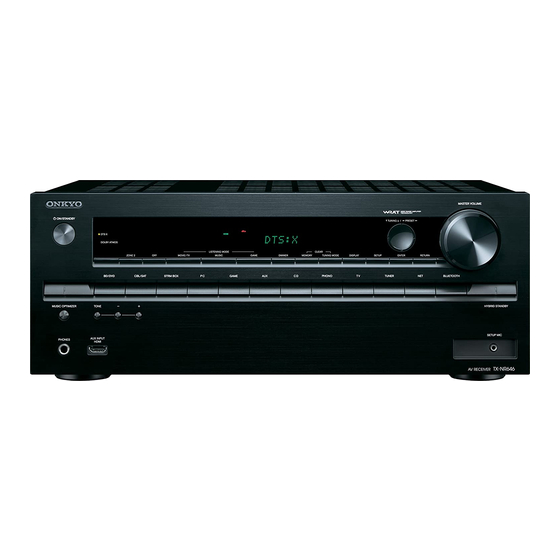
(European, Australian (European, Australian and Asian models) and Asian models) Front Panel zON/STANDBY button: Turns the unit on or into TUNING MODE button: Switches the tuning mode. circuits are turned off to switch the unit to Pure Audio standby mode. DISPLAY button: Switches the information on the mode and provide purer sound. -
Page 4: Rear Panel
Rear Panel the listening mode. Stays lit when Music Optimizer is enabled. RI REMOTE CONTROL jack: An Onkyo product with RI SPEAKERS terminals: Speakers are connected. To Lights in the following conditions. "AUTO": Tuning mode jack can be connected and synchronized with this unit. -
Page 5: Step 1: Connections
Step 1: Connections Characteristics of speaker types Dolby Surround listening mode. Install Top Front speakers so that they are positioned "# output front stereo sound and $ Connecting speakers at a point between directly above the output center sound such as dialogs and listening position and directly above the vocals. - Page 6 Step 1: Connections and the other type is designed to be integrated with normal speakers. Dolby Enabled Speakers placed with their " Right back Left back diaphragms facing toward the ceiling create higher effect Front R Front L Or right height Or left height in the Dolby Atmos and Dolby Surround listening modes A speaker configuration...
-
Page 7: Instructions On How To Connect Speakers
Step 1: Connections Instructions on how to connect speakers When using commercially available banana plugs: tighten the speaker terminals to the end and then insert the banana plugs. Do not insert the core of speaker cable directly into the hole for banana plug of speaker terminal. (North American models) Cut and remove the plastic coating from the end of the speaker cable, twist the core and connect it to the terminal. -
Page 8: Connecting The Tv And Players
Step 1: Connections Connecting the TV and players HDMI HDMI To use the ARC function, connect to the ARC compatible HDMI jack of the TV and make an appropriate setting on the unit. See "2 Source Game console Connection" of "Step 2: Initial Setup". HDMI HDMI HDMI cable... -
Page 9: Connecting Components Without Hdmi
Step 1: Connections modify the settings to enable the input selection link with A player with a digital audio out jack can be connected. Video upconversion function CEC (Consumer Electronics Control) compliant device, Digital optical cable (OPTICAL) connection with ARC compatible TV, and HDMI Standby Video signals input to the composite video input ... -
Page 10: Other Connections
Step 1: Connections Network connection You can enjoy Internet radio, DLNA and AirPlay by Other connections connecting the unit to LAN. The unit can be connected to the router with an Ethernet cable or to the wireless LAN router with Wi-Fi connection. In case of wired connection, AM/FM antenna connections connect the Ethernet cable to the Ethernet port.
Need help?
Do you have a question about the TX-NR646 and is the answer not in the manual?
Questions and answers
how do i set my receiver to 5.2