Advertisement
Quick Links
Owner's Manual & Assembly Instructions
BASE KIT
Model No. FDN106
CAUTION: SOME PARTS HAVE SHARP EDGES. CARE
MUST BE TAKEN WHEN HANDLING THE VARIOUS PIECES
TO AVOID A MISHAP. FOR SAFETY SAKE, PLEASE READ
SAFETY INFORMATION PROVIDED IN THIS MANUAL
BEFORE BEGINNING CONSTRUCTION. WEAR GLOVES
WHEN HANDLING METAL PARTS.
NOTE: THIS KIT IS NOT SELF
SUPPORTING. SEE IMPORTANT
INSTRUCTIONS ON BACK COVER
Advertisement

Summary of Contents for Arrow FDN106
- Page 1 Owner's Manual & Assembly Instructions BASE KIT Model No. FDN106 CAUTION: SOME PARTS HAVE SHARP EDGES. CARE NOTE: THIS KIT IS NOT SELF MUST BE TAKEN WHEN HANDLING THE VARIOUS PIECES TO AVOID A MISHAP. FOR SAFETY SAKE, PLEASE READ SUPPORTING.
-
Page 2: Parts List
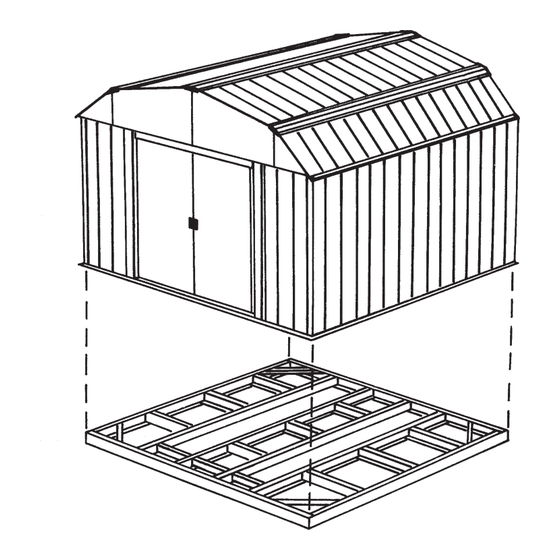
BEFORE YOU BEGIN..1. Before beginning construction, check local building codes regarding footings, location and other requirements. Study and understand this owner's manual. 2. Follow all directions and dimensions carefully. 3. Follow the step sequence carefully for successful results. 4. Be sure all the parts fit together properly before proceeding. 5. - Page 3 How The Base Kit Works Assemble Floor Frame. Assemble Base Kit. Attach Floor Frame assembly to Base Kit. Attach decking material inside Floor Frame assembly. DECKING MATERIAL (Not Supplied) FLOOR FRAME of Storage Building BASE KIT...
- Page 4 8 x 6 Attach cross channels 9215 following Snap front & rear channels 9216 together as shown. Slide channels to match correct overall dimensions shown, using screws. Fasten cross dimension shown. Bolt together where holes line channels 9214 to middle section in the same man- up.
- Page 5 4 x 10 Snap front & rear channels 9216 together as Attach cross channels 9215 following shown. Slide channels to match correct overall dimensions. dimension shown. Bolt together where holes line up. Make two complete assemblies. Carefully turn unit over and fasten opposite side connections with screws.
- Page 6 10 x 6 Attach cross channels 9215 following Snap front & rear channels 9216 together as shown. Slide channels to match correct overall dimensions shown, using screws. Fasten cross dimension shown. Bolt together where holes line channels 9715 to next section, bend tabs on ends of up.
- Page 7 Attach Floor Frame Assembly Do not fasten decking material at this time! NOTE: FLOOR FRAME MUST BE LEVEL AND SQUARE BEFORE PROCEEDING! If you are using decking material, complete the If you are using the base kit as a finished form to pour floor frame assembly for the storage building as concrete, see next page.
- Page 8 LAY EXTERIOR PLYWOOD OR ANY SUITABLE DECK MATERIAL (5/8" 15,5 MM MINIMUM THICK- NESS) NOTE: Pressure Treated Lumber must not be used where it will make contact with your Arrow Products. The properties of Pressure Treated Lumber will cause accelerated corrosion. If Pressure Treated Lumber comes in contact with your Arrow Models your warranty will be voided.


Need help?
Do you have a question about the FDN106 and is the answer not in the manual?
Questions and answers